Sails
by Walter K. Moss
In the selection of your yacht plan you made a careful study of the lines of the hull because you wanted the best design for the prevailing conditions where you proposed to do most of your sailing. Then you followed the details carefully to assure yourself that the finished product would exactly reproduce the blue prints. You completed light spars and efficient fittings. You enameled and polished all surfaces to a gleaming luster. However, necessary as all this may be, everything you have done so far is actually a hindrance to the sailing of your yacht.
After all, the wind creating a pressure on the windward side and a vacuum on the lee side of your sails provides the only propulsion for your boat. If you accept this fact, you will appreciate the importance of giving your very best attention to the sail surfaces. The sailing qualities, speed, and control of your model are dependent on good sails. Aerofoils in wind tunnels have taught the sail maker how to improve his design and balances, thereby increasing the power; and the result is that more “pull” has been gained from equal sail expanses than was the case in earlier days. Today’s builders mught just as well advantage by these studies and experience. Nevertheless, it would be rare indeed to experience the satisfaction of having every element of hull, sail area, wave, wind velocity, etc., combined so perfectly that your boat would approach 90 percent efficiency. It just isn’t in the cards regardless of what you do, and that is what makes this sport of model yacht racing so fascinating.
While this discussion will be confined to sails for the Marblehead class model racing yacht, the instructions given would apply equally well to sails for the International A, X, 10 Rater, Inland, or any other class, except as to general measurements.
The restrictions and regulations in sail making as pertaining to any particular class must be observed, and it might by well to review those applying to the Marblehead class as they exist at the time of this writing (briefly):
- Actual sail area not to exceed 800 in2.
- Roach not to exceed 2 in.
- Four battens allowed in main sail, dividing the leach equally, and not to exceed 4″ in length.
- Three battens allowed in jib, dividing the leach equally, and not to exceed 2″ in length.
- Base of headboard shall not exceed 3/4 in and not be stiffened to sail with wire, or otherwise.
- Jib forestay, at point of mast attachment, must not exceed 80 per cent of sail plan height from deck.
- Spinnakers allowed without computed areas so long as sheeting rules are observed.
The first step, in considering the matter of sails, is the selection of the material. A good suit of sails is light in weight, of fine texture and fairly smooth, not easily stretched and non-shrinking and, if possible, water resistant. Among those materials which have proved most satisfactory are union silk, balloon silk, “Egyptian cotton,” longcloth, waterproof window shade cloth, and a patented English material called X-L which resembles a heavy grade of blueprint linen. Occasionally one, or more, of these can be obtained at the ordinary department store, but the writer has found it most convenient to obtain the lightest weight grade of good spinnaker cloth handled at a regular ship’s chandlers and finds this meets most of the qualifications. The window shade material is a smooth surfaced, hard textured material that lends itself admirably to layout and cutting, but is a bit more difficult than the others to sew. It can probably be purchased through your local shade shop, or possibly through a book binder. [We have not been able to find out what this material was. – Ed.]
Some experimenting has been done with such materials as cellophane, pliofilm, and synthetic materials such as is used in shower bath curtains, but the stitches in these have been known to start tears, sun and water have induced rotting, stretching has been excessive, and other difficulties experienced. Two yards of any material is sufficient for a suit of Marblehead sails, and a first and second suit can be cut from three yards, the second suit being storm sails for heavy weather.
The materials list is made up as follows:
- Two yards of 30″, or wider, material (approximately 90 cents per yard).
- Ten dress hooks for attaching mainsail to jackline.
- One celluloid headboard for mainsail.
- Four celluloid battens 3/32″ x 3/16″ x 4″ for mainsail.
- Three celluloid battens 3/32″ x 3/16″ x 2″ for jib.
- Small box of 1/8″ metal eyelets for sail corners.
- One spool of cotton basting thread.
- Two spools of silk thread for machine work.
- Four yards of pre-shrunk 5/8″ linen binding tape.
- Two feet of pre-shrunk 1/2″ linen tape for batten pockets.
- Two feet of pre-shrunk 1/4″ linen tape for jib reinforcing.
- Shoemakers’ thread is excellent for joining headboard to mainsail.
[Any tough plastic will do for the celluloid. Dress hooks were originally brass; we have not been able to find any lately except plated steel, which will eventually rust, so you may have to make your own out of hard brass wire. – Ed.]
It is advisable to set your craft up on the stand with the mast squared and raked to about 3 1/2″. Install the spars, suing string attached to the mast to hold them in their proper positions — the after end of the jib club aligning with the gooseneck and the after end of the boom 5 1/2″ above the deck. (This provides clearance from the water when the boat is heeled and enables the running sheets to continue functioning.) Now measure the straight distances between the head, tack, and clew corners of each triangle to those points where you wish the eyelets to be located in the finished sail. It is best to draw a rough diagram on which to note these measurements. Recheck your measurements for accuracy.
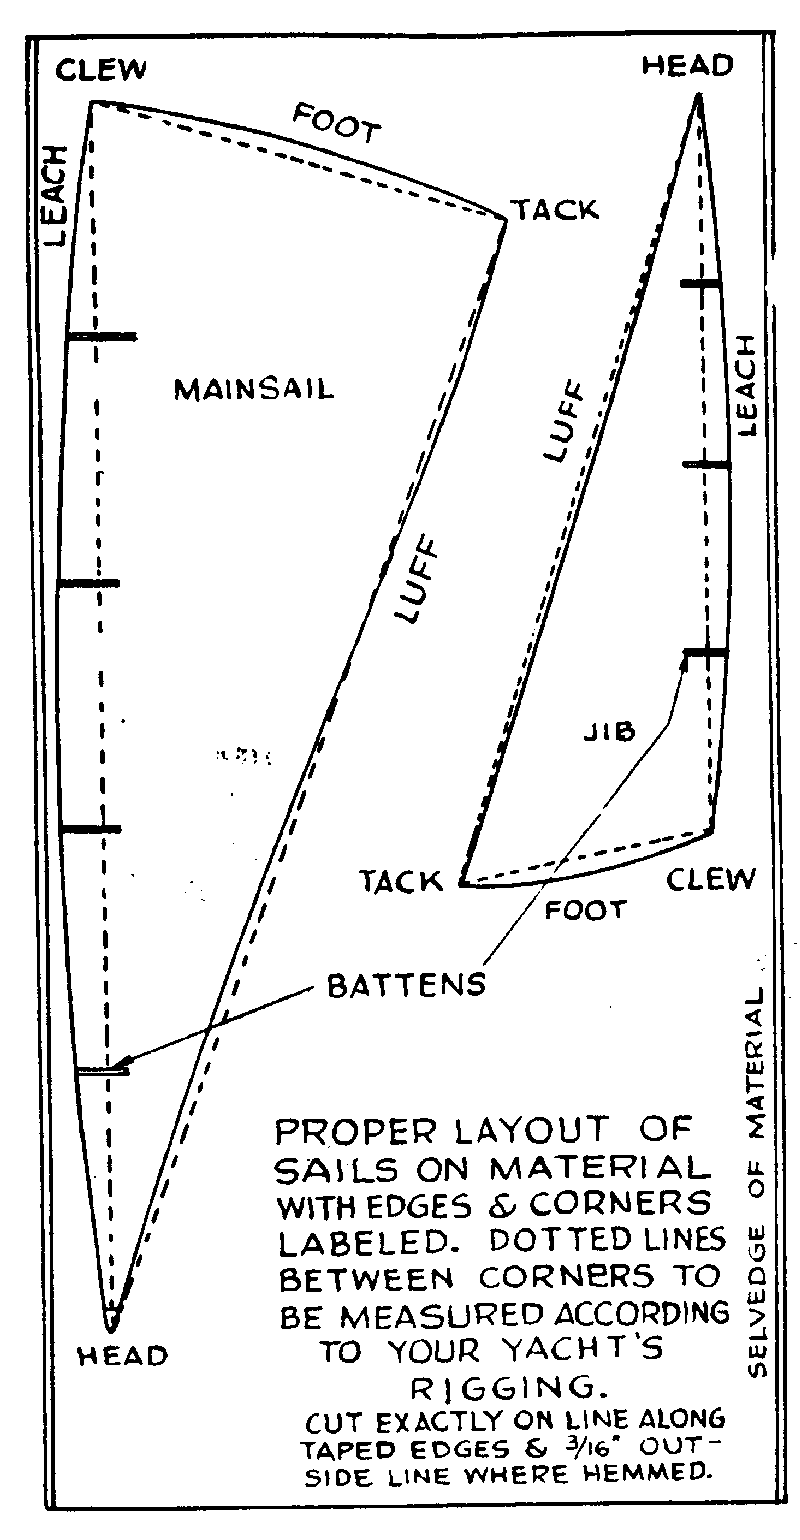
Your sail material should now be laid flat on a smooth surface such as a large drawing board or a plywood panel, or the kitchen linoleum is excellent if your wife doesn’t object. Fix it in place with thumb tacks and be very careful to avoid stretching or wrinkling. The selvedge is that edge which is closely woven by the manufacturer to prevent raveling, and because of wind strain on the sail surfaces care should be taken that all sails are laid out in accordance with the illustrations.
From exhaustive experiments conducted by expert investigators a number of interesting items have come to light which deserve consideration by the model sail maker, especially in fitting a suit of sails to his particular hull design. There is only one center of effort which will approximate perfection on your own boat and the author cannot tell you where that may be — whether high or low, forward or aft — but some factors can be followed in a general way. One of these discloses that the proportion of area in the jib to that in the mainsail should be 1 to 2.85, as this combination is most likely to prove satisfactory on a conventional design. It should also be borne in mind that a relationship exists between the length of the keel appendage and the length of the foot of the mainsail. If both are too long your craft will be sluggish; if too short, it will be erratic and hard to control. Another relationship to the whole enters here, and that is the length of the foot as compared to the height of the hoist. While no combination is perfect for every set of conditions, the following proportions would probably prove a happy choice: mainsail foot to host, 1 to 2.3; jib foot to hoist, 1 to 3.1.
Because of factors mentioned, it would seem best to aim at the relationships outlined, as much deviation from these figures will carry one to extremes — that is, unless you propose to explore uncharted territories.
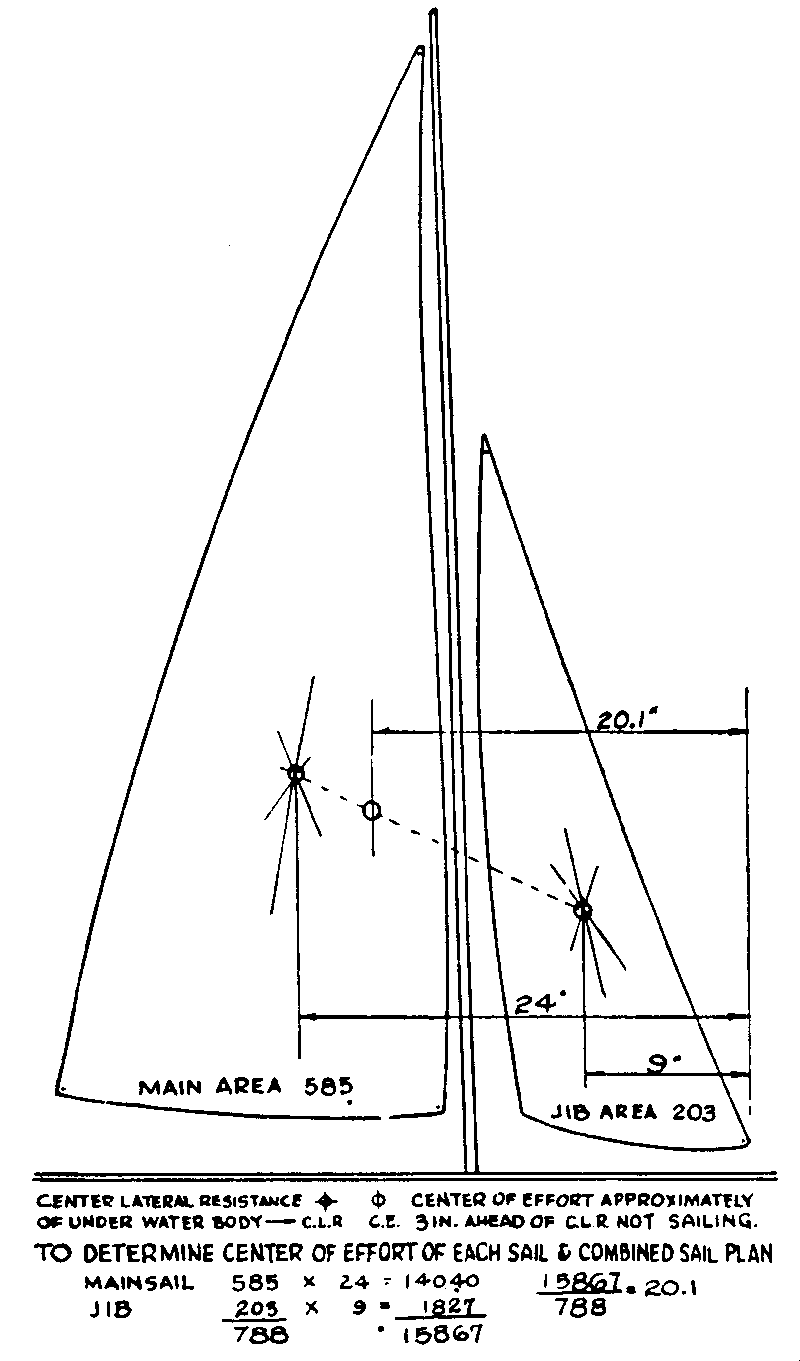
The illustration above makes it plain how the center of effort of each sail, and the entire sail plan, can be found. The only reason for determining this is so that the sails may be properly located with relation to the center of lateral resistance of the hull. The c.l.r. is that point around which the hull turns, and can easily be found by immersing the model and pressing it sideways across the water with a pencil point placed near the water. If the pressure point is too far forward the stern will lag, if too far aft the stem will lag; when the pressure point is centered at the c.l.r. both ends will move equally. Mark this spot on your sheer line, as the mast step should be mounted about 4″ ahead of this point on a Marblehead model. The calculated center of effort and the located center of lateral resistance are now established only for a boat not in motion; when sailing, both of these points automatically move forward varying amounts due to the design of the sails and hull profile, and adjustments in balance for these factors can only be accomplished by shifting the mast on the step or the jib on the rack. This operation is called “tuning the boat” and is a very necessary adjustment, to be made only under sailing conditions.
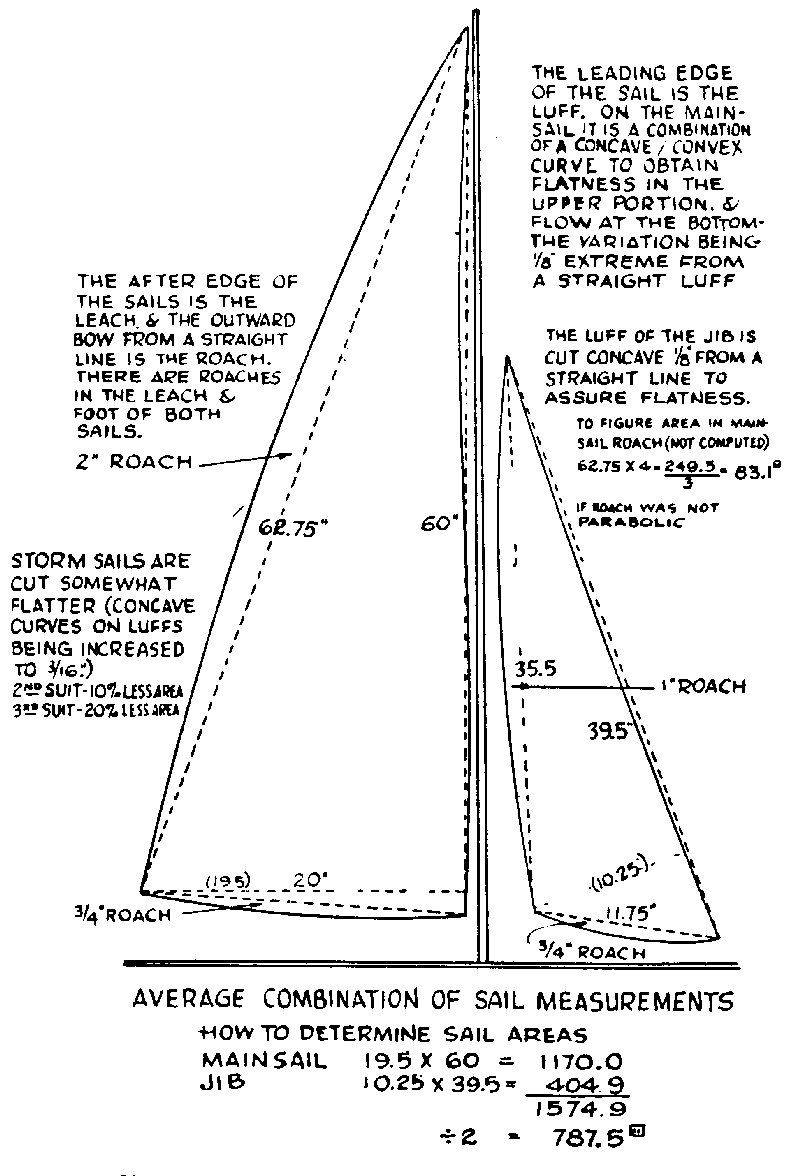
The effectiveness of a suit of sails depends on their fit and flow. A moderate flow is best for prevailing light winds, and a flat flow where the breezes are stronger. With loose footed sails such as those being described, the flow is determined by the manner in which the luff edges of the sails are cut. A sailmaker’s reputation depends on his ability to add, or take away, material in the proper places to produce the right flow within the given measurements. Cutting roaches onto the leach and foot of the sails does not affect their flow, but does add a limited amount of unmeasured area and prevents sagging and an untidy appearance after the sails have taken their normal stretch. A change in the flow will be effected, however, depending on how tightly, or loosely, the foot of the sails is sheeted. With modern high sail plans it is advisable to keep the flow moderate, and such are the measurements given in the illustrations in this article.
Laying out the sails is the first step, so about 3″ from the selvedge, and parallel to it, mark a fine, straight pencil line the length of your leach measurement — the mainsail on the left hand side and the jib on the right. With the straight edge in place, divide these lengths into four or five equal sections (depending on whether three or four battens are to be used) and draw a fine line at right angles the the straight edge at the division points. This determines the position and angle of the batten pockets. With a divider, or two rulers, project the spot at which the tack eyelet will be placed. This will be accomplished by extending the measurements of the foot and luff from the ends of the leach line until the lengths intersect. This is the point at which the tack eyelet will be placed later. The operation is the same for both the jib and mainsail. Having transferred your measurements to the material and drawn a fine, light line between the three points located for each sail, it is time to consider the flow, or flatness, of your sails. In the measurements given in the illustrations the aim has been at a happy medium, and even slight alterations may put your product in the “extreme” class.
At two points along the luff, the dividing points between three equal sections, mark a pencil spot 1/8″ inside the straight line at the point nearest the head and another spot 1/8″ outside the straight line at a point nearest the clew. These two spots and the tack and head eyelet locations give four points through which a concave-convex curve should be scribed with a flexible spline and thus provide for a flat upper sail surface and a modest flow in the lower portion. This moderate S curve is now the mainsail luff line, and, because it will be bound with tape, the cut, when it is made, should be 1/8″ outside the luff. A secondary line at this distance would be helpful in cutting, but may not be necessary. The roach along the leach curves outward from a straight line a maximum of not more than 2″ about midway between the head and the clew. A fair curve should be scribed here. Because this edge is hemmed, the cut, when it is made, should be 1/4″ outside this line. The roach on the foot is parabolic in character with a maximum of 1/4″ one-third of the distance back from the tack and decreasing as it nears the clew. The cut, when it is made, should be 1/8″ outside the scribed line, as the foot will be bound with tape. The mainsail cutting lines are now complete.
The jib is a somewhat flatter sail generally and consequently a concave curve should be cut into the luff. Mark a spot 1/8″ inside the straight line midway between the head and the tack and scribe a fair curve between the points. As this edge will be taped, the cut, when it is made, should be 1/8″ outside the scribed line. Parabolic curves are proper for the roaches in the leach and the foot with the maximums about one-third the distances from the clew. A 1″ roach in the leach and a 3/4″ roach in the foot will be about right. As the leach and foot are hemmed, the cuts should be made 1/4″ outside the scribed lines to provide for the folds.
All edges must be cut carefully and smoothly to eliminate irregularities in the finished sails. This can best be done with a razor blade while the material has been tacked down, or with well-sharpened scissors. The writer has found it better to remove most of the tacks and use shears as one does not inadvertantly gather up the material under the knife, thus causing a jagged edge.
From the scrap material now on hand, shape the reinforcing units which are to be applied in the tack and clew corners of the sails. The curved, or inner, edges should be hemmed under to prevent raveling.
All hemming, reinforcements, and batten pockets should be applied to the same side of both sails for the sake of appearance.
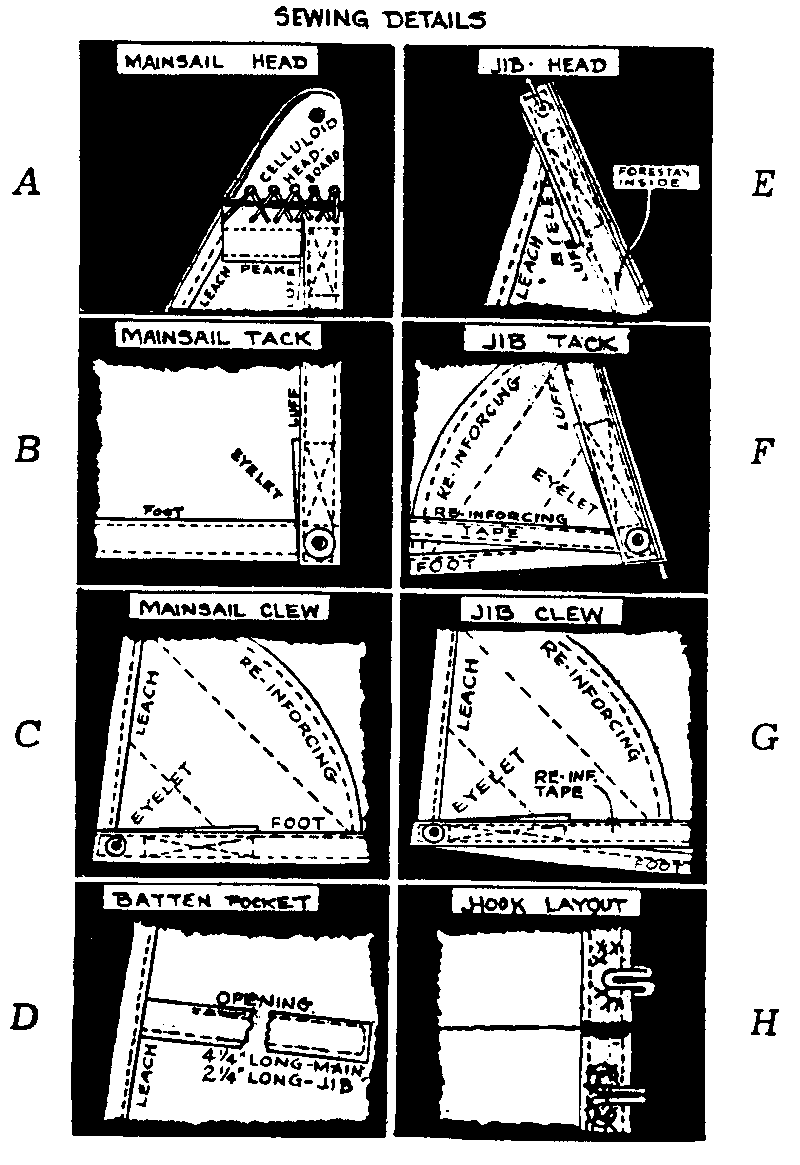
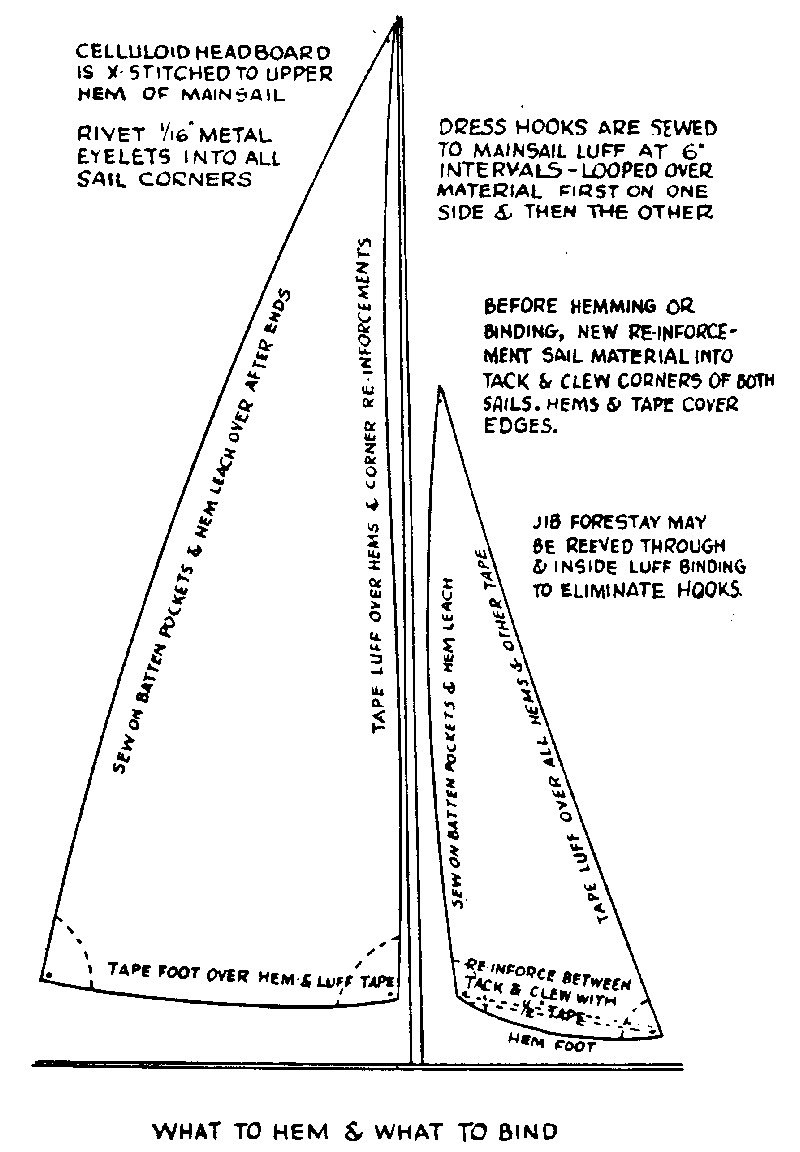
The batten pockets consist of sections of flat linen tape 1/2″ wide, with one end folded back under itself for for a distance of 1/2″ and then cut 4 1/2″ long for the mainsail and 2 1/4″ long for the jib. These should now be basted and machine stitched in place along the inscribed lines on the leaches, the after ends being cut off so that they will fall under the leach hems, but not so as to cause a lump because of excess material being folded in. An opening should be left in the upper after end of the pocket through which the celluloid batten can be inserted. This is done by starting stitching about the middle of the pocket and working it toward the leach, but not reaching it, and then looping back and on around the edge as illustrated. The openings can be closed with hand stitches if desired. See D.
The reinforcing units should likewise be basted and stitched into place at this time so that the luff, foot, and leach edges will be bound under the hem or tape. See C, F and G.
The leach and the foot of the jib and the leach of the mainsail should now be hemmed. If your sewing machine has a narrow hemmer attachment, you’ll find it most convenient; otherwise fold the edge in on itself twice over and baste and stitch. If inexperienced in this operation a little practice on a piece of scrap material may be advisable, as an equal tension must be maintained around the curves to avoid pulling them into unsightly shapes. Fold under the peak of the mainsail until the edge measures 3/4″ and will join with the head board, cutting away surplus material to eliminate bunching. See A.
The next step is to baste and stitch the 1/2″ flat linen tape reinforcing on a straight line between the tack and the clew of the jib — the clew end being folded back and under itself about 3/4″ to avoid raveling, the tack end being cut off flush with the luff, as it will be bound under the tape. Refer to G.
Binding on the tape is quite simple if it is first moistened, creased exactly down the center and ironed in this shape, being careful not to scorch it. The extra cautious sometimes boil the tape in water for 5 minutes to induce complete shrinkage and thus avoid any danger of later puckering.
If the method explained here is closely followed there should be little difficulty in doing a workmanlike job of the binding. Fold back, and under itself, about 3/4″ of the tape and baste it to the clew corner along the foot of the mainsail, being sure the sail material lies into the full depth of the creased tape. Take this end in your right hand and thumbtack the other end of the creased tape to the edge of your bench top, somewhat behind the tack of the sail, and toward your left hand. A slight pull on the tape with your right hand, which also holds the basting needle, while the left hand feeds the sail material into the tape crease without stretching, will make the basting quite easy. If you permit the material to creep up from the extreme depth of the crease your sail edges will be irregular and unexpected pockets will appear in the sail surfaces, and if you stretch the sail material while basting it will be puckered when machine stitched. The tape should be cut off flush with the luff edge of the material, B, and not folded under at this point, as the luff binding covers the rough end. Repeat the binding operation along the luff, but fold the tape under itself where it reaches the peak as in A. On the jib, only the tape binding on the luff must be applied, as the reinforcing tape was put on before hemming. However, the luff binding on the jib extends beyond the peak, or meeting point with the hemmed leach to provide space for the head eyelet. See E. Lay a cord, to be used as a forestay, inside the creased tape with the ends extending well beyond the luff ends; this will be attached to the jib club and through a bowser to the mast cleat. Reeving the forestay through the bound edge after sewing will be found to be most difficult.
The head board (A) should now be cross-stitched to the peak of the mainsail, and the metal eyelets riveted into the corners of the sails, being careful not to tear the material. This can be accomplished by pressing it aside with an ice pick or other sharp pointed instrument a bit larger than the rivet itself.
Set your sewing machine at No. 5 and fix the tension so it will not “pull,” and stitch along the outer edge of the tapes first, following up with the inner edge to smooth out the surfaces. Because silk thread will unknot itself when flapping in the wind, it is wise to put a drop of collodion [CA glue these days- Ed.] on the thread ends before trimming them off.
The dress hooks should now be sewed to the mainsail luff at 6″ intervals so that they come midway between the screw eyes supporting the jack line on the mast. These hooks should alternately loop over the sail edge, first from one side and then the other, as illustrated in H.
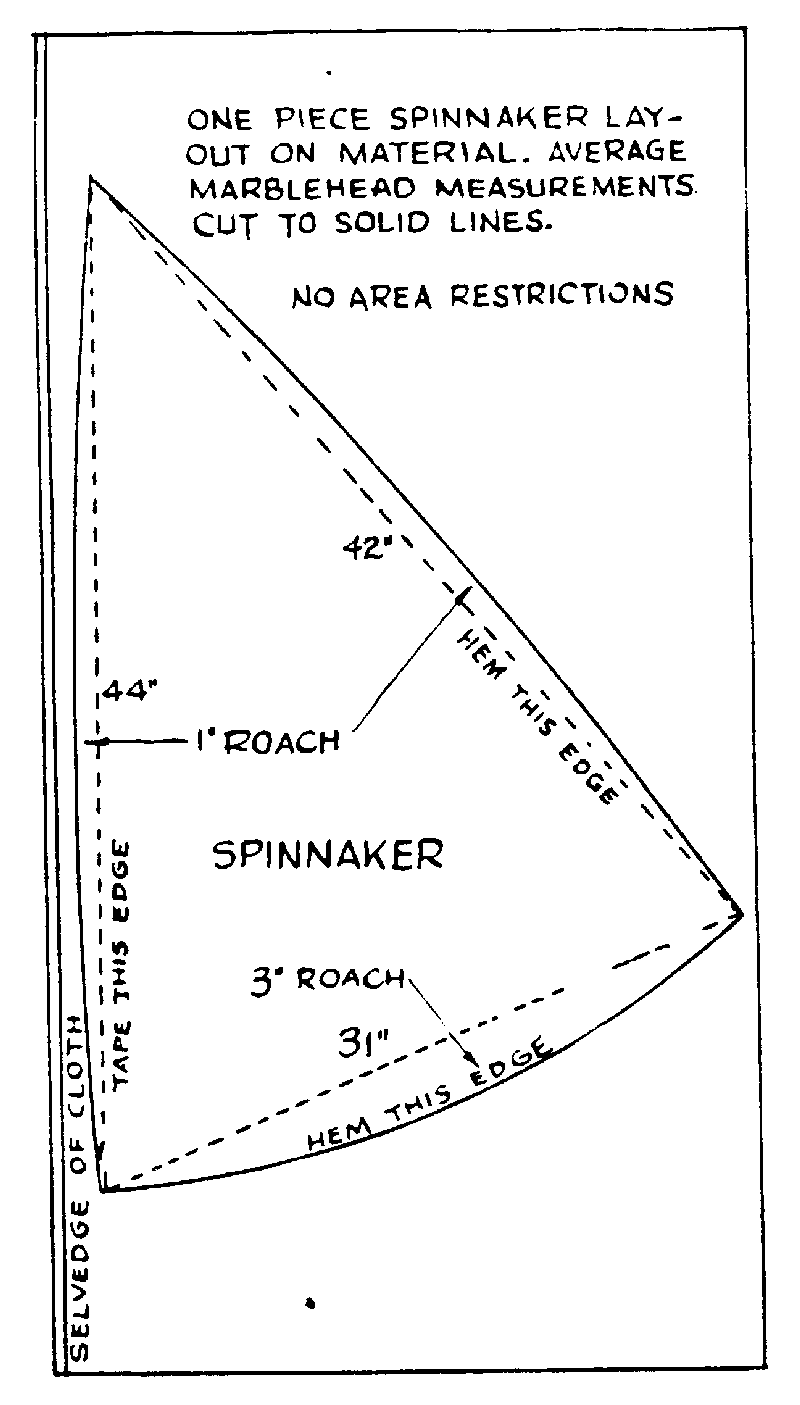
A one-piece spinnaker may be cut and sewed in the same manner as outlined above, the edge between the peak and the clew being along the selvedge and bound with tape, and the other edges hemmed. Reinforcing material should be sewed at the tack corner and the tape should extend above the peak to provide space for the head eyelet.
Storm sails, which are often important adjuncts, are smaller reproductions of the first suit, the second suit being 10 per cent less in area than the first, and the third 20 per cent less than the first. They should be so designed that their common center of effort will lay ahead and lower than the c.e. of the larger suit to avoid re-adjustments of the balance when sail changes are made.
Good sails must be given proper care — don’t “break them in” in heavy winds; give them a chance to fit themselves gradually to your rigging. Loosen the tension at all cleating points when the boat is not in use or if the material becomes wet. Don’t expect sails to reach their maximum efficiency until they have had their third outing. Don’t wash or iron them because they have become soiled; if water stained they should be dipped entirely in water and allowed to dry without wringing. As soon as possible after use they should be hung up to dry and then rolled from the foot along the leach and wrapped in paper for storage or, better still, left hanging.
These suggestions, if followed, will pay worthwhile dividends. The right material, accurate cutting, good sewing and proper handling mean satisfaction in the long run. As the only means of yacht propulsion, your sails are important to your pleasure. Treat them accordingly!

