Make a Pondside Boat Stand
Article by TMY Editorial Staff. Photos and drawings by John Stoudt
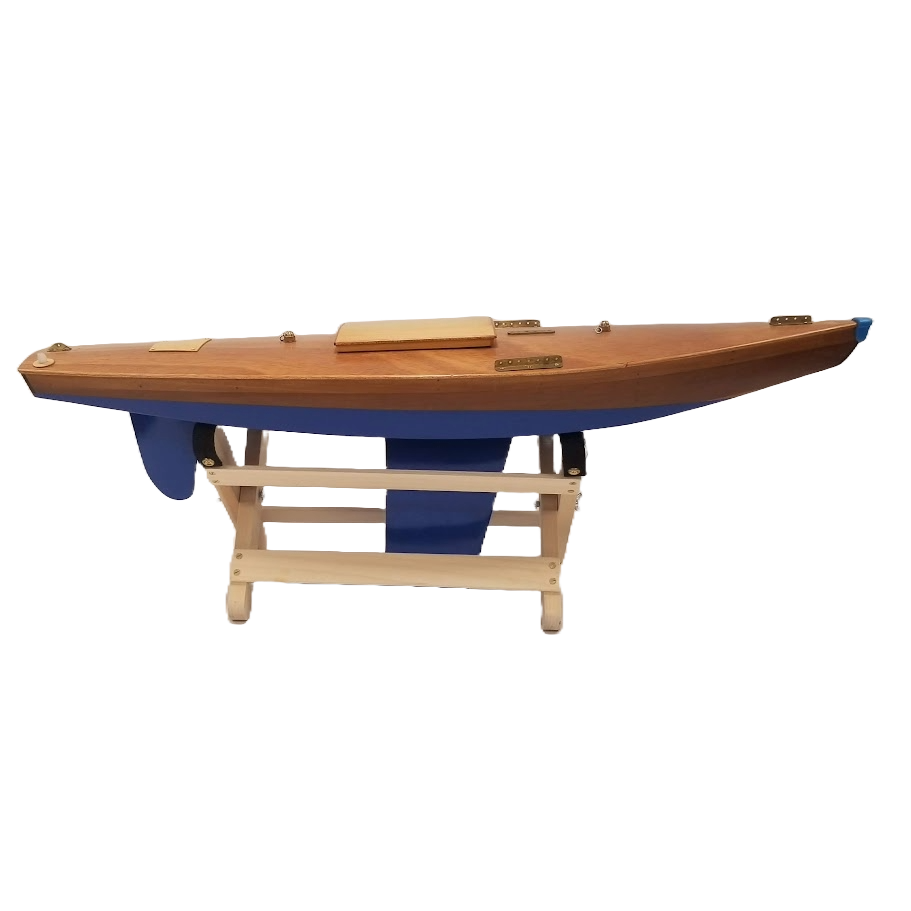
Star Sharpie Jr. in a travel stand.
There are many types of boat stands you can make for a model yacht. One necessary stand is the travel/work stand. When building or restoring a model yacht, this stand is the first thing you should make. It serves nicely as a work stand and is great for traveling with your boat. It folds up and is easy to transport with all of your other “stuff”. Although it could be used as a display stand, it is not intended for display
because it is not very attractive.
Materials
- Four pieces of 1⨉2 hardwood (length depends on boat size)
- Two pieces of ¼⨉2 hardwood (length depends on boat size)
- Two ¼-20 stainless steel carriage bolts, 2 inches in length
- Two ¼-20 stainless steel nut
- Two ¼-in stainless steel washer
- Sixteen ¾-in #8 stainless steel flat head wood screw
- Four #8 stainless steel finish washer
- About 36 in of polypropylene webbing
- Marine finish
The most conveniently available lumber is 1⨉2 and ¼⨉2 poplar from a box store like Lowes. These sizes come in 24- and 48-in lengths, and they will make a boat stand strong enough to hold a boat the size of an International A boat. The hardware is available in stainless steel in small quantity packages from the same store. Although brass and bronze are an option, they are much harder to find and rather expensive.
The strapping can be acquired in long lengths from Amazon. We have been using sail ties (polypropylene webbing), which come in a lot of great colors, for the hull support straps.
Tools
- Awl
- Assorted drill bits
- Sandpaper and sanding block
- Circle template or compass
- Countersink bit
- Drill press or electric hand drill
- Handsaw, bandsaw, jigsaw, saber saw, chop saw, or table saw
- Screwdriver
- Try square or combination square
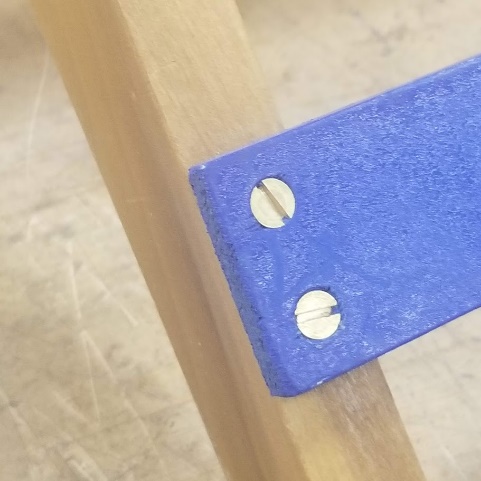
Rung attachment.
Because the model yachts we work with vary in size significantly, the lengths of the legs, rungs, and support straps will vary from stand to stand. Here are some general guidelines:
- The legs will be the same length as the overall height of the hull from the bottom of the keel to the edge of the deck.
- There is one long rung and two short rungs:
- The long rung will be the horizontal length of the keel from the forwardmost point of the leading edge to the aftermost point of the trailing edge plus 9 in. (So, if the horizontal measurement is 8 in, add 9 in for a length of 17 in).
- The short rungs will be the horizontal length of the keel from the forwardmost point of the leading edge to the aftermost point of the trailing edge plus 7 7/16 in. (So, if the horizontal measurement is 8 in, add 7 7/16 in for a length of 15 7/16 in).
- Note: The difference in lengths between the long rung and the short rungs is twice the thickness of the legs (¾ in) plus 1/16 in for space.
Procedures:
- Cut four pieces for legs of 1⨉2 to length based on the overall height from the bottom of the keel to the edge of the deck.
- Cut two pieces for short rungs of ¼⨉2 to length based on the formula above.
- Cut one piece of for the long rung of ¼⨉2 to length based on the formula above.
- Round both ends of the four legs. Use a circle template or compass to draw a 3/4-in radius on each end of all four legs. Cut the ends using the saw of your choice. A bandsaw with a narrow blade works very nicely.
- Sand the rounded ends of the legs smooth and round of all edges.

Leg layout. The 1 ½-in wide face of the leg is shown.
- Drill a 17/64-in hole dead center along the length and width of all four of the legs on the 1 ½-in wide face (width).
- Sand the rungs smooth and round all of the edges and corners.
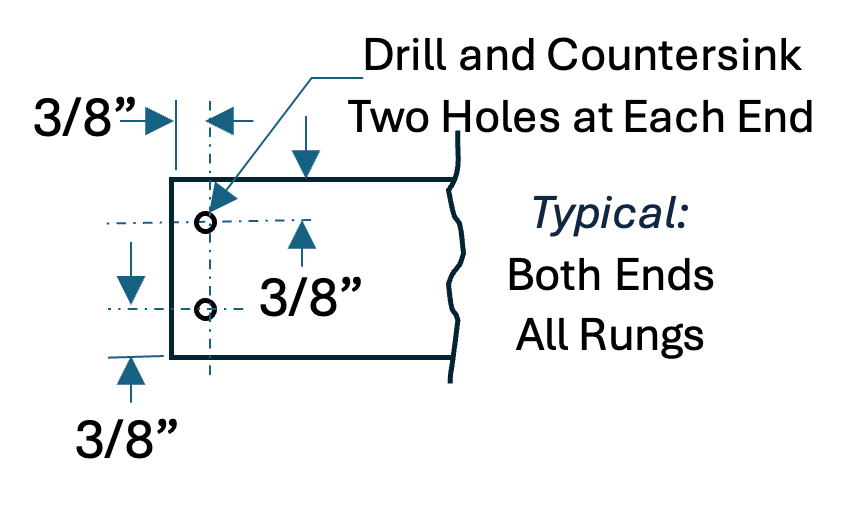
- Drill two 7/64-in clearance holes in each end of all three rungs and countersink for a #8 stainless steel flat head wood screw as illustrated.

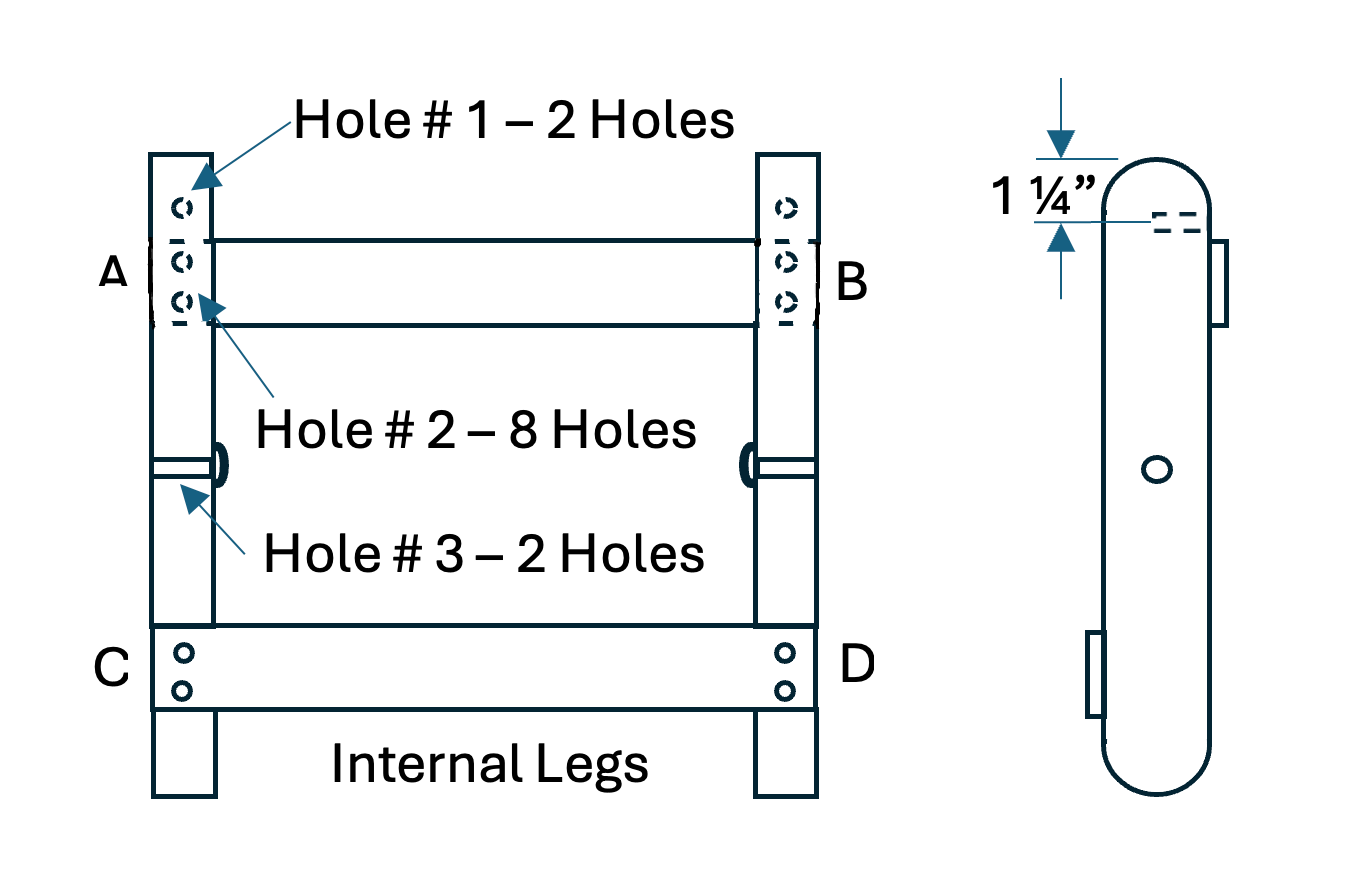
- Take two of the legs (these will be your internal legs) and place them side-by-side on their edges and line up the ends. Draw a line across each leg 2 inches in from both ends.
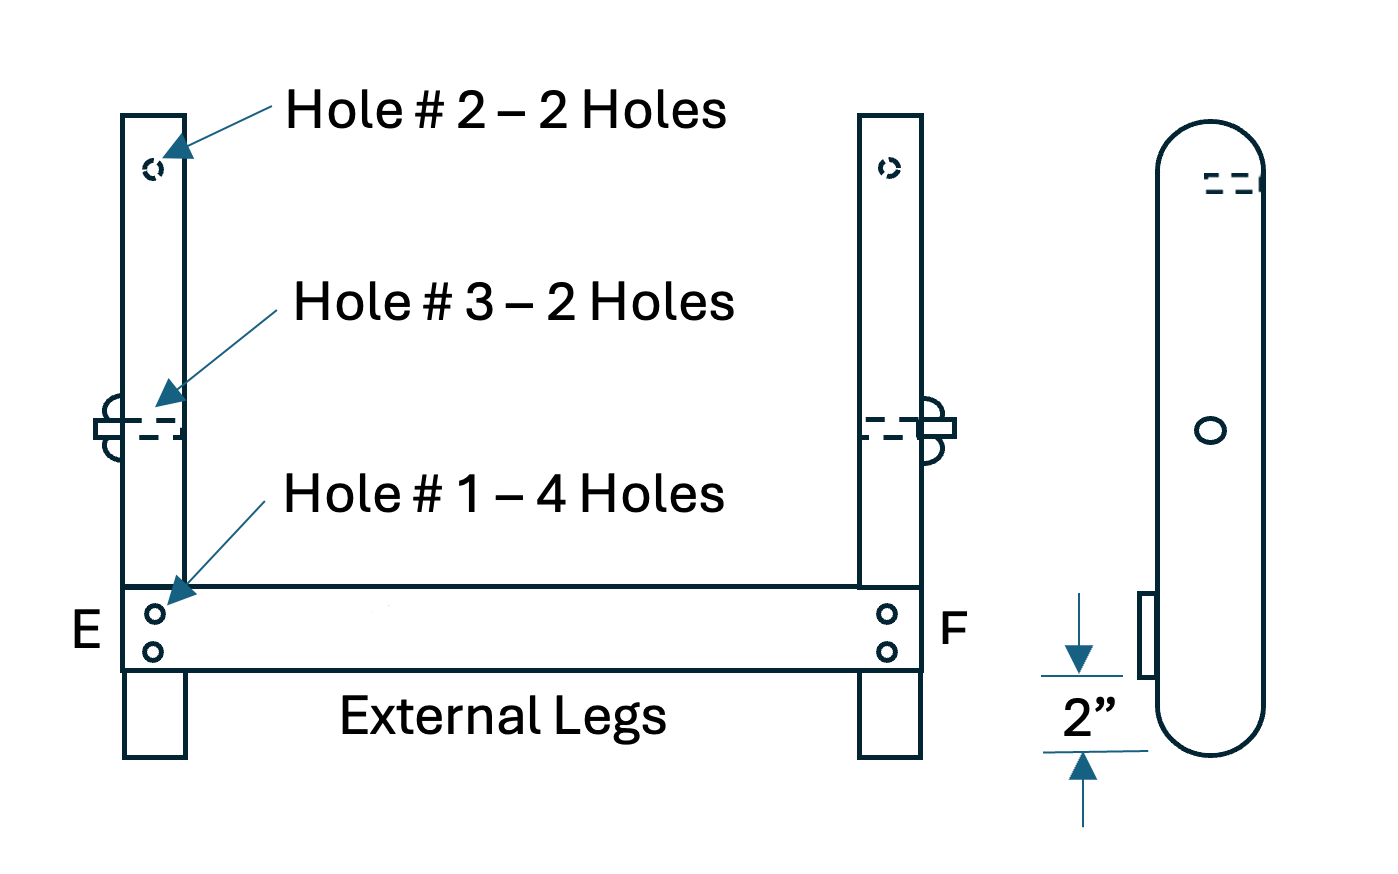
- Take the other two legs (these will be your long legs) and place them side-by-side on their edges and line up the ends. Draw a line across each leg 2 inches in from one end.
- Mark each leg and rung with the letters A to F. Place the notation in a location that will not be seen when the stand is completed. (See letters noted on the rung assembly illustrations). Note: You are doing this because you will assemble and disassemble the stand, and then reassemble it.
- Take one set of legs and move them about 12 in apart. Using a try square, align one rung flush and square on the outside of a leg and mark the two holes on the leg with an awl. Repeat this process for each set of holes for each rung. Note: The short rungs are attached on opposite sides of the legs.
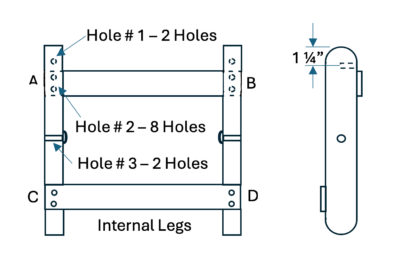
Short rungs.
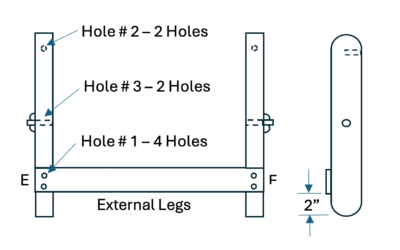
Long rungs.
- Drill a 3/16-in pilot hole in all 12 locations on the legs.
- Assemble the leg sets with ¾-in #8 stainless steel wood screws.
-

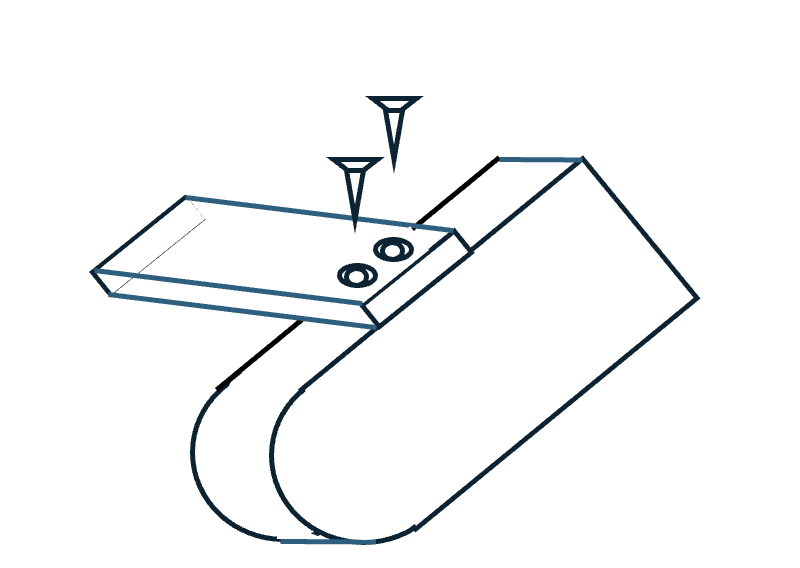
Leg rung detail.
Place the legs sets together as pictured and insert the carriage bolts from the inside out and place a washer and wings nut on the carriage bolt. Lightly tighten the nuts and see if the legs “rotate” easily.
- Now mark the top outside edge of each of the four legs for the screws that will hold the straps on. Mark down from the top edge 1¼ in and place a mark at the center of the leg with an awl. Drill a 3/16-in pilot hole at each of these locations.
- Cut two pieces of webbing and heat seal the ends with a grill lighter so they do not fray. The length of the webbing should be 1½ times the height of the boat (already measured as the length of the legs) plus 3 in. For a boat that is 12 in from the deck to the bottom of the keel, you will make the legs 12 in long and cut the webbing to 12 in ⨉ 1½ + 3 in = 21 in.
 Fold one end of the webbing back on itself 1 inch and punch a ⅛-in hole half an inch back from the end, centered on the webbing. Fold and punch the other end and on the other piece of webbing.
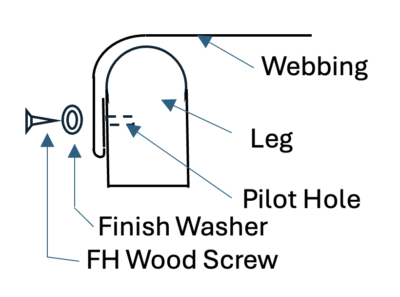
- Place a finish washer onto a 1-in #8 stainless steel flat head wood screw and insert the assembly into the tWebbing detail.wo punched holes on one end. Insert the screw into one of the pilot holes on the top of one leg and screw into place.
- Attached the other end to the mating leg.
- Repeat on the other set of legs.
- Take the entire assembly apart and apply multiple coats of a waterproof finish to protect the stand. Make sure to sand lightly between coats of finish to ensure a nice smooth finish.
- Assemble your stand.