by Earl Boebert
Why the title? Simple. Sawdust makes you sneeze, tracks all over the house, can form an explosive mixture, and is pretty useless once produced. Shavings look nice, are easy to clean up, and are great for lighting wood stoves and fireplaces. Sawdust is mostly made by power tools; shavings come from hand planes and chisels. This article tells you how to cheaply and easily join the Ancient and Honorable Company of Shavings Makers.
Old Steel vs. New Steel
It’s not hard to run into people who will claim that they just don’t make cutting tools like they used to. It’s easy to dismiss this as just another geezer sounding off about the good old days. In this case, however, they’re right. I checked this out with a metallurgist I worked with, and learned the following:
Prior to 1940 or so, hand tools were sold mostly to professionals, who used them hard and for a long time. The ability to hold an edge and be resharpened was a major factor in how well your tool sold.
In the same era, specialty steelmaking was a a black art. For example, during that period everybody knew that Craftsman wrenches didn’t break and nobody knew why. Secret formulas abounded, and some of them were pretty darned good.
Then the hand tool market became the domain of the hobbyist and home handyman, and price became more important.
Also, people learned how to surface-harden steels, so blades could be shaped when soft and then hardened. The resulting tool came with a decent edge, held it for a while, and could be sharpened once or twice before you ground down into the “soft stuff” and the tool was gone. This is plenty good enough for the occasional user, but not so hot if you want something that will really cut. The exception to all this are the blades made by specialty knife and blade craftsmen, of which Ron Hock (https://www.hocktools.com/) is an example. He hand makes blades to fit many of the planes I describe, and a properly sharpened Hock blade cuts like something Merlin had a hand in.
So you’re not just being nostalgic if you prefer a pre-WWII blade. The principal manufacturers in those days were Stanley, Millers Falls, and (a distant third) Sargent. Old Stanley tools have a mystique and avid collectors, and as a result cost much more than Millers Falls; I’ve found the quality of the latter to be more than adequate.
Nomenclature and Uses
I use three basic types of planes in building a plank-on-frame boat: miniature planes, a rabbet plane, and a 6-in block plane. The miniature planes are for the small stuff, the rabbet plane is for, well, rabbets, and the 6-in block plane is used for tapering planks, fairing hulls, and making masts.
Miniature Planes
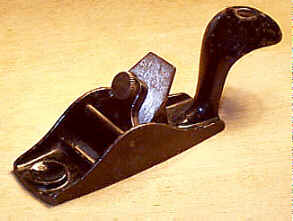
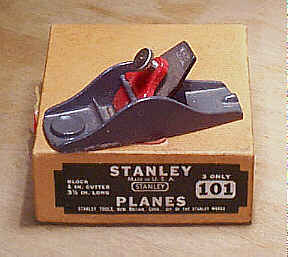
The basic miniature plane, and my favorite for small work is the Stanley 100/Millers Falls 33. This plane has a “squirrel tail” handle that fits nicely in the palm, increases control, and reduces fatigue. The Stanley 101/Millers Falls 55 is the same plane without the extra handle. If the Stanley has a “mushroom” shaped screw clamping the blade, it’s an old one. If it has a red plate holding the blade, it’s toward the end of the production run. When Stanley started going downhill they made a stamped metal version of the 101 which is pure junk.
It’s my pleasure to restore a couple of these every year and present them on a display base as the US VMYG Craftsmanship Trophy at the San Francisco M Class Invitational and our VM class National Regattas, as a way of resuming the old tradition of giving tools as prizes.
The bodies and blades of both planes can be cut and ground to a variety of special shapes for special purposes. Nathanael Herreshoff, who designed his boats by carving half hulls, made a whole raft of these for his own use. The most useful modification is to cut off the body about 1/8 in ahead of the throat (the slot the blade goes in) to make a “bullnose” version that can get into tight spots.
John Black, designer of the Cheerio series of M boats and the Bostonia series of A’s, was a shop teacher by profession, and he convinced the Stanley works to put out a specialized plane based on the No. 100. This is the 100 1/2, which has a double curvature to the sole (the part that rubs against the wood) and a curved blade. It is used to cut the garboard radius on vintage M boats and the hollow garboards of fin-keelers. It is a rare Stanley, not duplicated by Millers Falls, and originals are pretty expensive. Luckily, as Ed Martin describes in his review, reproductions are available at much better prices.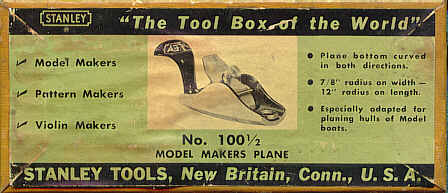
Rabbet Planes
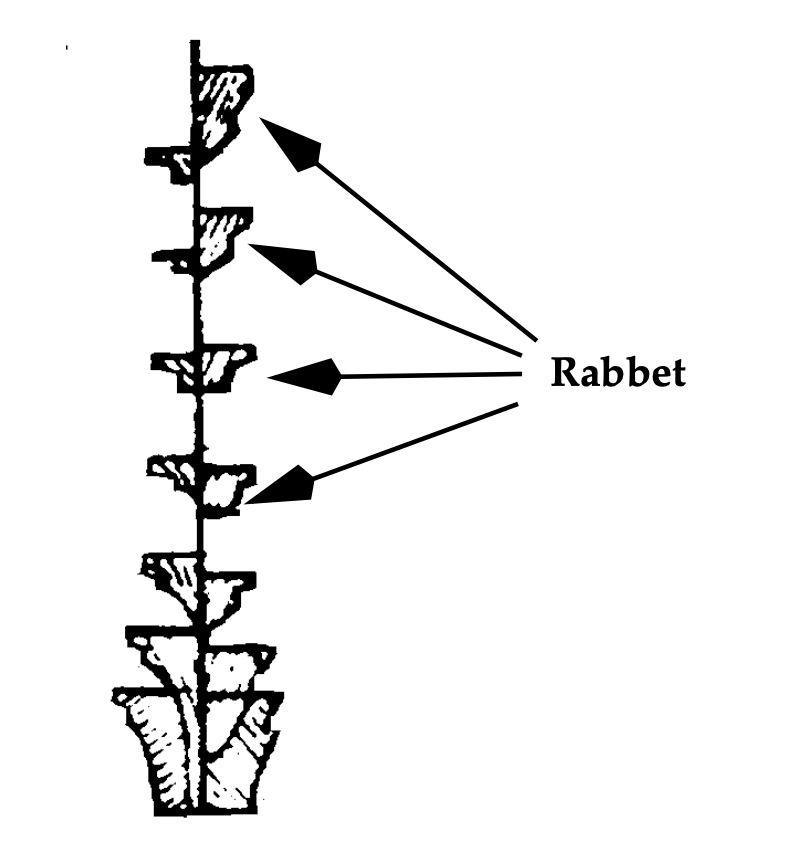
Before I talk about rabbet planes, I guess I’d better explain a bit about rabbets. (The term has nothing to do with rodents; it is a corruption of the word “rebate.” – Ed.) These, as the drawing above shows, are the lengthwise notches in the keel that take the planks. They can be a real pain to cut with a chisel. A rabbet plane, such as a Stanley 75/Millers Falls 4 makes quick work of them; you still have to start them with a chisel but then the going is pretty easy. Note how the angle changes from station to station; getting this curve nice and fair is what the rabbet plane does for you.
The specialized shape was designed for cutting the inside of a such notches. The “normal” use was to cut away the rabbet for the glass in a window or picture frame. You’ll note that the plane is narrow and the blade goes all the way to the edge of the sole.
The plane has two adjustments, one for the depth of the blade and one (the screw on the top) to adjust the throat. The one problem with rab
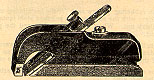
bet planes is that because of the way the “bullnose” front is held on, they fill with shavings as you use them. No big deal, but something to be careful about.
Block Planes
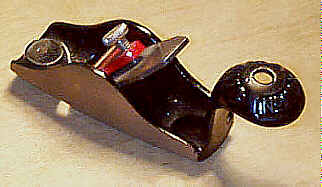
Block planes were supposedly named because they were used for “blocking,” or cutting the framing of buildings to exact length. The blade is held at a lower angle than a normal plane, which enables a properly sharpened one to cut across end grain without “tearout,” or the pulling out of splinters of wood. The smallest block planes, which are perfect for our uses, are the Stanley 9 1/2/Millers Falls 16.
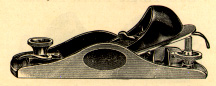
A good block plane has three adjustments. There is a lever at the front, with a knurled locknut, that sets the size of the throat. Another lever on the back adjusts the skew of the blade so that the blade edge can be set exactly parallel to the sole. Finally, a horizon- tal thumbscrew permits very precise adjustment of the blade depth. All in all, a precision cutting instrument.
My block plane sees service mainly in two areas: making masts and the final fairing of hulls.
Now I know that aluminum masts are lighter, and stronger than wooden ones, but I much prefer the looks of a wooden mast and greatly enjoy making them. For one thing, you end up ankle deep in shavings when you’re through.
The process is quite simple. I start with 3/4-in Sitka spruce longeron stock from Aircraft Spruce and Specialty. (www.aircraft-spruce.com This company also sells a “grab bag” of spruce cutoffs which is an economical source of spar and keel stock.) This stuff is intended for homebuilt aircraft, and is just as clear and straight as it can be. The first thing to do is to cut the taper according to whatever plan you are using. You will be amazed the first time you do this at how easy it is to get long, straight surfaces at a gentle angle. After cutting the taper, the next thing is to knock off the corners so you end up with a hexagonal cross section. Then knock those corners off and so forth until it’s round. A tiny bit of smoothing with sandpaper and you’re in business.
Final fairing is the process of removing just enough material from the outside of a hull so that it doesn’t have any bumps or hollows. Before final fairing, the fairness of the hull should have been checked on the drawing board by drawing the diagonals, and on the building board by using battens to check how the planks will lie before you put them on.
To fair, set the block plane to the finest possible cut. On mine, this is a cut of about a thousandth of an inch (I’m not kidding — I’ve measured the shavings.) Then take a long pass with the plane along the hull. You’ll feel it “snick” as it trims just a little off a high spot. Keep at it until you just start getting long shavings, at which point the hull is fair. You can check fairness with battens, or simply by running your finger along the curve.
Now that you know that old is better than new, and what the basic models are used for, I’ll get into the “words and music”: how to find one of these beasts, how to restore it, how to sharpen the blade, and how to tune (adjust) it for best results.
Finding an Old Plane
The bad news is they aren’t making these things any more. The good news is they made millions of them while they were at it. They can be found at flea markets, antique fairs, and, of course, the eBay Internet auction site. Look for a plane whose description says “minor rust” or “no pitting.” Since you’re buying it to use, you don’t really care what shape the japanning (the baked enamel) is in, but collectors do, so that’s where the bargains lie. In general, the older it looks the better the steel in the blade will be.
Miniature Planes
There always seems to be a handful of these up for auction on eBay at any given time. The Stanley 100s are somewhat rare and usually more expensive than the 101s. You should be able to get a decent 101 off of eBay for between $20.00 and $40.00. (Of course, if everybody reading this runs out and bids on the first plane they see on eBay, the price will “spike.” Be patient. — Ed.) A lot of time people selling them don’t know what they are, so they list them as “toy plane,” “little block plane,” “funny little plane,” etc. As always on eBay, patience, persistence, and creativity with the search engine pays off. There were similar models made by both Millers Falls and Sargent.
Rabbet Planes
These get mislabeled by sellers even more than miniature planes do — “very odd plane,” “small weird woodworking tool,” are some of the things I’ve encountered. You should be able to get one in salvageable shape for about the same price as a miniature.
Block Planes
These are usually listed correctly on eBay, because the model number is stamped on them. Prices fluctuate a lot. I got a first-rate Millers Falls 16 for $20.00 a few years ago, and have seen them go as high as $60. A Stanley 9 1/2 will typically cost about twice as much as a Millers Falls 16, and in my view just isn’t twice the value. Beware of the cheap throwaway block planes that both Stanley and Millers Falls made for wood shop classes. These don’t have the essential three adjustments, and are pretty much worthless.
Restoration
There are four steps to restoration: rust removal, lapping the sole, sharpening, and tuning. Before you start you need to get your favorite rust remover (I like Evapo-Rust®), steel wool, and wet or dry sandpaper in grits 400, 600, 800, 1000, and 1500. The latter can be found in the finishing section of an auto parts store. You’ll also need a good flat to use in sharpening and lapping the sole. You want to get a thick piece of glass or a marble slab a foot or so long and six to eight inches wide. I use the marble base to a defunct desk set. Check with your local glass place or marble monument supplier for scraps. A Corian cutout from a kitchen sink is also good.
Rust Removal
Everybody has ideas about how to do this. The one thing you can be sure of is that nothing you use will be good for your skin, so take precautions.
Lapping the Sole
The bottom of the plane will almost certainly have warped a little with age, and is probably scratched to boot. Using the abrasive paper and flat surface, rub in a figure eight pattern until the sole is flat. If it’s really bad you’ll have to start with the 600 paper. The figure eight pattern insures that the piece is “rocked” evenly in all directions and so comes out flat. Watch the pattern of scratches as you go. When the bottom has an even pattern with no missed spots, it’s time to go down to the next level of grit. Oil just makes a mess and doesn’t help, so do it with dry paper.
Sharpening the Blade
There used to be, and in some circles still is, a lot of mumbo jumbo floating around on the topic of sharpening plane and chisel blades. If you believe some of these people you have to spend five years sitting cross-legged in front of a Japanese Waterstone Master before you were ready to take your first cut. As Nero Wolfe would say, Pfui.
The whole business of sharpening was revolutionized a few years ago when a guy named – Steve LaMantia posted the now-legendary “scary sharp” method on the Internet. (https://web.archive.org/web/20000306143630/www.shavings.net/scary.htm) Fundamentally, this involves doing to blades what you just got through doing to the sole: sanding it down through various grades of dry abrasive paper on a flat until it is right. The original description, which is still worth reading, had one gluing the paper down to it with spray glue. I don’t even bother with that.
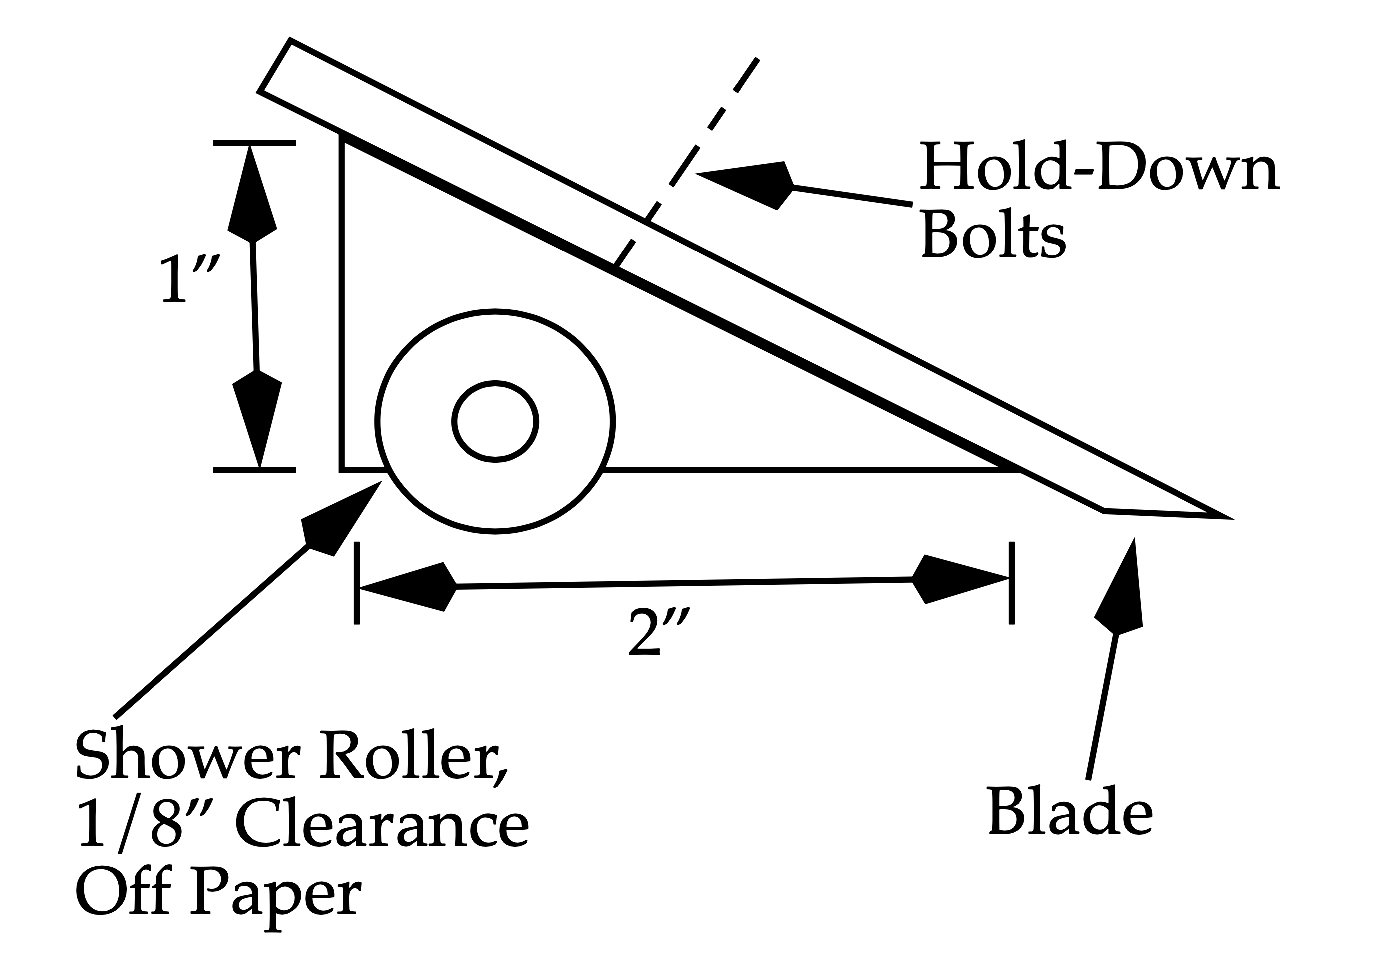
In order to sharpen the small blades of the miniature and rabbet planes you’ll need to make a sharpening jig. The drawing shows how I made mine. The wheels are shower rollers from the parts board in a hardware store. It has to be wide enough for the blade, 2 1/2 inches or so, with a couple of bolts for wing nuts to hold the blade clamped to the slanted face. I made mine out of scrap Lexan; most anything that will hold a screw will do.
Clamp the blade on the jig, and true it up with a square so that the edge will be at right angles to the side. If your blade is in really rough shape you may have to start with 400 or even 220 to grind it to shape. It helps to have a magnifying glass so you can see when you’ve ground the whole face of the edge flat—it’s easy to stop short.
After you’ve gotten the blade shaped, then you go down through the grits. For your first couple of blades you might want to look with the magnifier to see that you have an even pattern of scratches from one grit before you go to the next finer. Around 800 or 1000 grit you’ll start getting a mirror surface.
The final step is to strop the blade on an old piece of leather. Hold the blade at a 45° angle and pull it in the opposite direction from the way it will cut. Do both sides. Stropping breaks off the microscopic curl which is left from the sanding process and puts a microbevel on the edge. Watch how you test it with your finger—it will indeed be scary sharp.
Tuning the Plane
This involves getting the blade aligned to the sole and sticking out just a few thousands of an inch. This is easy with a block plane because of the adjustment facilities. Align the blade first, then adjust the size of the throat (wider for deeper cuts) and finally play with the blade depth until you are making those lovely paper thin shavings.
The miniature and rabbet planes don’t have those fancy threaded adjustments, so this looks tricky at first. Actually it’s easy. Get some shim stock of varying thickness. Lay the plane on your flat surface with a piece of shim under the nose to make a tiny angle between the sole and the surface. Slide the blade in place, letting its edge lie on the surface. Tighten the locking screw and take a trial cut. Adjust depth by changing the thickness of the shim stock, moving the shim in or out, or both.
This may all sound like a lot of work, but most of it you only do once. Resharpening is a lot quicker than putting a blade in shape the first time, and the advantage of good steel is that you really only have to sharpen once for each boat you do.