Article by TMY Editorial Staff. Photos by John Stoudt.
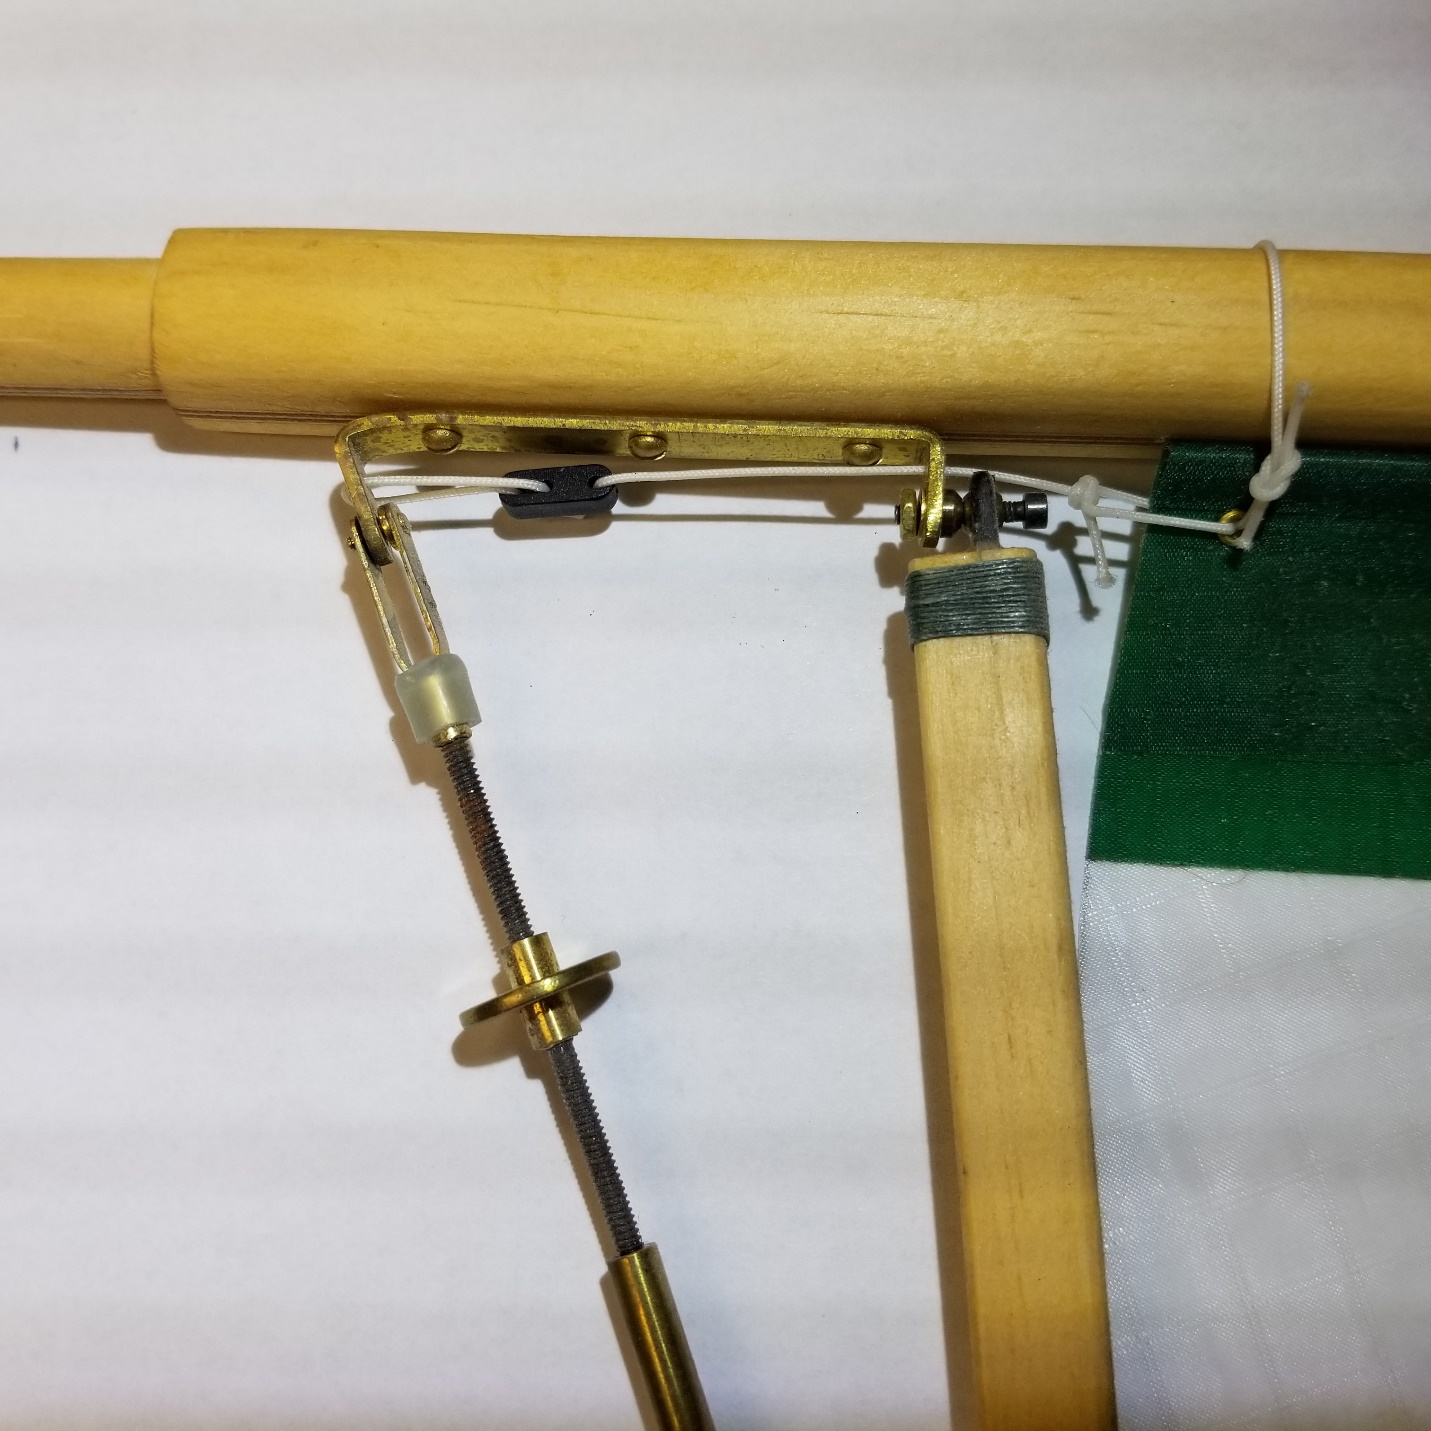
This gooseneck attachment bracket accommodates a ball link and a Walton Boom Vang [R05] (see the article “How to Make a Boom Vang.” It was designed as a simple way to attach the main boom to the mast and accommodate a very nice boom vang that you can make yourself. Using a readily available heavy duty ball link provides excellent movement for the main boom/sail. And it is strong when completed.
Tools
- Aviation snips
- Countersink (small)
- Crimping tool
- Drill bits: 5/64 in and ±¼ in
- Drill press or hand drill
- Hammer
- Miniature torch
- Ruler
- Small square
- Spring-loaded center punch
- Toothpick
- Small smooth jaw vise
Materials
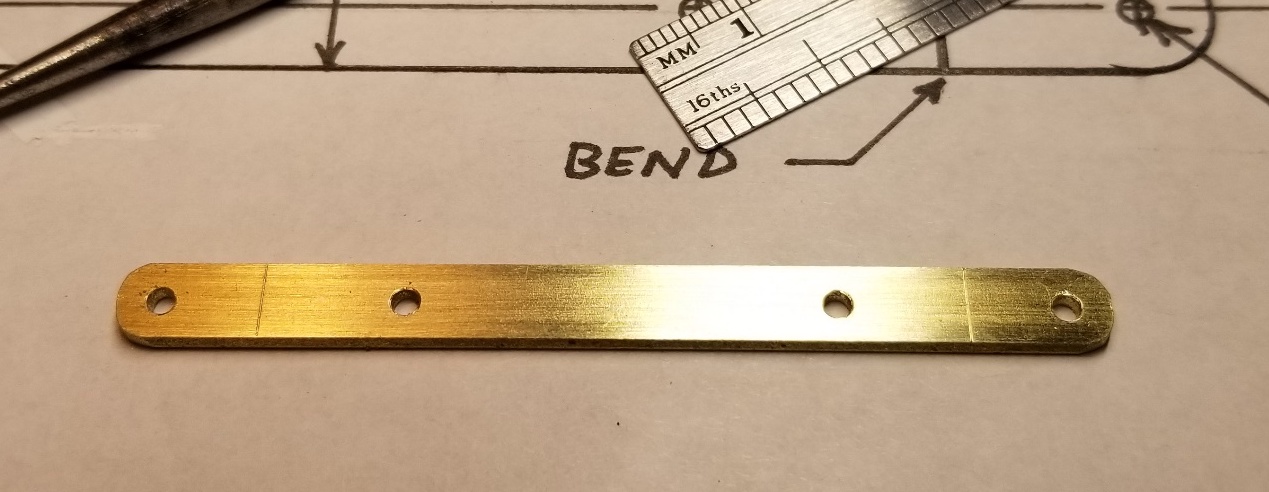
- One piece K & S Precision Metals 8245 brass strip, 0.064 by 0.25 by 12 in (to the right)
- 1-hour epoxy (2-part)
- Two ⅜-in, #2 round head brass wood screws
- Two ⅜-in, #2 flat head brass wood screws
- One Du-Bro 2262 4-40 Heavy Duty Ball Link

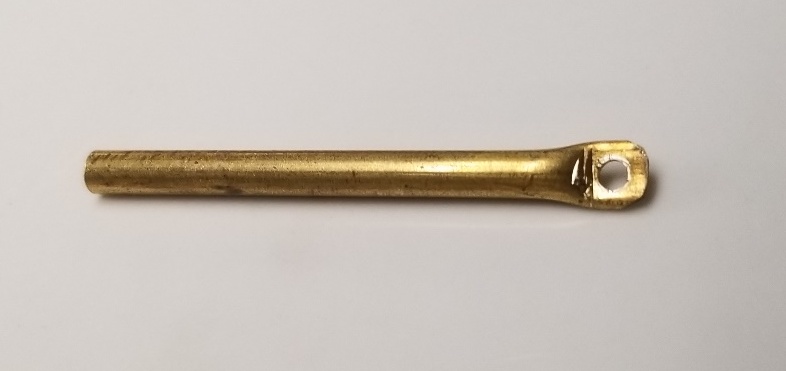
Making the attachment bracket
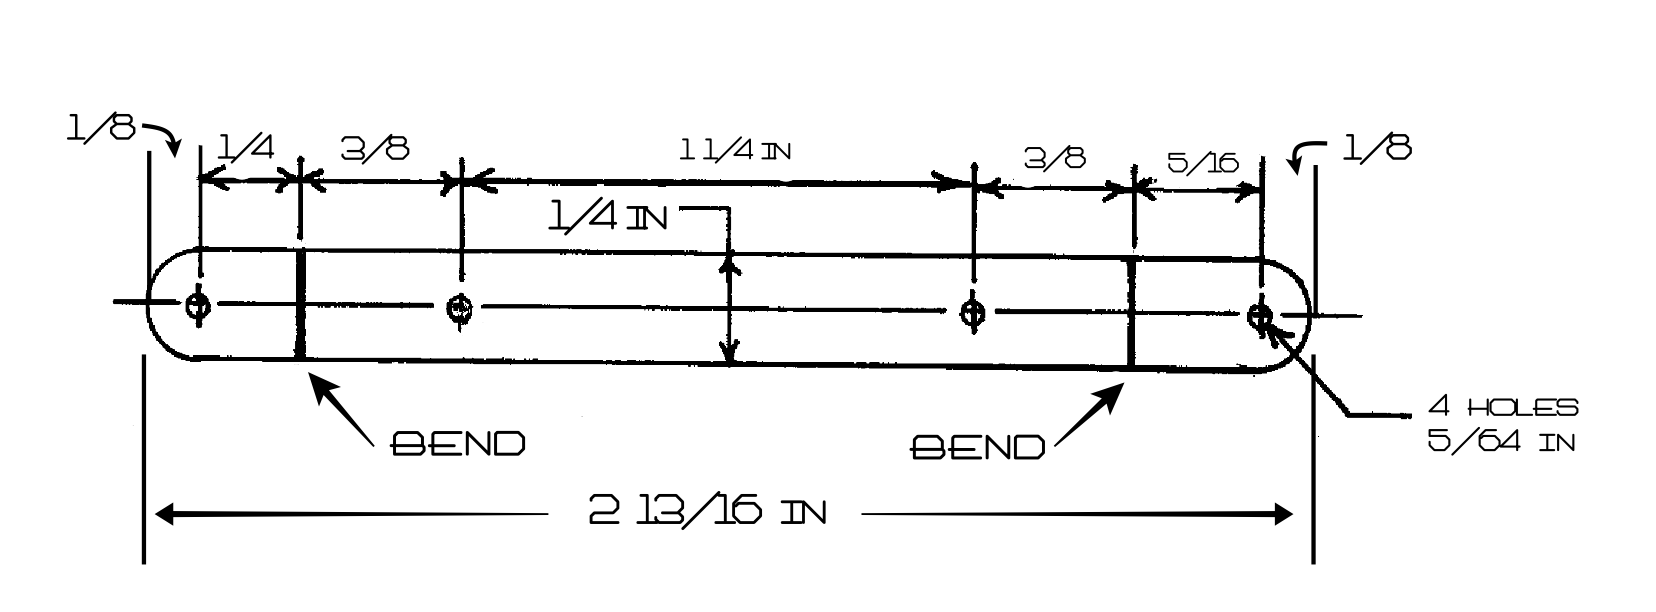
See plan and side views for more clarity.
- Cut one piece of the brass strip 2 13/16 inches long.
- Round each end.
- Measure in ⅛ inch from one end (short end) and center-punch the location of a hole on the centerline.
- Measure in ¼ inch from this hole and mark the location of the 90-deg bend with a scratch awl and a small square.
- Measure in ⅜ inch from this bend mark and center-punch the location of a hole on the centerline.
- Measure in ⅛ inch from the other end (long end) and center-punch the location of that hole on the centerline.
- Measure in from this hole 5/16 inch and mark the location of the 70-deg bend with a scratch awl and a small square.
- Measure in ⅜ inch from this bend mark and center-punch the location of a hole on the centerline.
- Drill all four holes with a 5/64-inch drill bit.
- Anneal the piece of brass (see the annealing procedure in the sidebar). This will soften the brass bar to enable a better bend.
- Place the short end in a small vise with the scribed line flush with the top of the vise jaws. Using a small ball peen hammer carefully tap the end over until it is at 90 degrees.
- Place the long end in a small vise with the scribed line flush with the top of the vise jaws. Using a small ball peen hammer carefully tap the end over until it is at 90-degrees. You will have to take this out of the vise and use a crimping tool to complete the bend to 70 degrees. (see the side view)

NOTE: The reason the two ends are different lengths is because when the bends are made you want the center line of the two holes to line up. This eliminates binding as the rig swings.
Attaching the ball link to the forward end of the main boom
- Drill a slightly oversized hole (larger than the diameter of the barrel end of the ball link) in the end of the main boom, centered side-to-side and slightly above center. Make this hole half of an inch deep. The larger diameter hole will allow you to correctly position the ball link in the hole before the epoxy sets.
- Insert the ball link into the hole to make sure it does not stick out too far. It should stop just slightly short of where the barrel end of the ball link stops. Adjust the hole depth if necessary.
- Scuff up the barrel end of the ball link with a small file or coarse sandpaper.
- Mix a small amount of 1-hour epoxy (two-part) and work it into the hole. Make sure you fill the hole with a sufficient amount of epoxy. Use a toothpick to work it into the hole.
- Have a 2-in piece of masking tape ready to hold the ball link in place when you have the ball link positioned in the hole, centered and with the flat side “horizontal”.
- Insert the barrel end of the ball joint into the main boom, adjust its position, wipe off the access epoxy (being careful not to get any on the ball joint itself), align, and tape it in place.
- Place the assembly vertically in a vise with the ball end up. Allow it to set for a couple of hours.
- After the epoxy has cured, carefully clean up any extra epoxy with a small file and/or sandpaper.
- Drill a 1/16-inch hole as a pilot hole for a ⅜-in #2 flat head brass wood screw horizontally through the main boom into the middle of the ball link. You must drill into the barrel of the ball link as well as the boom. Countersink the hole to receive the head of the screw.
- Carefully run the screw into the hole until it seats. Use some soap on the screw to reduce the friction. This is necessary to ensure the security of the ball link stays in place in the end of the boom. There is a lot of stress on this assembly.
Making an attachment point for the boom end of the boom vang on the main boom
- Cut a 1-in piece of 1/8-in brass tubing.
- Compress ⅛ inch of one end with smooth jaw pliers. Round the end.
- Make a center punch mark in that end center in the space.
- Drill a 5/64-in hole.
- Make sure you set the vang in a middle position before locating the tube position on the boom.
- Lay everything out on your work space in appropriate locations.
- Locate the bottom center of the main boom where the vang should attach and mark it with a center punch, centered side-to-side. 8. Drill a 1/8-inch hole vertically in the boom where the boom end of the vang will attach.
- Make sure you set the vang in a middle position before locating the tube position on the boom.
- Cut the vang attachment piece to length so that it sticks out from the bottom of the boon about ¼-inch. Insert it into the boom.
- Drill a 1/16-inch hole as a pilot hole for a ⅜-in #2 flat head brass wood screw horizontally through one side of the boom into the brass tube. Be careful as the brass is harder than the wood, and the drill bit will want to drift, Go slowly and with minimal pressure. Countersink the hole to receive the head of the screw.
- Carefully run the screw into the hole until it seats. Use some soap on the screw to reduce the friction. This is necessary to ensure the security of this piece in the boom.
NOTE: It is a good idea to run a stainless screw into the hole first to make “threads” for the brass screw to engage. Back it out and carefully run the brass screw into the hole.
Assembly
Take care to control all of those small parts. They have a habit of dropping out of your fingers and finding places to hide when they fall off your work surface.
Fasten the bracket to the backside of the mast with two 3/8-inch #2 wood screws. If this is for a larger boat, you can always add a third screw when attaching the bracket to the mast. Center the third screw between the other two.
Annealing Brass
Heat up the piece of brass until it is red hot and then let it cool slowly. You can do this with a small torch. Use needle nose pliers to move it to a spot where you can let it cool. Once the brass has cooled down completely, it will be softer and ready to work. Do not quench the part in water or oil. Place it on a nonflammable surface to cool.