Article and photos by John Stoudt
So now you have a boat you are working on and you want it to have a curved hatch opening. You have gathered the materials to cook the wood: aqueous ammonia, strips of wood and your “cooking chamber” (see “Bending Wood”, page 35, Issue 19 – 02, The Model Yacht). Wait, you need a mold with which to shape your wood strips.
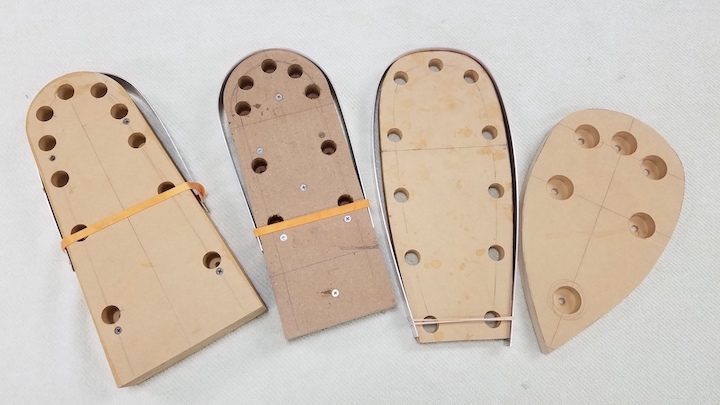
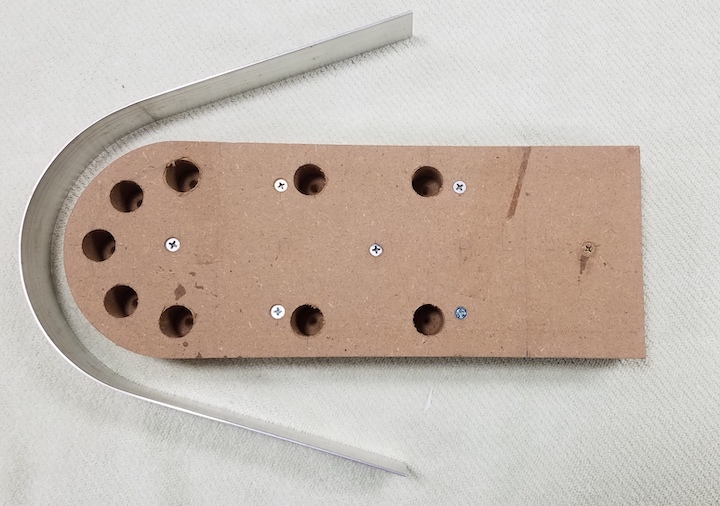
The mold is constructed to hold the pieces of wood (veneer for this application) in the desired shape. It is thick enough to accommodate your wood strips. The holes allow you to use small bar clamps to apply pressure to these strips. The aluminum strip distributes that pressure evenly and smoothly to the strips and holds them tight against the mold until they dry.
Materials needed:
- 2 pieces – 3⁄4” MDF (medium density fiberboard) 3⁄4x6x10
- 6 each – #8 x 1 1⁄4” all purpose flat head wood screws
- Cardboard
- Pencil
- Assorted drafting tools
- Center punch or awl
- 1 ” spade bore wood drill bit
- Drill press or power drill
- Band saw or saber saw
- Power sander (disk or random orbit)
- 1/16” x 1 1/2” aluminum bar
- Wood sealer – whatever you have around
For the purpose of this article I will discuss making a mold for a hatch opening with a half round forward edge.
The opening is 5 in wide and 8 1⁄2 in long.
The pieces of MDF should be slightly wider than the width of the hatch opening and a couple of inches longer. Begin by drawing the exact shape, of the piece you want to make, onto a piece of cardboard. I use the cardboard backing piece from a tablet. Extend the sides 1 in beyond the back edge of your shape – this allows you to run the sides slightly longer and trim to them to the correct length as you fit it onto your boat.
Cut out your pattern with a pair of scissors. Transfer (trace) the shape you have drawn onto one
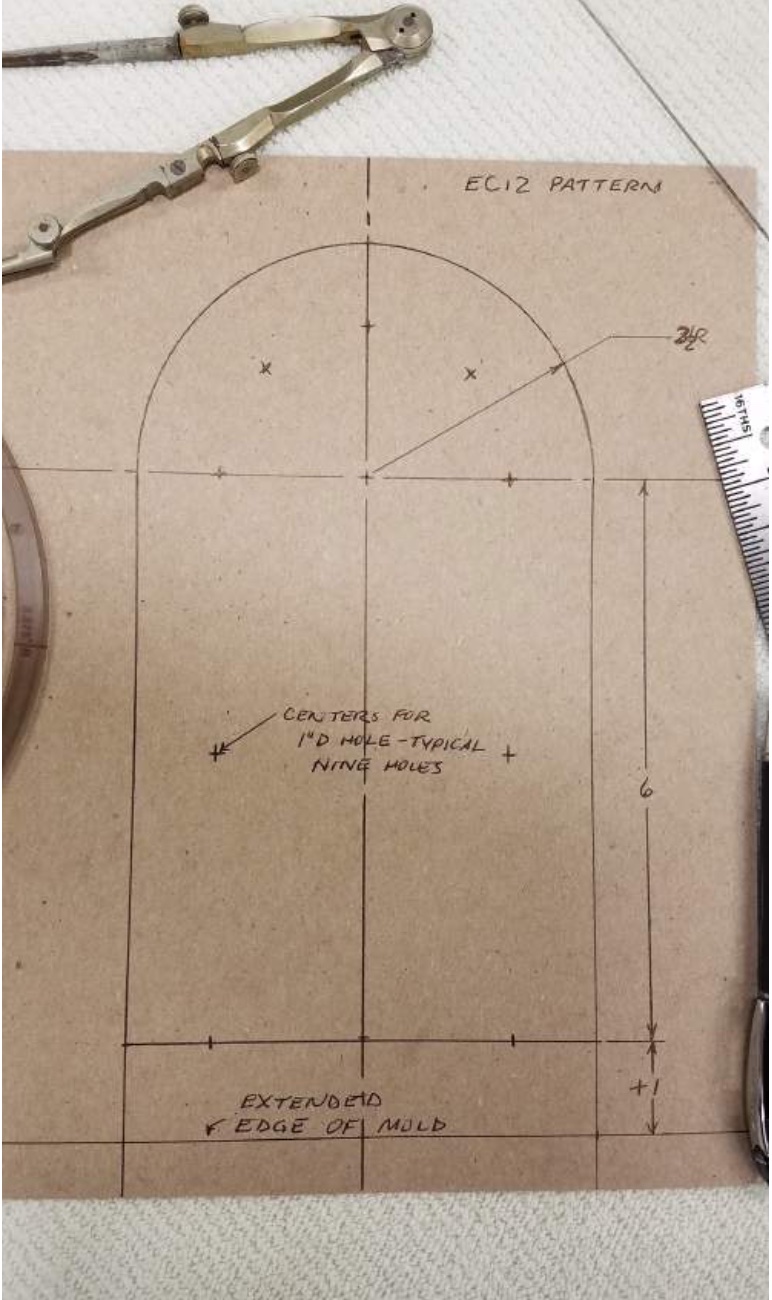
piece of 3⁄4-in MDF. You should tape the pattern to the MDF to accurately transfer the hole centers. Mark these centers with a center punch or awl. Fasten the two pieces of MDF together with the wood screws. Be careful to place the screws where they will not interfere with the holes to be drilled in the mold. Cut out the MDF using a band saw or a saber saw.
Leave the line and clean up the edge, sanding to the line, using a disk sander if you have one.
It is important to get the edge smooth, fair and square. All irregularities in this step will be transferred to the finished piece. So take extra care in getting the mold right. NOTE: As was done here you can fasten two or more pieces of MDF together if your finished piece is wider than 3⁄4 in.
You do not need multiple molds, one mold and the resultant shaped pieces you make can be used for all of the parts. What do I mean by that? For example: You are going to make a hatch cover with a round leading edge. The form can be used to make the hatch cover cowling in three steps – the piece that fits around the hatch opening and sticks up above the deck. The cowling when installed on the deck can be used to make the hatch cover edge band.
Drill the holes on a drill press using a 1-in spade bore bit. You may also use a hand power drill to make these holes. Place a backing board (scrap of wood) under the piece you are drilling to prevent tear out. You will need to cut a piece of 1/16” by 1 1/2-in aluminum a couple of inches longer than the total measurement around the mold’s edge, excluding the flat side (back edge).
This process can be used to make many different types of molds. See examples.
The next installment of this series will show how to “cook” the wood and bend it around this mold.