Model Yachts: How to Design and Build Them
Part II. The Hull — Materials — “Dug Out” Mode of Building — Block — Hollowing Out Sections — Layer Method — Adjustment of Pieces– Marking Off Water Lines — Roughing Out — Gluing Layers — Deck — Keel
I gave you in my last paper the way to put your model on paper. I will now endeavour to give you full instructions how to carry your design out in the wood.
The very first thing is to get wood that will not only stand damp well without shrinking, but will also be free from resinous matter and knots, and allow itself at the same time to be easily worked. My first model I made of white pine, and you can fancy it was more or less “riling” when one day she came to the shore, after I had been sailing her for some two or three hours, half full of water, the wood having shrunk, and the seams opened.
Perhaps had the seams been properly made, as I afterwards learnt to make them, the consequences would not have been so bad, but still I never used white pine again, and should advise my readers to avoid it. The best stuff you can get is Canadian; yellow pine; and when you go to buy it try and get a friend in the wood trade to go with you if you have one. I take it for granted you know enough about wood working to be aware that knots are things which can hardly be termed pleasant to work, so try and get your stuff with as few as possible, even if you have to pay a little more for picking and choosing.
Now there are two ways of building a model that I am going to explain. The first way is called “dug out,” and is made from a solid block of wood.
The other way is the “layer” fashion, and consists in fixing a series of planks one on the other, and cutting the model out then. Of course, there are other ways of building, for instance, like a real vessel, and then making two halves, and joining them afterwards, and the diagonal method, but none touch the “layer” fashion.
Firstly, then, the block. Having procured a nice piece of wood square it up exactly to the outside dimensions of your drawing, which will be 30 inches by 7 inches by 7 inches, and mark off on each side the horizontal and vertical lines, and the slope of the counter; and stern-post, and on each end put a centre line down. Then mark off the thickness of the keel, and the shape of your deck on the bottom and top respectively, and now you can begin to work with your tools. First, saw out pretty close to the line the part between the counter and stern-post, and then with a bradawl bore at each point where the vertical and horizon- tal sections cross, on the block, to a depth corresponding with the distance in the body plan, that the section on which you are boring is from the outside line, representing the square section of the block, or, in other words, measure off from the point of the bradawl, the distance the line VW is from section No. 1 on the respective lines C, E, G, K, M, P, and bore down to those various distances on the corresponding lines on the block. Treat the other sections in the same manner, boring down on each side of your piece of wood. You can either mark off the distance on the bradawl with chalk, or you can measure the distance, and put your nail there; the former is preferable though, I think. You can now set to with your gouges, of which you should have a fair assortment, both inside and outside ground, and pare off till you come to the bottom of the holes made with the bradawl.
Rough it out firstly, and then smooth it up after- wards, carefully work- ing across the curves, and not parallel o the water lines. The counter will have to be worked in gradually and carefully so as to run in nicely with the stern lines. Take care not to cut into the keel nor into the stem and sternposts. When it you have got her fairly into shape you can begin to hollow her out. Bore, with a centre bit, a couple of holes, one in the bow and the other in the stern, taking care not to go too deep, and having marked the thickness of your side all round the boat (about 3/ 8 of an inch), begin with a pretty quick gouge to scoop out first from one end and then from the other, letting the pieces split off in the centre. Take care you don’t go through the side, and keep on feeling, as you go down, how much wood you have to work on. Should you be unlucky enough to let your gouge slip through the side, patch it from the inside with a piece of wood, and the glue which I shall describe further on for the “layer” method. When you have hollowed her well out, finish up the outside with a rasp, and bits of bro- ken glass, and, lastly, with sandpaper, beginning with a coarse and ending with the finest, until there is not a: lump or hollow or angle of any sort on her. Now mark off the sheer on each side, and run that off with a spoke- shave; your model will then be finished, but I am afraid it will take you rather longer to do than to read how it is done. So much for the dug-out t method, of which I am not an advocate, but which, like everything else, has its advantages and disadvantages.
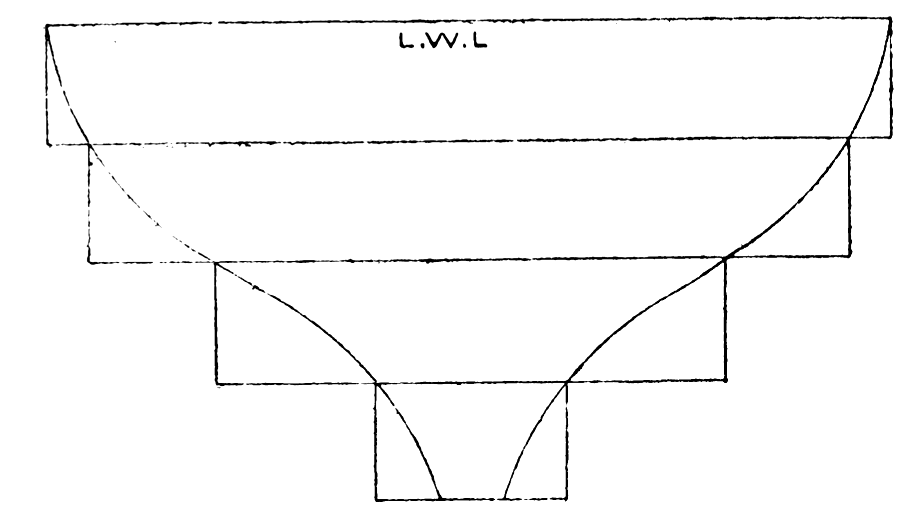
For the “layer method you must use the same yellow pine, or rather not the same, as that would be rather impossible; but I should say the same sort of yellow pine, viz., Canadian. In this method you get certain number of pieces, to correspond with the number of spaces between your water lines, and each the thickness of those spaces; in this case it will be seven pieces, each an inch thick. You will therefore have to get our wood a little thicker than an inch, so that you can plane it up an exact inch; and it will be a nice little job for you, if you can use your planes at all, to face these pieces up without the slightest winding on them, and to an even thickness throughout. If you cannot do this yourself, get a carpenter to do it for you, he will not charge much.
Wood disposed in layers for model yacht.
The widths of these pieces need not all be the same, as you will see by reference to Fig. 4; therefore, you must adjust your wood accordingly. Having got these several pieces in order, mark on the top one the shape of the deck line. On the next piece mark off the shape of the first water line; on the third piece, the shape of the third water line, and so on, till the last piece, on the under side of which will have to be marked the thickness of the keel. The thickness of the stem and stern posts must also be marked on the ends of each piece. I omitted to mention that a centre line should be drawn right round each piece of wood, and the midship section should also be marked right round.
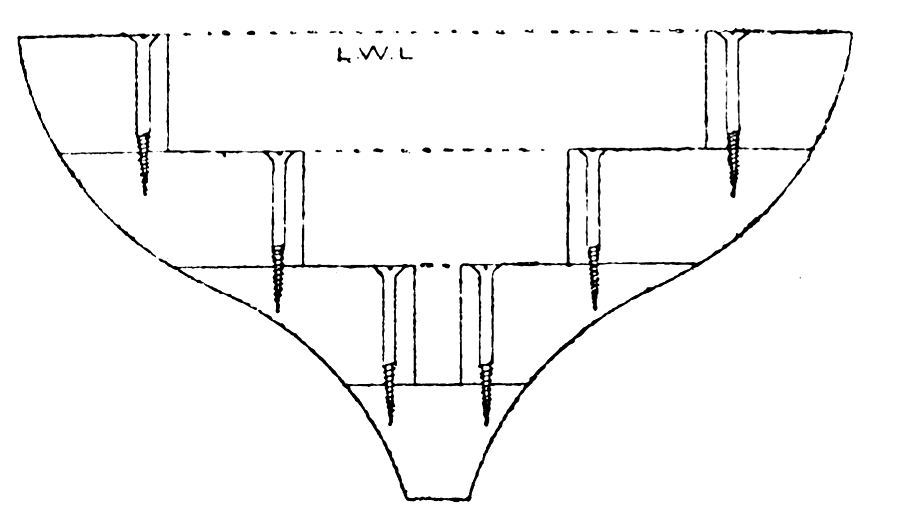
Mode of fixing layers together by screws.
To mark off the water lines from the drawing to the wood, you will have to mark off the different sections on the top side of each piece, and then measure from the centre lines the respective dis- tances that the different water lines are on each section from X Y, and then put in the curves with a spline. All this being done, take each layer and cut close to the line with a keyhole saw, cutting off all the four corners of the layer, and then with a spokeshave finish up carefully to the line. To test if you have marked off correctly the water lines, take each layer and place it on the half breadth plan, so that the centre line on that layer corresponds with the centre line on the drawing, and No. 1 layer should fall exactly along the deck line; No. 2 along the first water line, and so on.
Now take the bottom layer and place the last but one on it, so that the centre lines and midship sections correspond exactly, and screw them together with screw at each end, Fig. 6. (As the layers are 1 inch thick, a 1 1/2 inch No. 8 will be the best to use, and let them be of brass, not iron.) Then mark off on the midship section line a distance from each edge, where you can put a screw into the section underneath, without fear of its coming through the side, Fig. 5. Treat all the layers in the same fashion, and you will then have them all screwed together with four screws in each layer, two at the ends and two at the sides.

Diagram showing longitudinal view of layers attached by screws.
You can now begin paring off the corners and finishing up your model in the same manner as described for the “dug out,” taking care not to go beyond the proper water lines on the top side of each layer. When the roughing out is completed, take her to pieces again, e.g, unscrew the layers, and on each side of them mark all the way round the thickness your boat is to be — say 3/8 inch, taking care to leave space round the holes where the screws have been, as these will have to be put in again. Now, with a keyhole saw, cut as near round the underside mark as advisable, so as to leave nothing but the outside shape of each layer, and then pare off the rest from the top side with a gouge afterwards (Fig. 7); but, once more, do not forget the screw holes. The bottom layer is, of course, left intact.

Fig. 7. Mode of fairing off layers with gouge.
You will now have to turn your attention to the glue with which to join the layers permanently.
I came across some stuff quite accidentally, which answered the purpose “to a T.” It was the composition they use for fixing down oil-cloths, and can be bought in tins for 1s. each. This, diluted with a little spirits of wine, should be smeared on the bottom layer with a brush, and the next layer then screwed carefully into its former place. The others must be treated in the same manner, and when all are screwed together again, turn the boat upside down and place heavy weights on the keel. In this way it should be left to dry for about a couple of days, when you can begin to finish her up on the outside, and smooth her on the inside, just the same as for the “dug out.” Cut the sheer also as described before, and then think about your deck. But, first of all, prepare two little beams, about 1/ 2 inch deep and 1/4 inch or 3/8 inch wide, to go across the boat (Fig. 8), and let them into little niches made in the side. These tend to support the deck and, moreover, give it a curve, which not only looks prettier, but also allows the water to run off better.
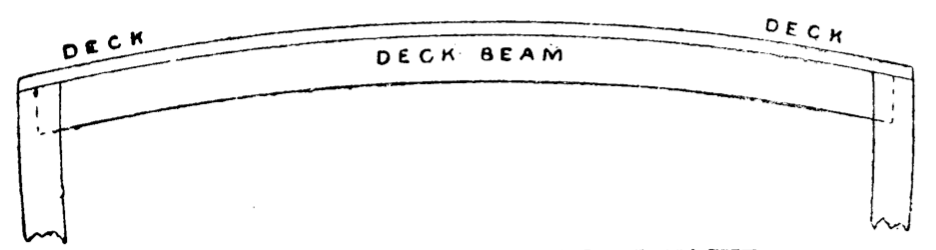
Fig. 8. Deck beams for model yacht.
Now, for the deck, get either a thin piece of mahogany, if you like the look of it, or if you prefer a white deck (which, by the way, is apt to soon get knocked about and look dirty), select a fine piece of white pine not thicker than 1/8 or 3/16 inch, and having planed it nice and smooth on both sides, rule the top side to imitate planks, with a hard lead pencil. Then give a coat of good copal varnish all over, top and bottom, and let it dry, but do not put it in a dusty place, or the appearance of the deck will be marred to a certain extent.
While that is drying, you must excuse me if I ask you to set to work at your hull again. I omitted to say anything about the keel, which you will, no doubt, have noticed, looked frightfully clumsy, at 1/2 inch thick.
You should leave it the 1/2 inch at the midship section, but from there taper it gradually both fore and aft, bringing the stem-post about 1/4 inch thick and the stern-post about 3/8 inch. The lines close up to the stem-post and keel will have to be fined away a little also. While we are about it, it may be as well to mention that a piece of hard wood, oak or teak, should be let into the front as a stem-post; the best way is to cut a piece of the present stem-post away, down to about the fifth water line, and screw the other in its place, put- ting a little cement in to make the joints, and trim- ming it into shape when in place.

Fig. 9. Diagram for rounding off “fore foot.”
By this time, I dare say your deck is dry; if so, screw it down with a small screw (brass 3/8, “No. 3”) at each end, and one or two in the sides, and then trim it off to the shape of your boat. It must not be fixed down permanently just yet, because you will have to get at the under side of it as you will presently see, but it should be taken off again when shaped down, as an undue strain is put upon the screws that are at present holding it in place. Take care you don’t loose your deck beams now, since they ought not to be fixed as it keeps the ship too rigid, there being always a certain amount of “working,” in even a model when she is “under weigh,” which it is as well not to pre- vent to too great an extent.
The keel will next require your attention, I think, but I shall only tell you in my next chapter how to find the weight that is really required to put her in proper trim, so I shall only suppose a certain amount now, and we shall see afterwards how far we are out. Suppose then you have found five pounds is required to bring her down to the water line, or rather say, suppose your keel is to weigh five pounds. Now a pound of lead contains 2.435 cubic inches; therefore, the cubic capacity of your keel would be 12.175 inches. Now the mean thick- ness is 3/16 inch, the mean depth would have to be 1.8 inch, therefore, since the length is 21 inches (as the other 3 inches must be left for the rounding of the “fore foot”). Now make a diagram like Fig. 9 (if there is room on your drawing do it on that) full size, by drawing a line1.8 inch away from the keel line, and making a parallelogram through the extreme points of the keel by the lines A C, B D.
Now strike a curve with your spline and divide the lower part of it by the line G H. Then, if you think A, C, E is about equal in area to F, G, H, and B, F, D to G, H, F, your keel curve will be about right, but if not, you must alter it till you think these parts are equal, making the keel rather larger than smaller, since you can always trim a piece off but can hardly stick a piece on.
Now round your forefoot to fall easily into the curve of the lead keel, and then you can set about getting it cast.
Make a nice smooth pattern of it, and do not for- get to make about four holes at different places right through, to admit of its being screwed on to the boat. If you go in for casting yourself, all the better, if not, get a founder to do it for you. When it is cast, weigh it, and I daresay it will not be very far out in its weight. Take off any superfluous weight with a spokeshave, and then trim it up nicely with a rasp, taking care to keep the surface which joins the boat flat and square with the centre line.
With a little putty underneath, screw the keel well home to the bottom of the boat with suitable screws, having first ascertained that it stands upright or rather straight with the centre line of the boat, because a crooked keel is out of the question.
I shall give you in my next, how to find the real weight of the keel, as I think, for this month, you have quite enough to do.