- YAMAHA 40EX ANTHONY CORBETT builds Tamiya’s Cruiser Yacht
- small YACHTS – MIKE KEMP reports on a couple of radio events and a first for this column – a vane regatta report – plus the league champions draw to a conclusion, but are not settled yet!

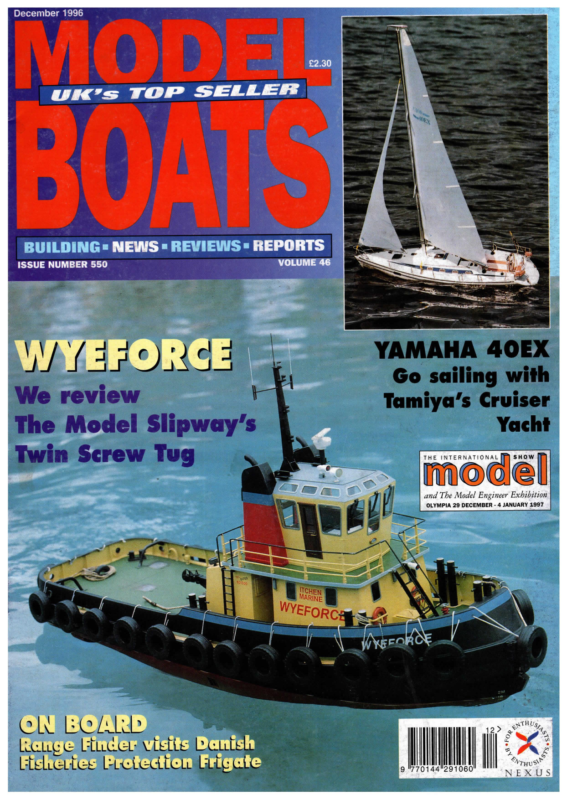
December 1996 VOBE wit7s TOP SELLER BOAIE BUILDING = NEWS = REVIEWS= REPORTS ISSUE NUMBER 550 VOLUME 46 SHOW [| ode INTERNATIONAL nn and Engineer Exhibition a10 OLYMPIA 29 DECEMBER – 4 JANUARY 1997 Range Finder visits Danish Ersh@rres Protection Frigate antsy, oS Yawf 3 K: ia aiU “3
— Ty AMAHA ANTHONY CORBETT builds Tamiya’s Cruiser Yacht Background Before turning to the box of bits itself, readers may recall the Tamiya Whitbread 60 kit that was brought to the market back in ‘93/°94, if memory serves. I recall wondering why Tamiya introduced the model as one of it’s range of 1:20 scale sailing boats, especially as there weren’t any others?! However perhaps this new kit is a sign of more to come, although one cannot ignore the Yamaha connection, sponsors of the fullsize Whitbread 60. From the blurb included in and on the box, I gather that Yamaha manufacture a range of sailing boats and that the 40EX is 11.98 KIT REVIEW The completed Tamiya EX40 Cruiser Yacht kit. metres long by 3.89 metres beam. The interesting thing about boat-builders is that their product names often bare little resemblance to the yacht’s actual size. Why for instance, in these days of metric, would a foreign builder name their boat a 40EX when it is 11.98M long (equivalent to 39ft 4ins in old money)? The other question is whether this dimension relates to water-line, over- deck or stem to stern length and in our case it appears to the latter, possibly including the pulpit overhang in the best French tradition of mass-production. I assume the Trade Description Act doesn’t apply to boats! The lines of the hull and fin suggest that this yacht was designed as a cruiser-racer, although I find it difficult to believe that the fin is scale, as it gives the boat a draft of close to 12ft. However the photographs on the box showa boat rigged for short handed cruising with a mast-head rig, fully-battened mainsail and furling genoa. Things worth bearing in mind if you are keen enough to improve on the accuracy of the basic kit. Requirements To build this model for sailing you will need the kit, a basic two-channel radio control set complete with transmitter (TX), receiver (RX), two servos, switch and battery case. You will also need He racing radio-controlled yachts, aving written the occasional article readers:may be surprised to see my name associated with a kit review. In fact I did have to ask myself why the Editor thought me worthy enough to trust with the building of such a model, however there may be some method in the madness- if I can do it, anyone can! Well I ‘m afraid that I will have to begin by admitting that it’s some years since I applied myself to building a kit, although I suppose that up until my spare time became dominated by girlies and boats, not necessarily in that order, I used to be quite a keen modeller. This adolescent enthusiasm was drawn back to such hobbies about nine years ago, when I bought and eventually built MODEL BOATS DECEMBER 1996 (finished some five years later) my first radio-controlled aeroplane. This was soon replaced in my affections by radio-controlled yachting, my obsession for which has been adequately recorded in past missives. Anyway, returning to the case in hand, or more accurately box I suppose, being presented with this Tamiya kit brought back memories or the cars and remote-controlled tanks (“fly-by-wire” as they were then) that I built all those years ago. I remember being impressed by the thought that had been put into these models and the excellent finish that could be obtained with fairly basic skill levels. So would this latest kit live up to expectations and more importantly would it sail? batteries, 12 of the AA type and you may wish to seriously consider buying rechargeables if you wish to avoid disassembling the model each time the boat’s power supply fades. This means you need a charger as well, adding to the expense. So before investing all your money, it’s worth thinking about how often one will really sail the boat. I’d have to say here that having built the boat, I see this more as a scale model that can be sailed rather than the reverse 37
The Tamiya EX40 in it’s raw state. CRUISERYACHT ,[S. 1/20th SCALE RADIO CONTROL oD, area The boxes and components that make up the kit. The only part omitted is the mast which is a length of oval shaped aluminium yy eM TH extrusion. fix the rig to the boat. These in conjunction with industrial size bowsies to adjust lengths etc. in my view really spoil an otherwise well designed kit, so I decided that these would be scrapped. My other pet hate was the bent aluminium spreaders supplied with the earlier Whitbread kit and was surprised to find that this model has raked spreaders moulded in plastic. but then I am used to sailing proper boats! In the box Anyway back to the box which is covered in useful information to tempt the prospective buyer as well as some photographs of the real thing. Lift the lid and you are presented with what I believe to be a well-packaged product typical of this particular manufacturer. It is also virtually bullet-proof, so I’d be surprised if any bits were missing or damaged by an escaped The one piece hull and deck, together with the transfers which transform the initially bland looking moulding into an attractive model. ballast. I must admit to some surprise in finding that the hull and deck come supplied as one piece but thinking about it, this appears to fit in with what I perceive as the logic of supplying a relatively easy to build kit. The instructions are also a magnificent piece of work in themselves with a comprehensive guide to just about everything one can think of including the tools needed to complete the kit, radio safety, radio-gear, tuning and sailing the finished model. So having put so much effort into producing the manual, then the least we can do is read them before we start building. Well I must have missed a few bits, but anyway | did scan the pages knowing from the photographs that there were certain elements of this kit that I did not like and would have to change. Fortunately after much thought, my changes were to be focused on the standing rigging (the bits holding the mast up) and these will be covered later. I also toyed with the idea of painting the hull as it looked incredibly bland in it’s naked white. Alright, I know most mass-produced boats are produced in this colour (a la Henry Ford) but it is boring. After more musing I decided that probably anyone seriously interested in this kit and review will probably have similar skill-levels to myself (none!) and therefore be more interested in whether this kit will help them produce an acceptable model as reward for their efforts. So I stuck with it as intended and in hindsight, without regret. The bits I don’t like are the rigging and the use of chord for shrouds and large hooks to 38 My other whine is the sails. These really are disappointing and are accurate only in their colour. Given time I would have made my own set, drawing the battens etc. for a scale effect and rigging the reefing stays out of thin whipping-twine. HoweverI again decided that this would not well serve the people for who this kit is intended, so I swallowed my misgivings and got stuck into the kit in earnest. Making a start Having mulled over the above, it was time to familiarise myself with the bits and start tearing into the treasure chest of boxes. There is one very big box that was found to contain two small ballast weights. The main ballast weighing in at 665 grammes with a smaller one, to be fixed later within the hull as a trim to balance the batteries, —- of 100 grammes. As usual, each moulding is referenced with a letter and all individual parts numbered, the whole being cross-referenced to the instructions and each logical step in the construction of the model. Other than building the stand as the first stage, I set about painting the components as clearly indicated in the instructions. This is fairly straightforward and most of the parts were painted on their frames as supplied in the kit. Yes this does mean that some need touching up after detachment but this seems the easier way of approaching the task where there are so few components to be painted. The alternative is to construct some of the assemblies and then paint, and the reader might well consider the winches, pulpit and pushpits for this treatment. These can be built and pressed onto a low-density foam, such as the blocks available from florists, to hold them during painting. Most of the other parts are best painted as described. This step also involves painting the hatches on the deck moulding, so after the paint, the kit was put to one side overnight before starting the next stage. After the stand and painting, the next job is to apply the numerous transfers that bring the hull and decks to life. These included panels representing the teak panelling to the cockpit floors and benches, as well as waterline and coach-roof sides. My only criticism here was the use of a metal coloured transfers to colour the genoa sheet tracks and fairleads. Again I stuck with the kit but felt that careful painting would be a better long term solution. The only difficult thing about this operation is the cutting out of the transfers themselves. You will need a sharp pair of scissors and a scalpel plus a metal straight edge for removing some of the longer pieces. The instructions say cut along the coloured edge of the transfers however this strikes me MODEL BOATS DECEMBER 96
After painting the components, the first stages include applying the transfers to hull, v coach-roof and decks. as a little misleading for the inexperienced. Most of the transfers are applied to areas where the transparent base will not show, where an erratic cut will be horribly trays and servo arms come designed to accept most of the systems commonly available. My only concern was that the sail arm system, used to control main and jib apparent. It probably seems basic to you sheeting was to be fitted to a standard servo, but given the light ballast and displacement paper not the scissors when cutting curves deficiencies, it is probably true to say that the loads on the servo will be quite light. The whole of this installation is well modellers but I always remember a primary school teacher showing us te revolve the and to cut to the right side of the trimming line. Funny what sticks in your mind isn’t it? Anyway I managed to extract most of the transfers without incident and “dry fitted” them to make sure of position and whether any further trimming was required. As to the sheer and water line transfers, the hull has guides moulded in making the whole process a doddle, providing you remember that the water-line guide is for the top-edge viewed right way up. Having completed the hull, I worked through the rest of the manual and applied the remaining transfers to all of the parts as indicated. So far I had spent about four hours actually working on the model and it was time to put it to one side and start on dinner, something to go with a nice Rioja I think. Back to work Stage 4 consists of applying the toe and hand rails together with fairleads and cleats to the hull and coach roof. This process Starts to involve some fairly small self-tapping screws, so have your tweezers and a decent Phillips screwdriver to hand (a cross-head jewellers screw driver is not up to the job as these are self-tapping screws). It is here that we also get to insert the rudder tube which struck me as an over-engineered, but probably idiot proof item well suited to your correspondent. Radio equipment We then get to install the radio-gear in stages 5 through to 9 and once again this is an extremely well thought out solution and much improved since it’s predecessor. I had an Acoms system to install and was impressed by the fact that the equipment combined with the small sail area and rig thought out, albeit that the trays are inserted through a deck-hatch – you do not want big hands for this part – and aligning the pillars with their fixings is not easy. Start with one of the aft pillars first, then align the second before fixing the forward one. Finish off by fixing the keel tube from beneath the hull. The rest is fairly straightforward other than the RX tray fixes over the top of the battery pack, making ni-cads the preferred solution. I’d suggest buying the highest capacity cells available remembering that this model is going to operate on a four cell or 4.8V pack. The RX position directly below the hatch makes access for crystal and frequency changes very easy. One word of caution, the jib and main sheets are installed at this stage and it is important to ensure that neither gets tangled with the trays or the RX antenna. Secure all the loose ends with tape to the hull as you go and there shouldn’t be any problems. Keel and rudder Stage 10 consists of fixing the keel and rudder. The keel comes in two halves with ballast fitted in between and then screwed together. I was suspicious of the keel support which is made up of a3mm stainless steel shaft retained in the keel moulding by a circlip. Most of the side loads are taken by the keel moulding’s fit into the hull but that circlip looks small even for such a light kit as I found that the rudder was unacceptably loose within it’s tube. A couple of washers beneath the retaining nut sorted that out and I was then free to connect the rudder rod and check the radio and servo alignment. Another 3 1/2 hours and I wonder what’s for supper? Fitting out We’re now coming up to the final straight as far as the hull is concerned, with stages 11 -17 covering the fitting out. This includes the construction of the winches, helm, transom boarding ladder, seat, the main hatch, pul and pushpits (or owner’s chairs as referred to in the instructions, although Heaven knows why an owner would want to sit in one of the most exposed places on the boat?!), stanchions and lifelines. As I said earlier, it might be worth considering building the chairs off the boat as they are a bit fiddly and better painted after construction. The pulpit is probably easier to build on the:boat as the deck positions help set thé flare of the stanchions, Stage 12 includes starting the standing rigging with the parts of the backstay. I left these off to be done with the rest of the rig. Far left: The keel consists of two half mouldings screwed together with the ballast in between. Theaiithor was a little concerned about the thin locating rod retained by a small circlip, but it is hard to imagine Tamiya getting this wrong. It all seems to work in practice. A moulded servo tray is fitted through the main hatch and holds both servos and the battery pack. The sail arm restricts removal of the battery pack ….. ballast. It’s worth noting that the fin isn’t sealed, it’s got a small hole to allow it to drain. Installation is easy although fitting the small snap-pin through the keel-shaft could have been a lot harder than it proved. Obviously no hangover that day! It was at this stage I found that I had lost the covers for the keel fixings but some small pieces of white insulation tape soon resolved that and it was time to install the Sas which is made worse by the RX shelf being fixed over the lot. The shelfholds the switch and gives excellent access for X-tal changes etc. All in all, a well designed installation. rudder. This was one of the few areas where I could have criticised the engineering of the MODEL BOATS DECEMBER 96 39
The rudder, when fitted in position, was found to be very sloppy. A couple of small stainless washers minimised the problem….. tens and the whole assembly is hidden by an effectively sealed cover. The rudder assembly is covered by a sealed lid, again an improvement on previous models and the helm’s seat and boarding ladder are held in place by self-adhesive Velcro; fortunately as I had over-tightened shrouds, I decided that a better scale effect would be achieved with the line supplied. The reader will see from the photographs that I decided to add a sheath to the lines in the rudder. It is also worth noting that parts D2 and D3 seem to be missed from the might have seen similar additions in the form of pipe insulation hanging on the lines of the real thing. This is there to make it more instructions and these glue in place on the top of the transom. They have to be fitted as one of the stanchions for the owner’s chair is fixed here. The main hatch relies on an insulating tape for water-tightness, which seems adequate and is held in place by brackets making a snap-shut fit. It has to be secure as the main sheet exits through it, but subsequent removal is a little challenging. Keel and rudder are fitted after the radio Lifelines The final part is the installation of the installation and the stanchions, followed by the lifelines. It is model starts to shape worth remembering that yacht stanchions up. tend to be flared slightly out away from the vertical, so that they do not intrude on the deck space (and hence crews’ legs) when the yacht is heeled. The hull is virtually finished The fittings are then applied bringing the boat, except for rig close to completion. It is worth thinking about leaving the lifelines off antil the model is completed. The kit components were discarded when it came to the standing rigging. Shrouds were fitted to the mast by passing the 0.45mm the region of the cockpit. Visitors to Marinas comfortable for the crew to sit on the edge against the life-lines – for the cruiser it stops the lines digging into your back when your enjoying the G&T. Anyway I added some thin PTFE tube, the black was too shiny, and feel that it gives the correct impression. These stages took about three hours, so I set about preparing the sails whilst the glue and paint hardened on the stanchions. I wonder whether North know about the sort of sails their logo is being applied too? The funny thing is that for sails which are simply triangles cut out of some light-weight spinnaker cloth, the batten positions are incredible precise. Well I suppose precision is typical of this manufacturer and not being one to argue, I finished off the sails as instructed, which basically means applying head, tack and clew reinforcement made from light self-adhesive plastic. I applied the battens on alternate sides of the sail cloth to avoid the weight pulling the sail roach over in any one direction. The rest of the work consists of applying the last of the transfers. now and the next stage suggests applying the life-lines. This is fine if you are sticking with the kit as far as the rig is concerned but if you opt for any variation, then I’d suggest (for reasons that will become clear later) leaving these until the rig is installed. As it was I found out the hard way and applied the life-lines as instructed, living to regret it. I pondered the life-lines briefly and had considered using wire rather than the thin with construction of the mast, main and jib booms. This is probably the time to discuss my ideas on rigging the yacht. white line supplied for the job. Those that have sailed the real thing will know that in Rigging thoughts most cases, and certainly on serious cruising yachts, the life-lines are often encased in a plastic sheathing, reducing the chance of chafe from the life-lines onto sheets, guys and mooring lines. It also prevents some nasty abrasions to the crew. Given that I was also going to use some fairly thin wire for the We’re now definitely on the final straight The fully rigged model, on it’s stand measures approximately 1.10M high by 0.65M long. If you want to sail it a lot, it will probably fit in most cars, so making the rig removable didn’t strike wire through the mast, me asa threading on a crimp, priority. The kit itself is designed to make removal and fitting of the rig very simple, the down-side being that all the standing rigging is made up of chord, industrial strength bowsies and large hooks (purloined from the fishing fraternity) which in my view, spoil the scale affect of the model. The mast also gets covered in large cleats for adjusting the forestay etc., all of which looks incredibly: untidy. My alternative was to rig the boat using the thinnest wire available, with the rigging adjustment being done with the smallest bowsies and rigging screws I could find. None of the following will be new to those used to rigging the modern MYA elasses, however for the uninitiated the common method for attaching shrouds, at least to aluminium masts, is to thread the shroud through holes in the tube, out the head of the mast, apply a crimp to the looped wire looping the shroud, then making tt off. With the shrouds pulled back into the mast, the crane was fixed in position. Far right: A photograph of the end of the backstay to help clarify the process for cutting shrouds to length. The tail of the wire is cut-off after crimping and the shrink wrap fitted over to tidy up the end. Above left: The model was levelled and a plumb bob hung adjacent to the mast to help with the vertical alignment. The business end of the shrouds with shrink wrap in position but unfinished. The rigging screws used to attach and tighten the rigging are clearly visible. 40 these being a feature typical of fractionally rigged yachts (small jibs or genoa that are rigged to a lower point on the mast). For a cruising boat, swept spreaders can cause unnecessary wear on the main during off-wind legs. There’s probably an obvious answer but it did make me wonder whether the yacht has a fractionally-rigged option featuring a lighter mast for racing. Returning to the model, we end up with the worst of compromises as far as the sails are concerned and I’ll explain whya little later. So we’re faced with the mast and stage 19 which covers the attachment of the mast and pull back down the mast. crane, spreaders and various cleats. Well I This was the way I was going to knew I wasn’t going to use the cleats and rig this model, so it made sense to get all the other bits made up didn’t want to fit anything else until the before tackling the mast, which would end up with a lot of wires hanging off it. My other whinge is the jib. crimps (0.45mm diameter seven strand The actual yacht featured in the photograph shows a mast head rig as described earlier. I’m therefore unsure why the mast and there is always trace wire from the fishing tackle shop) and proceeded to check exactly what standing rigging is specified. As far as shrouds go, the mast features has spreaders that are raked aft, cap, intermediate and lower shrouds, the shrouds are on, so I found my wire and flexible wire bought from Sails Etc. although I believe a slightly thicker alternative is available from Nexus supplies – MODEL BOATS DECEMBER 96
appearance. It was as I finished the sails that I discovered other problems that I should have recognised much earlier. Having religiously (ish!) complied with the instructions, it was only when I started to tie off the sails that I found the reinforcement patches at head and tack of both main and jib, should have been The final hull fitting out stages can be seen here with the handrails, stanchions, life-lines, helm and “owner’s chairs aft. applied close to their respective luffs, rather than behind the seams as shown on the plans. The problem is that in both cases, the tie off points on the sails are behind their respective rigging points, meaning that both sails are pulled too far forward. I accepted spreaders, so I needed to drill some holes in the mast for these. This I did with a 1.5mm drill bit and hand drill. The forestay and backstay attach to the mast crane (which is grossly oversized on the model) and as alluded to earlier, we have a strange solution in that the model is supplied with a fractional jib that is fitted to with a small turning block to take the bights referred to previously, added some shackles to the transom fittings and threaded some line to an approximate length, with a bowsie for the jib as it was for now, but drilled a new tie off point in the mast crane for the main and relocated the reinforcement patch at the tack, so that the cunningham pulled directly downwards. If you decide to build this model, locate all the patches as close to the sail edges as possible. As to the rest, well my experience with adjustment. This struck me as a more accurate proper (?!) boats lead me away from the idea representation of the real thing although detachment would be a more fiddly job. With the backstay roughly set to length, of tying everything off in fixed positions. Having purchased lots of small bowsies from Sails Etc., I attached the clew and tack of another hoist within the fore triangle. This was to give me a few problemsa little later as the forestay (without jib, see earlier paragraph) was awelcome datacompdded and adjusted to length by trying to get the mast close to vertical pulling against the backstay tension. As will be seen from the both main and jib so that there was some room for adjustment. I had fixed both sail heads so an adjustment for pulling down on the jib luff had to be added; note that the jib boom has to be held in place by knots on either side of it’s boom end, otherwise it will just fall down onto the deck. I must say that latter two being shown as tied to the there is only one attachment point for both forestays, and hence only space for a single rigging screw without reverting to an adjustment at the sail head. As I did not perceive the model as a serious sailing boat, I was not too concerned, but am still playing with various solutions. Getting back to the mast, if you decide to adopt a similar approach, then start by rigging the lower shrouds and working up as this avoids tangling the shrouds and crimps as you go. As the shrouds are installed, the wire is cut off some 100 -150 mm below the mast bases, to make sure there is sufficient wire to pull tight when the rig is fitted to the boat. Remember it is easier to make things shorter than it is longer! After this, the crane and spreaders are fitted and although I had some concern about using a plastic spreader, they are probably better and closer to the real thing than anything I could have fabricated. I was now at the stage when all the pieces were ready to finish the rig, so I turned my mind to how I was going to fix the rigging screws. The kit itself is supplied with a metal bracket that is screwed to the deck, with two holes to take the shrouds. Bit of a problem here as there are three shrouds each side so I decided that given the caps and intermediates are both outboard on the lower spreaders, the lower shrouds should go to the inner rigging screw and the others, to the outer. As to fixing, well the kit contained a lot of spare screws left from the fittings I hadn’t used, so I drilled the rigging screw ends with a 1.8mm bit and used several 2 x 4mm selftapping screws to fix the rigging screws to the brackets. God smiles on the virtuous, however theses rigging screws only have a few millimetres of adjustment, so I was aware that it would be important rig the shrouds close to their optimum length. With this done, it was time to face up to installing the rig, so of course I packed the boat away and made a serious G&T. Finishing| The next time I was to get the kit out, it was to finish the boat. Bending the main onto the mast and fitting the boom is straightforward and fortunately for me, the mast will stand in it’s deck mounting without much support. This is helped by the fact that the vang (or kicker) is rigid and clips to both boom and a deck spigot fitted behind the mast. With the mast on the boat, I measured from the table top up to the water-line to get the boat level fore and aft, then levelled across the deck before hanging a plum bob adjacent to the mast to help me align it vertically in the boat. MODEL BOATS DECEMBER 96 I then attached the backstay, finishing it photographs, the process for finishing off the rigging is as follows. Thread on a 10mm length of shrink wrap followed by a small crimp. Thread the shroud and return the end through the crimp. Pull tight, force the crimp down and close the crimp with some pliers or this arrangement is far from ideal but is certainly no worse than the kit’s rigging plan. Basically few of the sail controls are designed to work efficiently, so I assume that a crimping tool. For safety one should performance was not one of the major compress the crimp at each end but I tend to apply light pressure at first, just to hold the rigging in place whilst I check for length etc., considerations in designing the kit. Other than the minor niggle about the kicker attachment points not aligning, it is fairly obvious that without a balanced boom for the jib, the boom will lift in any breeze and depower the sail. Finally the sheeting lines were attached, with small bowsies added to allow for some adjustment, their lengths checked and and fit that particular piece of riggings opposite number. Once one is happy with the lengths, finish the crimps, cut off the excess wire and slip down the shrink wrap, thus containing the end of the cut wire. Installing the mast meant setting it vertically fore and aft, backstay and forestay, then fitting the cap shrouds as these are really the only ones providing any real support or control for the mast, especially when sailing. Having set the mast trimmed and finally the shrink wrap fitted to seal off all the standing rigging. With all this done, it was time to go off for a trial sail. Sailing the boat The problems experienced with the jib boom can be clearly seen as the boom lifts in a gust. See text. vertically sideways and fixed both caps, I did the same with the other shrouds, pulling each as tight as possible given the rigging screws would have such little affect. This is where I ran up against the problem with the life-lines as they made it difficult to crimp off the shrouds and adjust the rigging screws. There is certainly nothing to prevent these being added after the rest of the rigging. With all of this completed it was time to add the jib by removing the line threaded in it’s luff and slipping it over what I can only refer to as the inner forestay. This had been added to the mast at the same time as the shrouds. Again I had a problem here as, like the shrouds, my only solution was to fit the lower end to the same rigging screw as the outer forestay, which was bound to give me a problem with jib luff tension for sailing. I considered fitting the jib to the outer forestay and doing away with the other but having not placed the boat on the water as yet, it seemed more sensible to keep this solution as a last resort. The alternative is to do away with the outer forestay, but this might result in the backstay bending the mast too much, so I stuck with the principle of the Tamiya rigging plan, knowing that my favoured option was to scrap these sails altogether and make something more real in 41
YACHTING MIKE KEMP reports on a couple of radio events and a first for this column – a vane regatta report – plus the league cha mpionships draw to a conclusion, but are not settled yet! [# fortunate enou gh to get a slightly different view of the 1996 Midland District Ranking for One Metres – | was ‘invited’ to act as Race Officer. I’m not sure whether I should take it a complime nt or perhaps I was the only mug available to take on the job; all the others wanted to sail! | certainly enjoyed the challenge of settin g a suitable course, I only wished I could then have sailed it for we were bless ed with a decent wind. Not only that but the venue was great: it had to be share d with some dinghies from the host club but they were not too much bother, indeed one or two provided some light relief from the tensions of hectic racing when they demonstrated that, havin g no heavy weight on the bottom, they are inherently unstable and can ‘fall over’. With an entry of thirty-nine, reduced by two when the time came to start racing, we appeared to be in for a hectic day. The entry was split into three heats for seedi ng and then followed up by a three heat EORS sequence which no one skipper mana ged to dominate. With the co-operation of all we were able to keep the regatta flowing along so that a total of six races were completed: this doesn’t Seem very many but is a total of eighteen heats and easily matches the strike rate achieved at the recent One Metre Nationals and a much more exper ienced organisation team. In addition to the event being allocated as the 1996 Midland District One Metre Ranking Race we were also racing for the ‘Isis Trophy’ which had been promoted in importance for this year. On this rare occasion when we had a pretty constant wind to work with, David Fox and I were able to set a big course with an equally big start line with just sufficient bias to tempt the port tack starter. That it was just sufficient was demonstrated by the fact that only one or two managed to get away cleanly from that end during the day but, a little to our dismay, starters from all alon g the line were arriv ing at the windward mark in close company. It did also prove the point that a long line almost evenly biased helps to prevent too many start line incid ents: our only problem with the buoys ‘borrowe d’ from the dinghy course was that they didn’t turn very well when hit by a One Metre . With the windward mark in particular this didn’t really matter as everyone who hit it did so in such an obvio us way that it could be clear ly seen: this was one mark that appeared to be acting like a magnet for bow bump ers. As the morning wore on the wind rose to a point where I was bein g asked for time to change rigs as the numb er two suits were pulled out: later in the day it dropped back again and we were final ly presented with a short sharp shower of rain. Seemingly without drama tics Rob Vice slowly eased into the lead just a little ahead of Chris Dicks who might well have done better but for a repetition of some electrical trouble which had been seen at the Nationals a few weeks beforehand. Chris was not alone in suffering from minor radio faults as Martin Roberts was to find with his ‘other’ yacht being used for this meeting: the wooden ‘Midget’ let him down a little during the day. MODEL BOATS Rob Vice’s performance was an indication of how some of the other s were having a pretty variable time: he won only one race, recording third in one race, two fourths, one fifth and eighth in the last race, that still exists for half of the lake anda major ‘tower’ thing – presu mably part of the business part of the lake’s function as a Thames Water reservoir, the lake could be used for Vane sailing. Indeed a rarity these Midland District One Met re Ranking Top Ten Place Skipper Ist Rob Vice 2nd Chris Dicks 3rd 4th 5th 6th 7th 8th = 8th = 10th Chris Harris Mark Dicks Martin Roberts John Cleave Chris Jackson David Taylor Tony Edwards Mike Harris Club Clapham Clapham Bournville Clapham Birkenhead Ryde Woodspring Woodspring Leicestershire Bournville Design Tonic Metrick Magick Tonic Crossbow Midget Red Wine Aussie Skiff Dann-3 Kato Tonic Designer A Austin Total Score 16 C Dicks 18.7 A Austin 20.4 M Dicks 20.7 C Dicks 21 G Bantock 24.7 G Cameron N Gilson A Edwards A Austin 25:7 Sans 34 Chris Harris and Mark Dicks had a close tussle all day long with both of them recording two sufficient ly large scores to hurt when only one could be discarded. Among the trivia that can be pulled out of the results is the fact that there was Someone named Chris in first and/or seco nd place in every race but numb er two. John Cleave had an up and down sort of day although he did mana ge to stay in the A heat throughout as did Chris Jackson who was sailing one of the more interesting boats. Chris’s ‘Aussie Skiff’ is a Gary Cameron design and certa inly looks a little different with its wide, wide stern sections. That it is admirably compe titive was demonstrated by Chris getti ng it into * seventh place overa ll, just one point behi nd John Cleave’s ‘Red Wine’. For most of the organising team this was their first major event and they provided an excellent back-up to comp lement the venue. The Banbury Cross Saili ng Club is a ‘full sized’ club with a small yacht section also. Unfortunately the radio section is not only small in the relative size of the yachts it sails; there are precious few radio yacht members among the club total. The most significant at the moment is most certainly David Fox, manning the rescue boat for us at this meeting, who is the Club Commodore. What this club needs is an influx of radio yacht members; they have a superb venue: days: Couple this to a close proximity to the M40 motorway, a club hous e with all the usual facilities, and the nearby historical but modern town of Banbury and you have a truly precious venue for Radio Yacht sailing. It would indeed be sad if we lose this facility because there are so few members to maintain the club’s inter est in sailing craft of our size. A National Champ ionship would need an imported manageme nt group but that is always a possibility. A top skipper once told me “Ifyou’re thinking about challenging sail, it’s probably too late.” It’s too late for this heat at the 1996 Midland District One Metre Ranking race at Banbury as Martin Roberts (22) in Number 1 suit runs away from the pack who are all still carrying No. 2 sails. easily a match for many of the lakes selected for National or even International events. It is one of those rare sailing venues where the edge of the lake is very accessible for 50% percent of its perimeter and just accessible for the remainder. One comment made by a visitor was that, but for the sloping edge left: David Fox Commodore of the Banbury Sailing Club, presents the Isis Troph y to Rob Vice. DECEMBER 96 65
The Mac McCulloch Trophy was not blessed with too much wind in 1996. Here Fred Catt’s Dann-3 (27) leads the ‘charge’ at the start of a B’heat; Mac Colyer (33) seems to have found a bit’ on port tack. Mac McCulloch Trophy September 15th saw the re-dedication of this trophy that was presented in memory of a Mac McCulloch, multi-hull specialist Andy McCulloch’s Dad, who was member of my local club’s predecessor. Mac was very much a ‘gentleman sailor’ who used surprise many of us with the sailing performance of his almost antique ‘March Hare’ Marblehead. The meeting always used to be sailed in a fashion to perpetuate Mac’s gentlemanly behaviour. In its original guise it was raced for with Marbleheads and the last skipper of that ilk to win it was Nick Weall, a name that has not graced these pages for a while. In the meantime the club has transformed and transplanted to a different lake with a predominance of One Metres. So it seemed fitting that this class should carry on the tradition of our September Open Meeting. Nineteen yachts came to the line, some of them prompted by the nearing of the League season end as much as anything, under the Race Officership of Andrew Jefferies who was taking command of such a meeting for the first time. Andrew was ably and effectively assisted by Barry Seymour, scoring; and Jack Day, line watching together with a sprinkling of the home, Two Islands, accounted for the first places in the seven weekend of 21st and 22nd September a small races that followed the seeding round: David Taylor took the second of the seeding heats group came together at Witton Lakes in with his ‘Canadian plated’ Dann-3. While Paul and I were battling out at the front, close behind us – very close in many cases – a fair old battle was going between Mike Weeks club members who took on the role of observers; so that, once again, the majority and Derek Beere with Nigel Gilson, Mick of competitors could get on with what they came for. The weather was very kind for the time of Shillington and David Taylor joining in as well. the year, forcing the wary to spreada little of the sun cream about the exposed bits were called to a halt to let all get away for By the end of the day, when proceedings their long journeys home, the fleet had resolved itself into two or three obvious groups. Paul and I were just over four points apart and nearly twenty points clear of Mike because we had to suffer day long sunshine! Unfortunately the wind was slightly less kind and could be described as variable, basically Getting on for half the assembled personnel have turned out with radio yachts points in between, and that was during the length of one heat! Andrew tried very hard to give us all a beat from the start to the first mark; in most races he was thwarted but we usually got a beat somewhere around the basic triangle sausage configuration, even if turn were roughly ten points clear a rapidly at one time or another, the other half are improving Peter Salt who finally seems to be getting the hang of this radio yachting thing normally seen around the vane circuit. One of things that strikes me about vane after years of chasing a vane yacht around the lakes. The rest of the fleet were spread out behind Peter with some very creditable performance having been turned in by some of my club colleagues who were literally getting their first taste of this level of racing. meetings is that they are inherently friendly affairs; in most cases the yachts are sailed by a pair of people who have to work together if the sailing experience is to be successful. Unfortunately at this event there were several members who were ‘mate-less’ and probably would have had quite a torrid time if lots of tacks had been necessary to get the yachts from one end of the lake to the other. There is evidence that communication Having re-dedicated the Mac McCulloch Trophy we can now look forward to an even bigger entry for next year. between skipper and mate is not always what it ought to be, even between father and son when there is a family entry. There were two Mac McCulloch Trophy Top Five Place Skipper Club Design Designer Total Score Ist Paul Tickner Guildford Widget C Dicks 6.4 2nd Mike Kemp Two Islands Dann-3 N Gilson 10.7 3rd Mike Weeks Leicestershire Stomp GBantock 29 4th 5th Nigel Gilson Derek Beere Gipping Valley Three Rivers Dann-3 Bubbles NGilson AAustin 29.4 31. Frequencies and the amount of space around what was expected to be the windward mark meant that we could not be Chambers, with hat and Mac McCulluch Trophy to Paul Tickner. expected to charge around in one big fleet so a two heat EORS system was used. Even so, the total of eight races (sixteen heats), was a pretty creditable performance considering the lightness of the wind and provided some close competition, even if it was split into at least two quite distinct groups. To my surprise I started the day the way one normally only dreams of – four straight wins. Then I thought I would try and adjust the sails to better suit the conditions, that was my undoing because by the time I had got them back to something like what they 66 even ‘older’ yachts around a pond. In some cases the people chasing the yachts around the lake are the very same ones who have been mentioned in connection with the radio 6 Metre events. followed by the others I mentioned; they in quickly and without too much activity in the rubber rescue boat. shades, presents the did the Radio Section, relative to the more popular classes like the One Metre. Another misconception about such events is that they are populated by ‘old’ fellows slowly chasing Weeks in third place who was very closely reaching. The number of buoys spread around the lake meant that the almost inevitable course changes were made quite Chairman Charles event saw only a small group of yachts but so very light and swinging between south west and north east with occasional hesitations at it was when we should have been running or Two Islands club Birmingham to celebrate the 1996 celebration of the MYA 6 Metre National Championship. It is true that the 6 metre ‘free-sailing’ MYA 6 Metre National such combinations at this meeting and they came first and second overall, so the effectiveness of the communication between father and son could not have been that bad! On Saturday when the wind blew significantly they undoubtedly had to get to the leeward end of the lake as fast as possible because a six in that sort of wind can really get motoring. They had an easier Championship Those of you who regularly study my scribbling will be used to reading here, about National Championships of the remotely controlled kind: just occasionally I mention the ‘other’ form of model yachting that still survives in a number of places and has its particular devotees. It is not very often that we have a chance to see a bit more information about a major event: indeed I am should have been I had racked up a couple of relatively heavy scores. During this spell Paul Tickner leapt in to the winning spots and, having followed me home in most of my ashamed to admit that I had never actually been to a vane successful races had a good string of consistently low scores, he only discarded a claim to have broken part of that particular duck; I have 3 while I had a 7 to get rid of and then had to count a six. Nevertheless, between us, we now witnessed at least part of a vane championship. On the competition, yet alone participate in one. I can now MODEL BOATS DECEMBER 96
MYA 6 Metre Championship – Top Ten Place Skipper Mate 1st Club Design Bournville Polaris Bournville Renaissance Graham Wyeth Sean Wyeth 2nd Mike Harris 3rd Bill Green 4th 5th 6th Peter Hopkins Bill Akers Lisa McKerchar Chris Harris time on Sunday when it moderated somewhat. Graham Wyeth, assisted by son Sean, sailing a free sailing close sistership design to the famous John Lewis design Flair called remember this was Bill’s undoing for it first of all climbed up underneath its rival to Sonata, only lost one complete set of five points. Thereafter he managed to score in each board to maintain a small but significa nt lead over second place skipper Mike Harris and son Chris who dropped three sets of five points. Perhaps I should explain how a vane race is conducted and scored before I summarise how everyone did. As with Radio Match Racing each regatta is divided into a series of force a collision. In the re-run it managed to get 7th 8th 9th 10th Peter Salt Alan Farnsworth Peter Lock Stephen Lock Peter Whiteside Carol Whiteside Eric Watkinson Dennis Clewley. actual matches there will be in each regatta; it says that if is the number of entries then the number of matches will be . Thus for this event with twelve entries there was a total of sixty six individual matches. In vane racing each match is divided into two sections, the beat – or windward leg and the run – or off. wind leg. A yacht is credited with three points if it wins the beat and two for finishing the run first: thus there are five points at stake each time a pair of yachts come together. If the two yachts touch during their encounter the leg is re-run: unlike radio sailing they cannot take off and ‘do a turn’. The final positions tell less about the way the event unfurled than do the scores which, in some cases, are only one point apart. Even the second place was decided on the last board when Bill Green, sailing his green Renaissance – aptly named Billy ‘Us, lost the beat to Peter Whiteside after having to re-run that leg. Those three points would have put Bill level with Mike Harris and his Polaris named ET2 which could possibly have resulted in the two of them reversing their final positions. Further down the list the positions were just as close providing just sufficient uncertainty to keep everyone interested right to the very end of the meeting. In addition to the lovely Sonata being sailed by Graham Wyeth and his son Sean, other interesting yachts being used include d Bill Green’s Billy Us which is a rarity; a true radio controlled yacht which has ‘made it’ in the Vane world. Bill has made some minor changes to effect this success; these have included changing the rig proportions, not immediately obvious, and replacing the famous delta planform lead with amore traditional bulb shaped object which has less effect on the off-wind performance. Additionally the usual semi-balanced rudder has been replaced by a small section of fixed blade or skeg and a smaller moving section linked to the vane gear up on deck. This yacht was showing considerable signs of wear in its gel-coat from rubbing along the concrete edges of the lake. That is something I think I would find hard to bear on that lovely external finish. Watching the yacht going to windward it looked very familiar , my own Renaissance also climbs very close to the wind, but in the race I particularly MODEL BOATS Oberon 67 GBantock 54 GBantock 51 C Dicks 49 R Harris 42 J Lewis 41 Birmingham Wild Rumour R Harris 40 RStollery 38 Fleetwood Treble Chance Leeds ar Birmingham Treble Chance Leeds 36 situation for the green yacht found itself in a bit of wind-shadow while its opponent was able to fall off onto the recovering breeze further out in the lake and proceed to a successful completion of the beat in front. a run rigged like a radio yacht, without the spinnaker, and positively ‘steamed away from many heats in each race as there are entries and one less races than there are entries. There is a formula which decrees how many Bournville J Lewis way to windward of its opponent which was again not the ideal once, Each race, or ‘board’ as it is traditionally known consists of a group of Tern Total Score ahead and then climb That just about cost Bill and his ‘mate’ Peter Salt second place in the championship. On a heats, or matches. There are normally half as Birmingham Oberon Bournville Dave Heritage races during which skippers race in pairs. By the time each race has been completed each skipper will have sailed every other skipper Birmingham Seismic Designer more successful note Bill set his yacht off on his opponent in the lightish airs towards the end of the meeting. Mick Shillington took on the job of presenting the impressive cup to the winner and said some nice things about the way in which everyone had behaved during the weekend. Mike and Chris Harris receive d a pair of lamps as the second place prize, whereupon Chris started to negotiate an exchange because he already had such an illumination and preferred the ‘booze’ on offer for the lesser places – what are the young coming to?!? Next year the championship moves ‘across town’ to Bournville and maybe there will be a few more to contest that cup in what has now becomea true two day championship. Who knows there may even be some new yachts Top left: At the Six Top Ten Radio Clubs Metre Vane Nationals, Club 1st 2nd 8rd 4th 5th 6th 7th 8th 9th 10th Score Woodspring 1,494 Chelmsford 1,212.6 Birkenhead 1,086.8 Fleetwood Bournville Guildford Market Bosworth Leicestershire Poole Doncaster 1,032 1,011.9 926 663.4 471.6 457.3 422.2 not sure that I am up to the level of trim Top Ten Radio Individuals necessary to set a yacht off on its own to do battle with another similarly loose craft but there is undoubtedly a lot to be learned from this part of model yachting. I shall have to go and watch again; they tell me watching people work is very therapeutic – if the wind comes up they will certainly have to work! Leagues By the time you are reading this the MYA league championships will have been decided. In some past years they have been decided by the time I write this – towards the end of September – but the Radio Championships look like ‘going down to the wire’ again this year. Even the Vane League could see some changes in the closing stages but is probablya little more settled. In the Radio Individual Championship there is a fair old tussle going on at the top with Paul Tickner working like mad to retain his precarious position: like many of those at or near the top he is popping up at all sorts of events. At the time of writing, with just about all the events up to date, he is some fifty two points clear of Martin Roberts with one time leader Keith Skipper in third place just over thirteen points below. In the Club Championship there have been some significant happenings over the last month or so with some of the district events taking place and producing significant gains for the host clubs. The award, if there was one, for local effort in 1996 must surely go to the Fleetwood club for their Windsor Trophy One Metre event where nineteen of the twenty five entries were home members . One important between boards, especially for skippers sailing without a mate. Above: Lisa McKerchar sets her Tern (14) on its way to beat against Bill Pitt’s Psyche named ‘Merlin.’ Lisa appears as well; one of this year’s competitors showed me a part finished vane steered Sylph which might have made it by then. I’m the fleet make ready for the next beat. Periods of rest like this are Ist Skipper Score Paul Tickner 362.9 2nd Martin Roberts 3rd 310.7 Keith Skipper 297.5 4th 5th 6th 7th 8th 9th 10th Chris Harris Tommy Mills Peter Stollery David Taylor Gordon Sears Paul Jones Derek Priestley 297 252.9 244.5 234.5 227.4 225.2 195.4 to be using a left handed version of the ‘Harris Technique.’ Below: The luff that cost a second place. Billy Us climbs to windward of Exit and into a hole in the wind while the latter yacht carried on to take the three points for the beat. has visions of the Club ‘management’ going around ‘pressing’ newish members into action with a One Metre for there were around half a dozen ‘new’ names on the list – all scoring double points for their first entry in a league event for the last twelve months. All this effort lifted the club up into fourth place overall. However they are still some 460 points behind the leaders Woodspring who have also had some local effort during the last month and host the last National Championship of the year towards the end of October. I may be biased, being the league secretary, but I have a feeling that the league is definitely working at getting people interested and out there sailing: keep it up folks. To those of you who have tried it out at your home club when the DECEMBER 96 67
Chris Harris with ET2, in the foreground, and Peter Lock with Cameo set their yachts off to the run. Note the follow through’ from Chris: is this the infamous ‘HalfHarris’ in action? Far right: Graham Wyeth’s Lewis designed Sonata gets its spinnaker drawing on nicely as it takes off its last run of the Championship. league ‘came your way’ I would ask, ‘it wasn’t that bad was it?’ Why not go just a little further afield next year and visit another club who hosts such a meeting: give them the support that some of Sean Wyeth helps to pack away Sonata after becoming 6 Metre Champion ‘mate.’ The underwater similarities between this yacht and Flair become visible from this angle. them gave your club. Remember that, whether you support the rules or not, racing is eventually at the heart of most radio yachting activity and could be a way to promote the MYA 2000 active members by 2000 objective. The Vane individual league sees an almost certain winner for 1996 in the ‘quiet man from Fleetwood’, Peter Whiteside. I am afraid I have no details of the remainder at the moment but am reliably informed that they are unlikely to catch him now. In the Club championship Peter’s home club also looks as if it has the championship sewn up again although there is still an outside chance that they may be caught by… you will have to wait and see! Detail ofa control gear not often seen on a Renaissance, or on these pages; the vane mechanism is a dark mystery to many of us in the model yachting world. Apologies I have a couple of public apologies to make this month; firstly there are those who will probably scan the league scores and note that in one or two instances the scores have actually fallen since last month. I’m sorry folks but I incorrectly included the results of the MYA Veterans’ National Championship in the Radio League results. Unfortunately, or fortunately for some, the Veterans’ event cannot be included regularly supplies good value yachts, particularly One Metres, to the model yachting market Tony Abel. For some reason, I don’t really know why because they can be very competitive, one rarely sees one of Tony’s designs featuring in the upper end of open events and even less in Ranking events. Thus, when I was fed some ‘design’ information about the Metropolitan and Southern district One Metre Ranking Race I didn’t notice that one of Tony’s new yachts, the One Metre Mandarin, was buried securely in the top ten in the hands of a relative newcomer to our sport – Ken Binks from Eastbourne. Such an emergence is certainly worthy of note and the next time I get a chance to see one of these yachts I shall have a closer look for a more extensive review of the latest from what is becoming a long line of value for money good performers. because it is a New 6 Metre Champion Graham Wyeth makes his acceptance speech holding the magnificent cup at stake in this regatta. restricted entry event. All other events currently included are, officially, Open Events even though some may think there are restrictions – like; you must have use of a yacht of the right class and you must be a member of an affiliated club. The other apology is to that chap who Another father and son combination, Mike and Chris Harris, took second place; Chris Harris has obviously ‘seen the light.’ Far right: Three happy chappies; Bill Green left) and his mate Peter Salt collect their awards for third place. In the background Race Officer Mick Shillington waits to OO Oo announce fourth place. MODEL BOATS DECEMBER 96


