- Blackwatch – A 50-800 Model Yacht. By J. B. Duncan.
- Details for building the “Black Watch,” a 50-800 Class model yacht designed as a versatile performer using the “buttock system” of construction. This method, involving vertical strips of wood parallel to the centerline, is highlighted for its material efficiency and structural strength, resulting in a robust hull with a broad stern that aids downwind performance. The process requires patternmaker’s pine, precise templates traced from blueprints, careful assembly with casein glue, and final shaping of the hull.

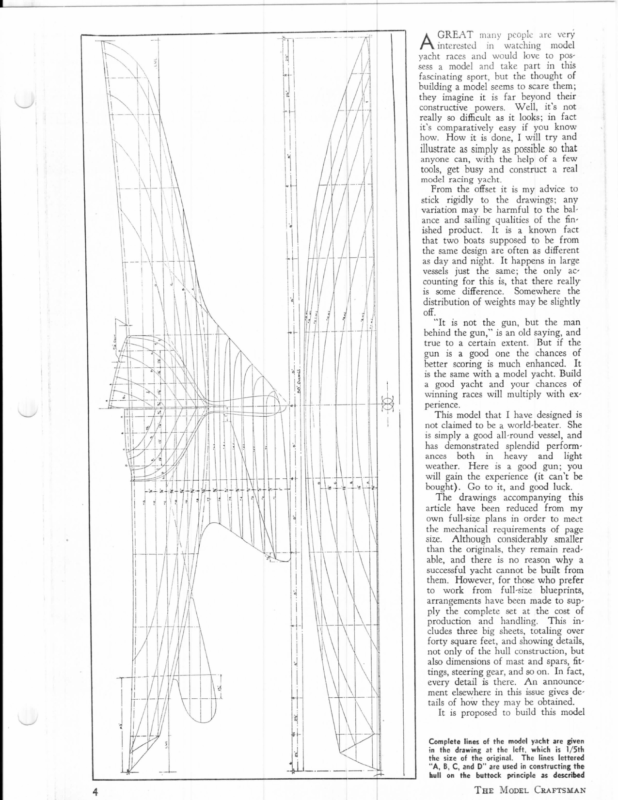
GREAT many people are very interested in watching model yacht races and would love to pos- sess a model and take part in this fascinating sport, but the thought of building a model seems to scare them; they imagine it is far beyond their constructive powers. Well, it’s not really so difficult as it looks; in fact it’s comparatively easy if you know how. How it is done, I will try and illustrate as simply as possible so that anyone can, with the help of a few tools, get busy and construct a real model racing yacht. From the offset it is my advice to stick rigidly to the drawings; any variation may be harmful to the balance and sailing qualities of the finished product. It is a known fact that two boats supposed to be from the same design are often as different as day and night. It happens in large vessels just the same; the only accounting for this is, that there really is some difference. Somewhere the distribution of weights may be slightly off. “It is not the gun, but the man behind the gun,” is an old saying, and true to a certain extent. But if the gun is a good one the chances of better scoring is much enhanced. It is the same with a model yacht. Build a good yacht and your chances of winning races will multiply with experience. This model that I have designed is not claimed to be a world-beater. She is simply a good all-round vessel, and has demonstrated splendid perform- ances both in heavy and_ light weather. Here is a good gun; you will gain the experience (it can’t be bought). Go to it, and good luck. The drawings accompanying this article have been reduced from my own full-size plans in order to meet the mechanical requirements of page size. Although considerably smaller than the originals, they remain readable, and there is no reason why a successful yacht cannot be built from \ \ aie { = them. However, for those who prefer to work from full-size blueprints, arrangements have been made to supply the complete set at the cost of production and handling. This includes three big sheets, totaling over forty square feet, and showing details, not only of the hull construction, but also dimensions of mast and spars, fittings, steering gear, and so on. In fact, every detail is there. An announcement elsewhere in this issue gives details of how they may be obtained. It is proposed to build this model ae 4 be 4 | \ j ee 2 Se kK NY || a Complete lines of the model yacht are given in the drawing at the left, which is 1/5th the size of the original. The lines lettered “A, B, C, and D” are used in constructing the hull on the buttock principle as described Tue Mopet CraFTsMAN
: BLACK WATCH very e “= i” Staten Island Model Yacht Club on what is called the “buttock system” rather than the ordinary B. tee “bread and butter’ method, because in this system of construc: 90 Eon tion there is considerable saving in labor and material. ! bal. produces a stronger job by virtue of the fact that larger gluing give a clear conception of the vessel’s shape. From this drawing ree it will be noted that a fairly broad stern is called for, and as S. from 5 erent — expected this broad stern has helped considerably when running down the wind. Having a clean underbody, the broad stern does not impair her other sailing ; 7; qualities. I ato E The buttock lines are clearly indicated by letters the ° . ° of the alphabet.” They represent the shape the hull tightly would take if the completed model were held ver- 7 ng, and tically and cut into strips parallel to the center line. ; So that no difficulty will be encountered in cutting templates of the buttocks, I Bef the have prepared separate drawings of them. ces of If you get the full-size blueprint, you Bed It simply take this print and prick or trace E. Build through onto thick paper or cardboard a: bth ex- all the lines shown on the buttock templates B1, B2, B3, B4 and B§, all clearly : indicated ened j 3 erformlicht i j and ; you 8 can’t be duck. § a g this om my —_ of page corners are chiseled off smoothly to dotted lines a i t from Tf] Lf etfnetecesuen| clan \\ i =cost of oan fINISHED HULL |1lAmpine cle[fest7 Clare | < a - Down To Line. Tug | ie pat aa = at , 467 Ps momaam 5 details, 4 : fon, but pars, fit- | “In fact, Semoec Cr Line ALL Round — ‘ ! H ae Bot har | Zt WY ae _— Lee 7 i Suepius Mareaial cur Away ee Se THWARTSHIP i C SHCoyT “| SECTION THRO. STATION “S — ware given sis 1/5th s lettered | : i a Sr. ? Beijoc « A Berrece : ; A 7 Ce Wat ‘ Zives deained. ; Lf Le } mounce- acting the described -/ aorreer oes Sb: u! amen | \ P View for location // BS “> Lest _ BEAMS See StroNc FeAN THWARTSHIP li Cut Seumpos matemial | — © ut S10 $——H+4} TecetHs SN pe) A OT perce “Ss ayre ee AY Ss Saw Coy Fell ee Clean yo Oemenen Line over al t Glveme Sumpace| | S|1 BS ‘his in- wy tessiome Final Firat – ——__}+—_ Slamm Tocener Firs} ami – a to sup- [ets = eo 7 Final Clargming Sacon® Stace. _ heprints, ; To \ \‘ —&S 4 Beste 22 Ose ro ‘ a Py mg & qj nile ae] 36 of Cunwale : 0 prefer thick gluing surface than the usual “bread and butter” method. After the glue is thoroughly hard, the ‘ h The how the buttocks are glued together to form i read- the drawing. the general shape. This construction gives more { ssmaller on A thwartship section of the hull, which shows She sel, / It also surfaces are developed. A careful study of the lines plan will “ fin- J craft looks when afloat By John B. Duncan and few good idea of how the A 50-800 MODEL YACHT | ‘ This sketch of the completed yacht gives a — CAMBER Of STRONG BEAMS “ FOR OTHER SECTIONS TH
paper or cardboard you have made this impression on is cut with a sharp tool (an old razor blade will do) exactly to the line. Also, be careful to mark the load water line (l-w.l.) and the line of stations No. 3, 5, and of the clamps hanging on the wood are supported; you may twist the wood out of shape otherwise. 7 on each of these moulds. Cutting the Buttocks From these moulds you will be able to lay out on the selected plank of good, clear-grained white or sugar pine (patternmaker’s quality) the most economical way to cut without losing too much material, care being taken that sufficient room is provided for entering and freeing the band saw. Any lumber yard that handles this class of lumber will be pleased to run the plank through the planer for uniform thickness, and the band saw for shaping, leaving about 1/16” clear of the finished line. After all the cutting is done you now take each piece The other buttock pieces are treated in the same fashion, and when all groups are assembled, should you find difficulty in getting clamps with sufh- cient gap to grip the three groups for final gluing, this may be accom- beams above, using the cuttings you have salvaged from the mill for mak- ing wedges, also for blocking up to form a solid base for shoring against. (A study of the cross-section drawing will give a clearer conception of this procedure.) The same care must al- ways be taken to see that the load water line and the thwartship section lines all hit up, otherwise your boat will not be “true.” Also, take care that the clamps or shores are not driven up too tight; you are liable to casein glue will do. Follow the directions on the can carefully before commencing. Also, be sure you have everything ready, sufficient clamps, and just enough glue mixed to do the amount of pieces you intend sticking together. The glue left over should not be used again; throw it out and mix fresh each time. Assemble With Glue You will take the center buttock, Bl, and the one on each side of it first, B2, and apply the surfaces that overlap with a fair even coating of glue, being very careful as you place one on the other that the load water line and the section lines hit up with each other dead true. Then apply your clamps, checking all the time you apply the pressure that the pieces have not moved. You may have a little difficulty if you don’t put equal and moderate pressure on each clamp; the more clamps the better, but don’t use less than six. Also, be careful after clamping and waiting for glue to harden (twenty-four hours) that you lay it down so that the weight 6 deck: t thickness is retained for strength. cjen A rub with rough sandpaper will take out most of the ridges caused by thea gouge, using a finer sandpaper as finish. Your hull is now finally shaped except the deadwood, and before proceeding any further, attention must be directed to the lead keel. From the drawing given, lift a longitudinal tem- plate of the keel. Procure two pieces of scrap wood and with a chisel and gouge carve out the half thickness of the keel using thwartship templates to check the curvature. Be sure you reverse the mould to the opposite hand before carving the second piece of wood. On completion, the two pieces are bolted or clamped together being sure they line up, otherwise your keel will be distorted. Vent openings must be provided at the extreme ends and a hole about 3%” dia. for pouring in the metal. It is essen: tial that the lead be in a good mould- end to prevent any tendency to warp. quality. Any of the good brands of and you can be guided by its intensity, taking out a little at a time until you have an even 3/16” all over, except at the bottom and at the gunwale, left where sufficient material must be and keel the on ing screw for on plished by shoring from the ceiling also, at the bow and stern sufh- and with care clean it up to the finished buttock line. Also, make sure you have transferred the L.W.L. and station lines. Number each piece B1, B2 and so on. You are now ready to glue the pieces together, but should you have to wait any considerable time before gluing, be careful to lay the pieces down on a flat surface and put a weight on the center and each For this very reason, I recommend that the deck be not cut or purchased until you are al! ready to use it. The gluing takes a little time and don’t try to do too much at one time. Be sure your glue is fresh and of good through the hull. When you have’ taken a good lot out, the safest way is to have a light shining close to the outside. The light will shine through split the wood. If you are not sure of your gluing and clamping ability; practice on a few pieces of scrap wood first. Shaping the Hull The gluing now is done and you have allowed sufficient time (twentyfour hours) to elapse to permit the glue to harden before releasing the clamps. Your next operation is to prepare the rough model so that it can be securely held in the vise for shap- ing. A piece of wood is screwed to the deadwood, also a second piece is secured across top for holding in vise when working at model upside down. Shape the outside of the hull first, cutting away a very little at a time till the “Vee” almost disappears. Keep trying the section moulds so as to check each side for fairness. The final shaping should be done carefully, using a sandpaper block or scraping with pieces of broken glass. After both sides are shaped and checked with the section moulds, give the whole hull a good sandpapering first with No. 1 and finally with No. O paper. Gouging Out Inside The inside can now be tackled, taking care you don’t exert too much pressure on the gouge in case you go ing condition using an old pot, if you don’t possess a proper one for the purpose. Before pouring the metal see that the scum is cleared off the top. Also, that sufficient amount of lead is available for filling the mould with one pouring. Fill until the lead is up to the top of the filling hole. Molding the Keel Allow the lead to cool off slowly and don’t try to open the mould too soon. You had better melt about fifteen pounds of good scrap lead. Don’t use babbit. The wood mould makes a nice clean casting so very little cleaning up is necessary. The most important thing is that the top of the lead be cleaned up and planed fair, so that keel will lie true on deadwood. Try it several times for fit before marking the position of the three screw holes required to hold it. A good tip is to gouge a groove out of the top surface, thus leaving only the edges to fit snug. As this surface is coated with a good layer of white lead before screwing home the groove becomes filled up automatically. Use long brass wood screws, (see drawing). If you have to drill the holes by hand, it is better to drill from both ends in case you go “off.’’ Counterbore the bottom end of hole with a larger drill so that head of screw will THE Mopet CRAFTSMAN
— u have st way to the hrough tensity, til ae EXC ne wait, bbe left and el be well sunk into lead. The little “Vee” shaped filling-in piece at aft end of keel should be glued into place. A screw through this piece will also help; leave it same thickness as dead- wood meantime. After securing the lead by screwing up hard, and the surplus white lead has been forced out, wipe this off and leave for a few days before shaping the deadwood to the lead keel. Some rasping or scrap- ry suffi- ing may be necessary to fair up the take forms the proper curvature of the section. It is most important that the rength. rill DY the as br a ped ex- pieces sel and ness of m plates ire you pposite d piece ne two ie gether Iherwise Vent the ex- 6″ dia. essen- rmouldaf ZOr \ metal > e top. lof lead id with d is up slowly bout fif- . Don’t ice clean g up is ht thing scleaned reel will several required wouge a Ice, thus pg. As ra good } The Rudder Tube While you are waiting to clean up the ral tem- is keel is absolutely vertical. Any deviation will mar the ultimate behavior of the vessel. must ro > lead so that a clean smooth surface ed up ss wood the deadwood, there are several things can be done. Strong beams to support the deck can be made and fitted. The inside of hull can be painted or varnished. Rudder tube will have to be bedded into the hull and through the strong beam. Leave this tube of sufficient length to penetrate deck with about a 36” to spare. Don’t forget that the deck has camber and this must be allowed for. If you are not sure it’s best to leave plenty on, it can be cut off after the deck is screwed on. Before fitting the deck, which has previously been cut from a plank, planed down to 3/16” thick and a 1%” margin allowed all round the finished deck line taken from your deck mould, it is better to finish your deadwood and smooth up. Also, the top of the gunwale will have to be planed up fair to conform with the true sheer of the deck. Apply a good coating of fresh white lead all round top of gunwale and your deck with a hole aft for the rudder trunk to pass through. Press down gently and begin screwing down, using No. 1 brass wood screws 3%” long, spaced at 134” centers. When completely screwed home, remove the surplus white lead that has been squeezed out and leave the whole job aside for a number of days to allow the white lead to harden before trimming off the deck. Take care to keep both hull and deck ‘clean and free from oil stains, etc. You want to have a nice finished job later. This completes work on the hull itself, and the next subject to take up is that of masts, spars, and fittings. These will be described in next month’s MopEL CRAFTSMAN. Mean- while, I am willing to answer any questions that come up. Just address me in care of the editor. oles Dy ounter- r-with a rew will FISMAN Patterns for cutting out the buttocks appear in the drawings at right. They are repro- duced to the same scale as the lines plan on a previous page. with casein Buttocks are assembled glue and dried under pressure September, 1938 NI bm both
EERE ———— : : SIS —EE Tim pole! business is picking up. Six more clubs have joined the M.Y.R.A.A. since January of this year. All of the older clubs join in welcoming the new members to the flock of Skippers now inhabiting the earth. Let us continue, and time will find every home cluttered with model racing yachts of every conceivable shape and size. A man will be selec ted to rule a nation, and for lesser tasks, on his ability to build and sail a yacht; and every street will be like the canals of Venice. No more highways with cars—all automobiles will be traded in for model racing yachts. There’s a nice thought there—! and M.Y.R.A.A. alike, offering to By C. O. Brook finance their own way, if only the tional Association appoint a Commit- tee to function solely as “A Committee for the Good of the Sport.’ Let their job be only that of devising ways, consistent with finances, to keep the sport advancing, with duties in connection with Racing Committees, etc. I never hope to represent this country in such a contest; neverthe- less, calm judgment points out that in this way lies our success for Community and other Governmental recog: nition. We have two skippers, Wm. cided there are too many sports on Bithell and Fred Pigeon, both of the Boston M.Y.C., whose fighting spirit Well, why not omit some a lesson for everyone. Here are two The Olympic Committee has de- their list to consider Model Yacht Racing. of the other sports and put in something real and worthwhile—like model yacht racing—? The Southern California M.Y.A. for the International Races should be who make many overtures to Clubs has its own monthly paper called The Mainsheet. It is a small mimeo- graphed pamphlet. They also have weekly broadcasts. That’s pushing the sport. We wish them success in their Bill and Fred can always say, “We tried, anyway.” The beautiful Sheldon Clarke Trophy now bears the fingerprints of James MacKinney, of the Ogden Park M.Y.C., with Tullock Malloy of the Chicago M.Y.C. second, and our old friend George Barron of the Ogden Park M.Y.C. in third place. O. H. Torgenson was O.0.D. in this class-A event and they sailed in a snappy northeast breeze varying from six to fifteen miles an hour. Over at Port Washington, L. I., the boys had a light wind for their chase after the Marblehead Perpetual Cup. A. Downie of the Jersey City M.Y.C. took this trophy home with his Model Swift—evidently it is well named. A. Mattson of the Marblehead M.Y.C. was runner up with Damfino, while Geo. Lee, Long Island M.Y.C., came Over at the Warinanco M.Y.C. And the Berkeley Club sends us a snappy color poster of the coming National Championship races in the M-Class. It is printed from hand drawn artwork and very little type event they dragged up forty-two en- tries and a fifteen-mile blow. Noel Cram of the Warinanco M.Y.C. grabbed off first honors, with Bill Perfect of the Atlantic M.Y.C. in second place, and C. Heisterkamp of the Atlantic M.Y.C. in a tie for third place with another member of the Club, Cecil Drake. Tex Foster of the Long Island M.Y.C. and J. Brush of the setup. Will this year find no International Class-A event? I lament, again and again, “What a pity.” It is evident that there are a great number who fail to understand the importance of Warinanco were right on the heels of third place, being only two points behind. Internationa! Racing to make a sport worthy of National recognition. Of 42 like one of those times. At any rate, into third place. venture. course, it is expensive—any sport is when you take it up to its fullest extent. I might suggest that each Na- Internationals will go on. Their con- stant appeals and generous offers should never have been put aside. Sometimes it is possible for officials to establish a precedent, and this looks One of John B. Duncan’s latest designs, Argyll, which has lines like a cruiser At the Marblehead invitation race for the 50’s they pulled in twenty- Tue Mopet CRAFTSMAN
eight entries. With a light southeast wind they were able to have their usual two days of fun and sailing. Cecil Drake of the Atlantic M.Y.C. took top honors with Mintaur, while Bill Perfect of the same club was runner-up, and Tex Foster of the Long Island M.Y.C. took third place. The boys are certainly having their days of fun—even those who continually lag along down the score sheet have a great old time hoping for. the future—and what is life (or sailing) without something to hope for? Charles Farley’s quarterly report continues to be neat and orderly— and easily understandable. This poor do scribe wonders how some of them it. Were I to attempt a nice technical report of anything, from the stubbing of my toe to the Millennium, methinks I should have a long-winded report making fun of the whole matter. Ah, but life is too short to be serious —for long—and anyway, the folly makes one appreciate the wisdom. Variety, you know, is the spice in the pudding—or something! I have found still another friend. Small wonder that the sport appeals so strongly—from far-off corners of the globe we learn that someone reads with pleasure these bits of silly chatter —and likes it! Such a letter came from Commodore Cecil J. Pratt of the Vancouver Model Yacht Club, “way, “way out on the West Coast of Canada. It took six days to arrive at this tiny ‘“‘wheat-straw” studio, and Friend Cecil was gracious enough to give me a graphic and brief history of his club’s activities, together with a nicely worded bit of praise. Thanks, my friend—I am grateful. He enclosed a nicely made silk club pennant also, to be placed ‘““Among my Souvenirs.”” The Vancouver boys certainly are an active group—Cecil lauds not his own activities, but rather the entire Canadian fraternity. Starting with five classes of models, from “B” to “F,” ranging in size from 45” length and 650” of sail up to 75” L.O.A. and 2500” of sail. They have now, as the Commodore puts it, “fallen in line’ and adopted the “A” class, of which his club has a half dozen boats, and a number of six-meter and 50-800 class models. All are good sailing models, able to give a fine account of themselves in any company. They soon will have the privilege of holding the Canadian M.Y.R.A. Championship for the six-meter class—the first on this continent in this type of yacht. From various photographs enclosed with Commodore Pratt’s letter it appears that they sail in typical Cana- September, 1938 With its spinnaker ballooning out before the breeze, a 50-800 yacht makes a beautiful sight. This photograph by Carl Schmaedig was taken at the Staten Island M.Y.C. dian country. Pine trees line the lake and rugged mountains form a beautiful background for any devotee of the sport. What a place to spend a vacation—mountains, woods, a fine lake and a host of good friends—each with a model to give their guests a chance to sail with them. The world is not such a bad place to live in, is it? We had a nice “chase” recently— like ‘‘fox and hounds.” While driving through heavy trafic we saw a car pass with what looked like a fine class- A model aboard. We chased the car for miles, and even though the speed- ometer danced a jig at the “70” mark, we still failed to make contact. Some modelman was in an awful hurry to wiggling After somewhere! get through trafic for half an hour we finally decided our necks would be safer if we let the “fox” get away. We were so excited we even forgot to get the license number so we could trace the owner and tell him how we at least tried to buy him a mug of coffee (or something). We should have an International Code for tooting the horn when we see a model in the offing. Here’s an afterthought: possibly the driver was deliberately trying to escape because we may have seemed like lunatics darting about the road as we did. I see where the South Jersey M.Y.C. had “their toes stepped on.” First the Atlantic M.Y.C. takes them for a nice winning, and then, laments one of their members, “That guy, Tex Foster ran away with first. In fact, the whole Long Island M.Y.C. did it. Left us with fifty-eight points to their 120.” “What kind of boats do those guys have?” he asks. Good boats, I guess. (Continued on page 57)
MODEL YACHTING MASTERCRAFT (Continued from page 43) Material in magazines is limited, else we might chatter on indefinitely. But space is used up, and that’s that—’til next issue. CUT-OUT SCENERY (Continued from page 35) of the platform is level with the bottom of the door. The ramp is put in of the same material and the en tire base covered with lattice work. The watchman’s shanty included this month is intended for those who did not wish to build Kitchawan station, and who desire some small ac’ cessory for their railroads. The crossing signal and right-of-way signs also After being pasted on cardboard, cut out, and cemented to poles, they will give the railroad line a very business-like appearance. month we will give you something that will be useful to ev ery model railroad builder, a cut-out slide rule for converting one gauge into another, and by which you can transfer scale feet into inches for any scale. We will also have scales similar to the one published this month in HO, OO, and 17/64”. If you write soon enough letting us know of any fea: tures you would like incorporated in these rules we will be pleased to work them in. September, 1938 only too 50 Supply fou—Send Postal @ No hand vise to spin, break drill, injure hand. Money @ 7” square—434” travel both ways Hollywood P. O. BOX Station, Los Angeles, 1345 JOBBERS — DISTRIBU- TORS—DEALERS. Cal. for Special Write Discounts! PRER REECERE ES RE eee ay aE 3 Toe ee oe ee ee ee eee eee eee ee eee ee ee ee ceedingly—and we regret that space Unconditionally «


