
- Building a Miniature Yacht by the Plank Method: A System of Framing and Planking Used in Building Polka Dot. JL Wilson. Nearly all model yachtsmen build their own boats and if you happen to be one who does not, try it on the next one and see if you do not get more fun out of the sport.

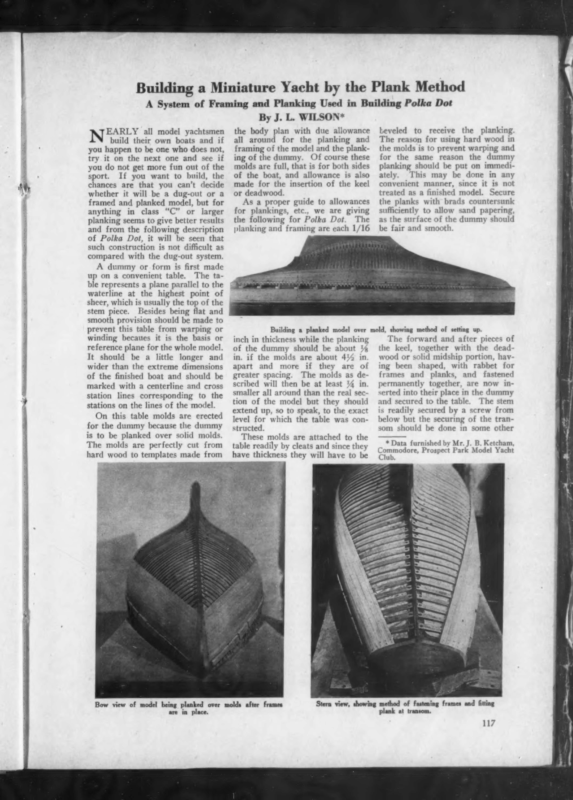
Building a Miniature Yacht by the Plank Method A System of Framing and Planking Used in Building Polka Dot By J. L. WILSON* EARLY all model yachtsmen build their own boats and if you happen to be one who does not, try it on the next one and see if you do not get more fun out of the sport. If you want to build, the chances are that you can’t decide whether it will be a dug-out or a framed and planked model, but for anything in class “C” or larger planking seems to give better results and from the following description of Polka Dot, it will be seen that such construction is not difficult as compared with the dug-out system. the body plan with due allowance all around for the planking and framing of the model and the planking of the dummy. Of course these molds are full, that is for both sides of the boat, and allowance is also made for the insertion of the keel or deadwood. As a proper guide to allowances for plankings, etc., we are giving the following for Polka Dot. The planking and framing are each 1/16 Leveled to receive the planking. The reason for using hard wood in the molds is to prevent warping and for the same reason the dummy planking should be put on immediThis may be done in any ately. convenient manner, since it is not treated as a finished model. Secure the planks with brads countersunk sufficiently to allow sand papering, as the surface of the dummy should be fair and smooth. A dummy or form is first made up on a convenient table. The table represents a plane parallel to the waterline at the highest point of a a oea sheer, which is usually the top of the stem piece. Besides being flat and smooth provision should be made to prevent this table from warping or winding becaues it is the basis or reference plane for the whole model. It should be a little longer and wider than the extreme dimensions of the finished boat and should be marked with a centerline and cross station lines corresponding to the stations on the lines of the model. — ee On this table molds are erected for the dummy because the dummy is to be planked over solid molds. The molds are perfectly cut from hard wood to templates made from J res =” ei< a) r hs ae > ae ima S i be a. y | structed. som should be done in some other These molds are attached to the table readily by cleats and since they have thickness they will have to be _ * Data furnished by Mr. J. B. Ketcham, Commodore, Prospect Park Model Yacht Club, a; a3 a ; Building a planked model over mold, showing method of setting up. The forward and after pieces of inch in thickness while the planking the keel, together with the deadof the dummy should be about %& wood or solid midship portion, havin. if the molds are about 4% in ing been shaped, with rabbet for apart and more if they are of frames and planks, and fastened greater spacing. The molds as depermanently together, are now inscribed will then be at least % in. smaller all around than the real sec serted into their place in the dummy and secured to the table. The stem tion of the model but they should s readily secured by a screw from extend up, so to speak, to the exact below but the securing of the tranlevel for which the table was con- ) ok ( Bow view of model being planked over molds after frames are in place. Stern view, showing method of fastening frames and fitting plank at transom. 117
Wl 2a i YACHTING for February of Kerem Laat Seaton tim Seelion of APter Crd elm Plans of Polka Dot, International Winner of 1922. way to protect its upper surface. A convenient method is to leave ears or lugs on the tops of the transom when shaping it and secure these to a block on the table to give it the right elevation off the table. The transom itself is secured permanently to the after end of the keel before placing on the dummy and care should be exercised in ending the dummy planks so that it can be readily moved up and down before securing. This insures removal of the completed boat from the dummy. The dummy is now covered with glazed paper or any other convenient substance to prevent the model sticking to it after gluing. No paper or anything else should extend over the surface of the keel pieces, deadwood or transom because the ae frames and plank ends are to per- manently fastened at these points but only temporarily glued together throughout the remainder of the body. Beginning amidships on both sides and working both ways at once the frames are bent on and tacked in place. In order to do this without breaking them they should be prepared to the finished size and soaked in boiling water for a few minutes to become pliable. Do not drive tacks down to the heads because they are to be removed in the planking process, but permanently secure the foot of the frame to the keel if dowels are to be used for fastening; if not, it is better to use temporary fastenings until fully planked. As the ends are approached the frames should be canted or inclined somewhat to keep them normal to the skin of the boat because such 118 She is of planked construction. thin members cannot be beveled conveniently. Although it is convenient to place the adjacent frames next to each other in the sizes with which we are dealing, they may be spaced their own width apart. With frames 1/16” by 34” this means a frame every %” apart. It is considered weakening to exceed 1” spacing with as thin planking as 1/16” finished. The sheerstrake or top plank is the first one to attach and its location Should be carefully marked on the dummy so that when finished it will present a fair sheer line. A fairing batten will be found very useful in planking. Use this freely as no amount of descriptive matter The will make good planking. planks are glued on the frames and permanently fastened at the ends. There is only one thing necessary in planking—namely, to remove all tacks as you go along because they are securely holding the frames to the dummy. A few of the difficult points will be: first, in shaping the keel pieces and securely fastening them together so that they are perfectly in line. The importance of this will be fully realized. Next you will find a point at the stem or keel where the frames cease to enter the rabbet and consequently the latter should be cut only deep enough for the planking. At the transom also the rabbet is only sufficient to take plank ends. Where the deadwood molds into the hull at the after body, about where the rudder tube is located, a little ingenuity will be required to end the planks properly to avoid excessive twisting or splitting. The splitting tendency is also noticeable at the deadwood on the lower planks amidships and it is good practice here to jog the rabbet for plank ends only. When the planking is completed and the model removed from the dummy, tear out the paper, and fit in the corner log all around the inside of the sheerstrake and frames, using filling pieces between the frames. This will provide a means of cross tying while fastening the planks to the frames. There are in general two methods used in fastening—pins and dowels, the latter being similar to the repular practice of using treenails. Polka Dot was fastened with pins of small size cut short to allow just enough point for clinching inside. Two of these were used at the crossing of each plank with each frame and they were staggered. If the frames are put in adjacent to each other it is suggested that one pin for each will be sufficient. Treenails are made easily by cutting a hardwood tapered toothpick in half, which provides two. If these are used it is better to drill for each one with a tapered reamer or by using a tapered awl and before inserting the dowel it should be dipped glue or shellac. in The remainder of the details in connection with the construction of this model are similar to any other except perhaps in reinforcing the sides at the floors holding the lead ballast bolts. These floors carry tubes for the bolts and connect at the bilge with two short stringers to distribute the thrust over a number of frames and thus preclude the possibility of bulging. Several different woods are used in construction—namely, white pine for the deadwood and deck, mahogany for the keel pieces, transom and deck.