Article by John Henderson and John Stoudt
There are many types of model yachts that may need a new mast. A wooden mast may be a dowel, a single piece of wood cut to shape, or a glued-up mast of two or more pieces of wood. Your mast choice will be based on the model and anticipated use. The topics discussed in this article will help you develop a plan and to make your mast.
Choosing the Wood
You want straight-grained, clear, and lightweight wood.
Straight-grained
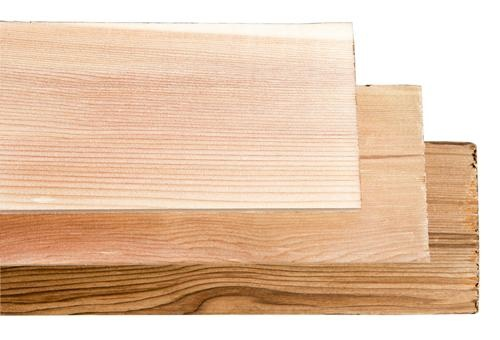
Straight-grained means that, if you look at the wood surface, the grain lines should run parallel to the edges. In the real world, perfect grain is very rare, but you want the grain to run for long distances before it crosses an edge. This visible grain pattern can be complicated by how the wood was sawn (e.g., “quarter-sawn”, “plain-sawn”) and where on the log your particular plank came from. Straight grain should be visible on at least two edges.
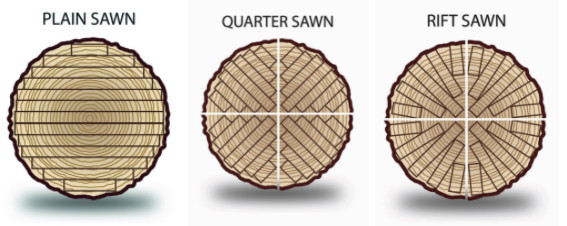
Fig. 1 shows cross-sections of a log and the ways in which it can be sawn into planks. Note the orientation of the grain (i.e., the growth rings) relative to the saw cuts. Plain sawn is the most common in lumberyards—it is simplest to cut, and it uses the wood efficiently. Quarter sawn lumber can be ordered, although you will note that some of the plain sawn boards (horizontal boards near the center of the log) will have grain patterns close to quarter sawn. Quarter sawn wood is desirable, probably because of improved humidity stability, but it is not necessary in model masts.
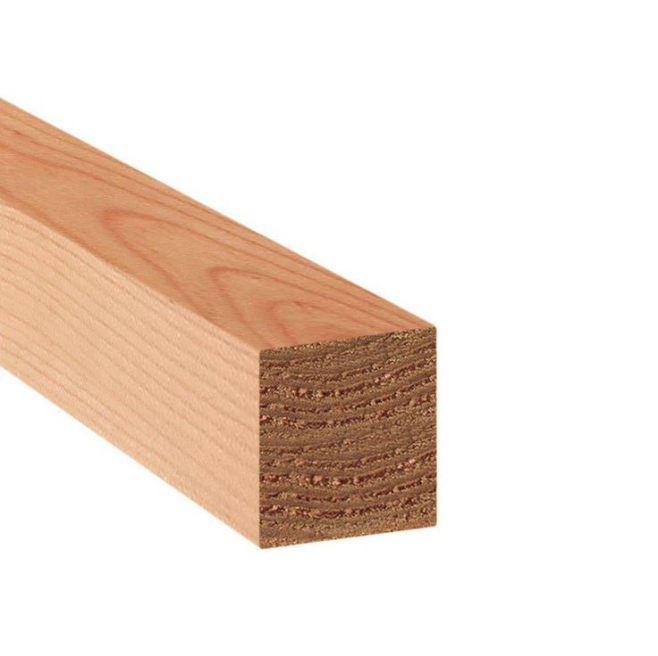
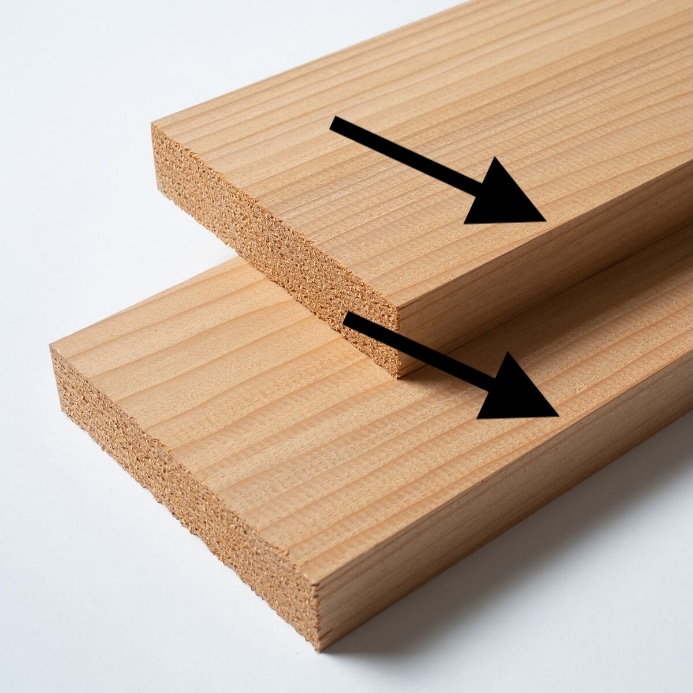
Fig. 2 shows a square cross-section that might well be suitable for a mast. Note the fairly straight grain on the vertical face. It is not perfect, but there is little “run-out” of the grain at the upper face. Note the grain pattern on the upper surface. Referring to the plain-sawn wood in Fig. 1, it can be seen that this piece came from near the top or bottom of the log. The grain rings are relatively far apart on this upper surface, indicating that the grain on the vertical surface runs nearly parallel to the top surface.
Clear
Clear means free of knots. Small, tight knots may be unavoidable in full-size boat masts but they are not acceptable for model yacht masts. Even small knots are a large percentage of the diameter of a mast for a model yacht. Knots are weak points.
Fig. 3 shows a piece that would NOT be suitable for a mast. Note the effect on the grain lines of the knot at the top of the photo. This is a weak spot, and it will cause much regret.
Fig. 4 shows three pieces of wood of varying degrees of suitability. The top piece is the obvious choice. The edge of the knot visible in the bottom piece renders it unsuitable. The middle piece is a “maybe.”
Light Weight
Light weight means exactly what it says, but the term is relative and species-dependent. Sitka spruce is the gold standard for wooden masts in full-size boats, especially for yachts and racing boats; its stiffness and relatively light weight are vital. Full-size workboats often used pine or fir, depending on local availability. These are generally heavier than Sitka spruce. The grain may not be as straight, but the cost is lower.
For model boat masts, western red cedar is often a good choice. It is lighter than Sitka spruce and can be found in clear, straight-grained lengths. You will need to search through the wood at your lumber yard to find a good piece. Clear white pine is a decent second choice, but it is harder to find really straight-grained pieces. Note, however, that western red cedar is usually weaker and less stiff than Sitka spruce or pine, so it may require more care in selection and building and also in how stays and shrouds are placed.
Tools and Tool Use
You will need a table saw, a good hand plane, and a flat and sturdy work surface that accommodates the full length of your mast. If you are not comfortable using a hand plane, practice first on scrap wood. There are many on-line sources that teach how to sharpen and adjust a hand plane.
Your table saw must be set up properly: blade perpendicular to the table, rip fence parallel to the blade, push sticks at the ready, and splitter and antikickback devices in place. Use feather boards horizontally and vertically. If any of these terms is unfamiliar to you, on-line woodworking sources are plentiful.
A plane with a longer shoe is almost always better for shaping a mast, but you probably won’t need a full-on “jointer” plane. A plane with a 14-in shoe is usually fine, and a 9-in shoe will work if you pay attention to keeping the surface free of low spots.
Note that each piece of wood will have a preferred direction of planing. You can generally guess this direction by noting the direction in which the (imperfectly straight) grain exits at the edge of the plank. It is important to plane in this “exit” direction. If you try to plane in the other direction, you’ll learn your error quickly. Don’t blame the plane.
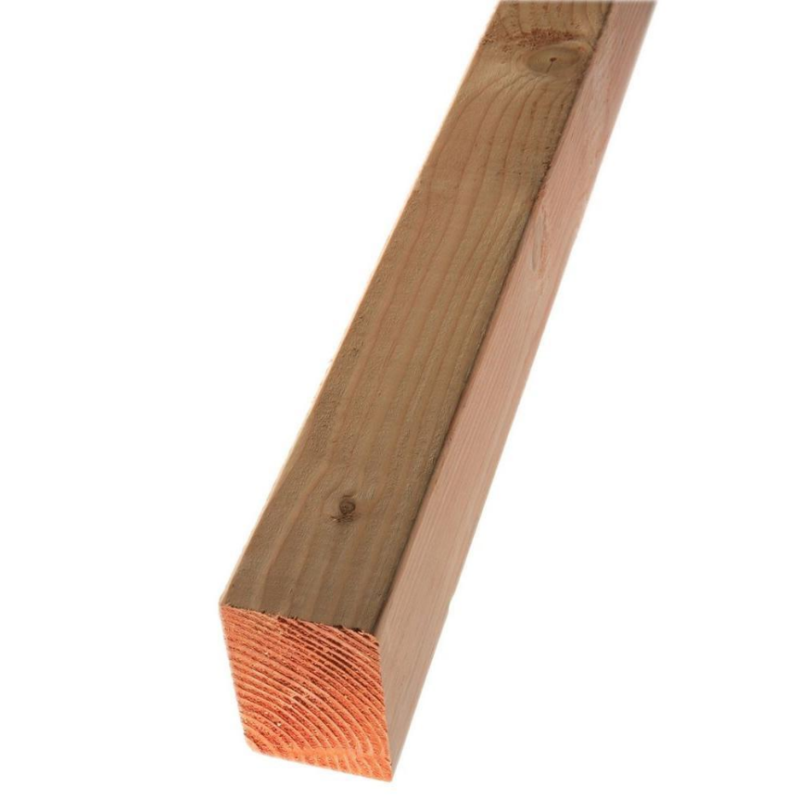
Look at the grain pattern in Fig. 5. Note that the grain “runs out” on the edges close to the front of the image. Planing from left to right on these edges would likely be successful, but planing in the other direction (i.e., “against the grain”) could be problematic. Learn to cooperate with the wood.
Making the Mast
Simple
The simplest mast is a cylindrical shape of constant cross-sectional size. On your table saw, cut a full-length piece of your chosen wood to a perfectly square cross-section (each side face is exactly the same dimension as the others). Cut the cross section faces slightly larger than the intended finish dimension to allow for planing smooth. Plane to a smooth square cross-sectional shape. The mast needs to be clamped to a flat surface for this planing operation. You can also have a lumber yard with a mill shop prepare the wood for you.
You should plan ahead for where fittings will be attached to the mast, because it is much easier and more accurate to drill holes while the blank is square. Locations should be planned and drilled to support the gooseneck, vang, spreaders, tangs to attach the shrouds, masthead crane, jib stay, etc.
Now you will make the mast round, or whatever cross-sectional shape you wish. With the mast clamped to the flat surface, plane each of the four corners at 45 degrees, turning the mast blank into an eight-sided section. For full-size boats, you’d probably now make it 16-sided, but for models you can probably start sanding when you have reached eight sides.
Sand the blank until it is round. An easy trick is to take an old, broken belt from a belt sander, wrap it half-way round the mast, and sand by pulling the ends of the belt back and forth. Note, after the mast is shaped round, you must finish-sand in the direction of the grain.
Unless your woodworking skills are quite good, you should start with a piece of wood as long as the mast. Scarfing shorter pieces together requires considerable skill and accuracy. The scarf should be at least 8:1, preferably 12:1. If you are unsure of the meaning and implications of these statements, don’t try scarfing until you have gained experience. An excellent, perfectly aligned joint is essential to an effective result.
Moderately More Complex and a Bit Stronger
A mast can be laminated of multiple, thin, full length pieces. Done thoughtfully and carefully, this can result in a stronger mast of the same cross-sectional size.
The simplest laminated mast is made by joining two pieces lengthwise. Start with a square (or rectangular) blank that is at least ⅛ in bigger in cross-section than the final intent and that is several inches longer. Cut this blank in half lengthwise (the extra ~⅛ inch is to allow for this saw kerf), and then glue it back together with a lengthwise offset of a couple of inches. The intent is that, if there are any weak spots in the blank, they will not line up because of the offset. You will need to make these longer than the mast length to accommodate the offset. Keep the orientation of the blanks the same (DON’T end-for-end them), so that the favored direction for planing will be the same for both halves.
Plane to four-sided and then eight-sided, and sand as above.
More complex laminations could involve three or more layers. Sometimes a thin layer of harder and stiffer (and probably heavier) wood could be sandwiched between the lighter cedar. Or perhaps the forward and/or aft faces of the mast could be thin layers of stiffer wood.
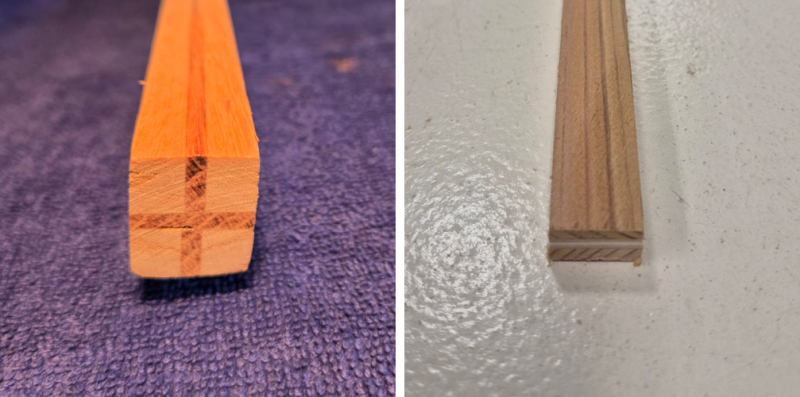
Fig. 6 shows two different mast laminations. Each uses thin sections of a harder, heavier, and stronger wood sandwiched between lighter pieces. Orient the stronger inserts based on the expected mast stiffness and strength requirements. The section on the left is unusual because it has two inserts in a cross pattern.
This mast is intended for a model that will have no stays or shrouds. The hardwood inserts add strength in both directions and provide a harder bearing surface where the mast passes through the deck.
Note that the mast does not have to be round. Often, a rectangular cross-section with rounded corners is easier, or lighter, or a better match to available materials.
Gluing and Clamping
A critical part of making the mast is getting the blank straight—whether you do that with your selection of a straight piece of wood as your blank or you glue straight pieces of wood together to get your blank. If you are gluing up a mast blank, you must use weight and/or clamps while doing the assembly on a dead flat surface.
The other important part is the glue joint(s). Do not starve the joint of glue. The glue is spread best using a credit card, making sure the entire surface has a good coat of glue. Either weight and clamp your assembly together or clamp your assembly to the work surface making sure the pieces align. It is best to work on wax paper.
Taper
Most masts taper over their lengths so that the top has a smaller cross-section than the bottom. This saves a little weight aloft, and it arguably makes the mast look better. Plane the taper into the mast blank while it is four-sided. Mark the desired taper on two opposing sides and plane to the line. Then do the other two sides. Once you have a four-sided tapered blank, make it eightsided and sand as above. Note that the mast always must be supported over its full length while planing these tapers.
Hollow Mast
Hollow masts can be lighter than solid masts, but the difference may not be worth the trouble. Fullsize mast builders are justifiably proud of their tricks to make multiple tapered staves, with proper beveled angles. This might be a delightful project for a model, but it is not suitable for your first or even second attempt.
A simple hollow mast would have a rectangular cross-section with four sides of relatively thin planks (~⅛ in) glued together carefully. You can even plane taper into these side planks. It is necessary, however, that the mast be solid wherever fittings will be attached or where there would be local stresses (e.g., the gooseneck and vang).
Mast Cross-Section Size
Size is dependent on wood species (stiffness), sail area to be supported, how carefully the mast was built, and (to a lesser extent) boat weight. No model mast will survive being slammed in a car door. Size recommendations also assume that the mast is properly supported by shrouds and stays. This usually means a pair of upper shrouds leading from somewhere near the point on the mast where the jib stay attaches down through spreaders to the deck, plus a pair of lower shrouds attached at the spreaders, plus a backstay and forestay (jib stay).
The arrangement may vary depending on the height of the jib attachment point. Shrouds and stays are topics for another article.
For purposes of this essay (except for the criss-cross example in Fig. 6), it is also assumed that the mast is deck-stepped rather than keel-stepped. Stepping the mast on deck avoids damage that could occur where a keel-stepped mast presses against the hard edge of the deck.
Built and supported according to the recommendations above, a ⅝-in round mast should be strong enough for models up to Marblehead size (800 in2 sail area). If you have doubts about your wood quality or building skill, make it a bit larger (probably no more than ¾ in). A rectangular crosssection of ½ by ¾ inch with rounded corners would work for Marblehead-sized sails. Smaller boats might get away with ⅜ by ⅝ inch. If you are building a mast to go on a boat in a particular class, make sure you check the class rule for dimensional information.
Larger boats should get bigger mast cross sections. For example, there is an “existence proof” of a Vintage 10-Rater with 1350 in2 of sail area supported by a rectangular cedar mast (with rounded corners) of ⅝- by ⅞-in cross-section (tapered at the top).
The mast is hollow, being glued up with ⅛-in thick pieces forming the rectangle. The mast has solid internal blocks where fittings are attached. It hasn’t broken yet in wind gusts over 20 knots. You should always consult class rules for dimensional information about masts and other spars.
This whole process requires about 2 hours of working time (plus whatever it takes for the glue to dry—TiteBond II (blue cap) works well, and you get to make wood shavings, which is always fun.
While this article is about mast construction, the same discussion, materials, and construction techniques can be applied to the booms and any other spars that will be needed for the boat you are working on. The construction technique described in the article is but one way to build and shape a mast. There are others that will work just as well.
For more detailed discussion of the engineering of wooden masts—solid and hollow, stayed and unstayed—see “Structural Mechanics of Wooden Masts“.