- Title. Author. Summary

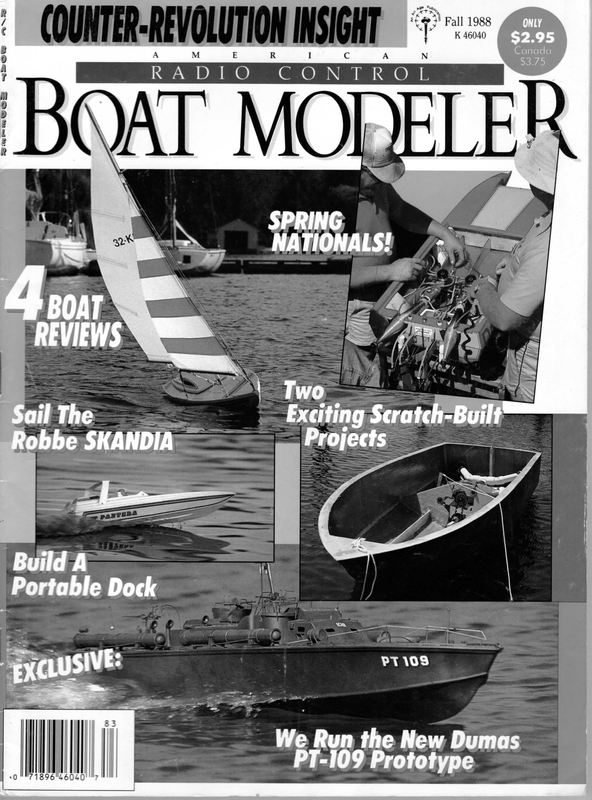
‘fe! Pall 1988 K 46040 VAT MOk LE M E RADIO. R CONTROL SPRING NATIONALS! vy 4 ~~ 4B coat ‘REVIEWS s t c e j o r P — — A N robeSHA We Run the New Dumas “0 PT-109 Prototype
I saiinc… FROM Your HEAD TO THE POND! ScratchA Sailboat by KARE laLONDE- 12 RADIO CONTROL BOAT MODELER ~~
IS ARTICLE isn’t bout building scale eplicas; it’s about building a sailboat that sails well. My sailboat was put together in about 16 hours, but this doesn’t include the time spent looking for parts. The final cost was about 15 bucks! If you decide to build a sailboat, first think about what you want it to look like. Spend time drawing the shape of the hull you want. First draw the side view, then the top, front (bow) and rear (stern); you’ll then have a basic blueprint. I prefer to build with styrofoam, which can be bought at any lumberyard. It comes in 4×8-foot sheets of varying thicknesses. I use two-inch-thick sheets, because they are easy to sand. My boat is 32 inches long and 9 inches wide, but I wish I’d made it two or three inches wider, as extra width would help it to sail flatter. I started with two pieces of two-inch-thick styrofoam, cut wider and longer than the finished boat would be. I then painted the contact surfaces with a latex paint. This protects the foam from being pitted by the contact . ee : Bisley es rigging. Here you see two threaded Kwik-Links find a cement that’s used to laminate the two pieces of foam that form the basic building block. Next, I drew the top view directly onto the foam and cut it out, with FALL 1988 13
Yes it’s me. I wish I could sail the big ones as easily as this one sails. works best for me. Place a largeenough piece over the bottom, pull it tightly to the deck and tape it in place. If there are any bumps in the cloth covering, remove them, because after the resin has been applied, it’s not easy to sand them down. With the cloth stretched over the bottom, mix the resin and paint it on. When the resin has hardened, repeat the process. Two layers of both cloth and resin should be enough for any size of sailboat. Sand it lightly and fill any low spots with auto spot putty. a quarter-inch margin all around. I used a saber saw, but a long knife or a coping saw would work just as well. I used a belt sander with a coarse belt to roughly shape the foam. If you have a table sander, that’s ideal. With the belt sander clamped upside-down into my vise, I can move the boat much more easily over the sander and check the shape after every pass. When I had the rough shape I wanted, I finished sanding by hand. It looked pretty good, but to make sure, I ran my hand over the bottom to feel for high and low spots. A few more passes with fine sandpaper andI was satisfied. Next I covered the bottom with a good, easily sanded wood filler.lusea water-based filler; just add water to it and mix until you have a smooth slurry. Paint it on; let it dry; sand it smooth with fine sandpaper, and it’s ready to be covered with polyester glass resin. Thin, closely woven fiberglass cloth Left: Bow hardware cut out of aluminum to hold the frontstay and jibstay. } Right: Below deck is the radio compartment. The 4- inch extension arm on the servo works as a winch for the main and jib sheets (ropes to pull in or let out the sails). 14 RADIO CONTROL BOAT MODELER | | When the bottom had hardened for about an hour, I cut away all the loose fiberglass cloth and sanded the topside edges. At this point I was feeling proud, because the boat was really starting to take shape. I used inch plywood for the deck and I edged it with basswood. The basswood trim around the deck and sides looks attractive, and it solidly joins the hull to the deck. Next, | cut through the plywood and through a two-inch layer of foam to make the cockpit and radio compartment. I covered the bottom and sides of the exposed foam with balsa, and the cockpit was finished. | What about the keel? No, I don’t pour in hot lead; most builders don’t have the facilities to do that. For the keel’s leading edge, I cut a triangular piece of balsa, and I glued the two leading edges of Ye-inch pre-cut plywood to it. When the glue had dried,
are Now there 28 OLCTTUIRIAN X-SERIES PROPELLERS 4 NEW SIZES From direct drive electric R/C boats to 30cc gas powered R/C model boats, there are 24 Octura competition proven “X” series metal propellers available. Ranging from the X427 up to the X482 there is an Octura “X” series pro- peller for any engine class and boat class legal under IMPBA and NAMBA rules. Last two numbers indicate propeller diameter in millimeters while the pitch is 1.4 times the The cabin superstructure is also the radio cover. I epoxied the trailing edge. The keel looks like a wing, as both the sides and the front taper to the bottom. The keel on the boat hangs down seven inches, with two inches inside the boat. To put weight in the keel, I had to seal the bottom. Using the bottom of the keel as a template, I traced the bottom cap for the keel and cut it out of %-inch plywood. Then I was ready to weight the keel. This weight (ballast) is necessary to keep the boat upright under windy conditions. I do use lead, but it’s in the form of plumbers’ solder. I cut the solder into lengths that fit compactly into the bottom of the keel, and for this boat I needed approximately two pounds, When the lead solder was in place, I poured resin over it to keep it in this position. The resin added another quarter pound to the boat’s weight. I attached the keel by first tracing the outline of the top of the keel slightly behind the center of the boat. I cut through the fiberglass layer and one layer of the foam, and I then inserted the keel, using cloth and resin to attach it to the bottom. (Two layers are enough to secure it very firmly.) Connected to the same screw-eye are the jibstay, forestay and antenna. diameter. The only satisfactory replace- After sanding the seam, I smoothed it with auto patch putty. I made the rudder of 44-inch plywood with a steel rod epoxied into a channel, and I veneered and painted it. The mast can be made from a piece of old TV antenna; if you don’t have an old one in your garage, try your local junkyard. On my boat, the sail cloth is real sailcloth that I bought from a sail-maker several years ago to patch a sail on my big boat. However, your local fabric store will have Dacron or nylon, and both work well. I cut and sewed the sail, with battens sewn in. Other things needed to complete the boat: Mast rigging: picture-hanging wire Sheet rope: nylon cord Rigging tie-downs: screw-eyes Turnbuckles: Kwik-Links; two-inch length of 4-40 threaded rod Two-channel radio Imagination: you have it! I think modeling is an art form, and any art form requires only about five percent talent—the rest depends on a commitment to do your best! By the way, the boat really sails well! Oo ment for an Octura propeller is an Octura propeller. RECOMMENDED APPLICATIONS X427) Direct Drive X432 > Electric- X430 _X435_) Ve Dia, Shaft X430RH |(X437/3 3.5 Outboard) xa a a and Inboard 4 X440/3 _xga2 X445 7.5 Outboard ( X447 _X452/3 4 _{ X455 utrigger \X457 Outboard 75 X455/3 Hydro “Haan79|»eae .65 Scale X460 X465 Tunnel *X467 |. sci *.250 Borae. «= RATA *X4B2 i, 90Own Outrigger Send stamped, self-addressed envelope for price list. shy hie eat THE R/C MODEL BOAT PROPELLER PEOPLE Octura Models, Inc. 7351 N. Hamlin Ave. ¢ Skokie, IL 60076 FALL 1988 15
‘just LIKE YOUR BOAT….TAKE IT WITH YOU!! ” = . E L B A T R O P ~ BOAT DOCK N O ANY PONDS AND LAKES are ideally suited to model boating. However, whether the property is private or public, the owners may be reluctant to let you or your club use it, because they may not have adequate insurance coverage. My club was allowed to use a public park for our sailboat races, but the village authorities wouldn’t § JT R U “ee allow us to erect a permanent boat dock. We had to wade into the water to launch or retrieve our model yachts, so if we wanted dry feet, we had to wear knee-high boots and change our footwear after a launch or a retrieval. Since we weren’t allowed to install a permanent dock, we deduced that we could at least install a temporary one. I designed a I temporary dock that was portable, inexpensive, handled well, and fit easily into the rear of a station wagon or pickup truck. Here’s a general idea (not a precisely detailed plan) of how | built the temporary dock. You can make improvements and change the dimensions to fit your requirements. Our dock was designed to fit into the back of my 1963 Studebaker Wagonaire and to match the slope of the shoreline where we sail. The wood for our dock was leftover scrap material from a house that was being built. The frame was made from 2x6s and 2x4s, and the deck was made TRIM FLUSH TO EDGE OF SIDE STRINGER from scrap 1x3s. Your major expenses will be a set of bicycle training wheels, lag bolts, nails and two metal handles. If your garage is anything like mine, you’ll probably have 90 percent of your required hardware already on hand. ADD WHEELS — 1xqn (BICYCLE TRAINING WHEELS INEXPENSIVE) 1×3″ Edge for Spacing so Si wl A = melee i—/al ry 2x6x8′ pala ae rn a a os When the portable dock had been in use for several weeks, a second, unexpected, use for it was discovered. When moving the dock, the end that usually rests on the bank was set on top of a metal trash can—a great portable picnic table! With one end of the dock/table supported by a trash can, picnic cleanup was a breeze! By using a portable dock, we were able to launch our yachts 2×4” —e with minimal effort. The Village Park Board was relieved of its : Ke worry about having an unattended dock, as the only time that a dock 1×42 & 24 LENGTH AS REQUIRED (8′ LENGTH USED) RADIO CONTROL BOAT MODELER was in the pond was when we were sailing. A portable dock may help you gain access to good sailing areas that would otherwise be closed to you and your club. O
BOAT REPORI weight and the radio. The instructions are generally good, but I occasionally had difficulty matching the drawings with the written instructions. In a week of AVE you noticed that things which rely on the wind for their power seem to possess a special grace? Add the need to travel over water, and you’ll see why human beings have been interested in sailboats for a long, long pleasant evening work, you can have your Fairwind ready for the lake. ® Construction: The XActo No. 25 whittling blade worked best for carving the flashing from the hull mold, but you won’t need to carve any wood from the die- time. (Archeologists unearthed an 11,000-yearold stone model of a Sailing craft at Fayim, Egypt, in 1929.) Just as the stone model was one of the first, the Kyosho* Fairwind is certainly one of the latest ARF (Almost Ready to Float) boats. It’s a handy size—3 feet long and 5 feet high— and it’s easily dismantled for tH cut parts— If you decide to use regular wood transportation. The ABS molded hull is flawless, and the mast and spars are of good-quality extruded aluminum. The Fairwind is suitable for beginners, but it will also challenge those with experience, and everyone will appreciate the quality of the kit and the ease of construction. The kit supplies everything except tools, glue, ballast 30 RADIO CONTROL BOAT MODELER they’re so well cut that they just fall out. Luckily, Kyosho labeled them! The hull and rudder are beautifully molded and perfectly symmetrical. glue to hold the ballast in place, use the yellow glue rather than the white. Neither is waterproof, but the yellow is much more water resistant than the white. If you use epoxy, warm it slightly before mixing, to make it flow more smoothly. (I set mine in warm water.) Kyosho recommends 3.75 pounds of ballast when usinga sail winch, but I used 3 pounds in my keel, by DICK BRINTON
as Se BO ee eee eee Oooo = ee thinking that I could add pre- cleat. In this of shot later, way, you can depending on the wind strength. x Light boats rudder, I filed ee and secured it on the same weighed bags sail better in light winds. When mounting the ee 5 = _ _. into the deck using Pacer’s Plasti-Zap and then carefully sealed everything else into the hull. When installing the off/on switch, use the rubber switch cover (furnished) to ensure a watertight seal. After carefully fitting the hatch onto the hull, I decided that a bead of silicone would seal beiier than the tape provided. I covered the lip of the deck with a sheet of wax paper, put the silicone on the hatch lip and mounted the hatch to the deck. When the silicone had set, I trimmed off the excess and then had a solid watertight seal. When rigging the boat, you’ll find that the forestay is led through the leading edge of the jib. The instructions tell you what to do with the lower end of the forestay, but the upper end isn’t mentioned. I fed it through the same mount as is used by the “jib-sail string” fore and aft, < while still 2 maintaining ‘3 __ the ability to = adjust the 2 Partially finished boat on the cradle that is also included in kit. a flat on the rudder post for the setscrew in the rudder horn, andI used _ | _ Pacer’s* Zap-Lock. Even if you don’t-have a sail winch handy when you’re building, set up the servo box to handle the sail servo (the recommended Futaba* S-25; Sanwa/Airtronics* 94581, or the servo you select). While the instructions say the Fairwind can be sailed without a sail-winch servo, I recommend that you install one as soon as possible. The boat will sail without it, but it sails much better with it, and if you plan to race the Fairwind, you'll definitely need a sail-winch servo. Shock-mount and bag your receiver in a plastic sandwich bag before installing it. No matter how well the boat is sealed, added protection is necessary, because water and electronics don’t mix! For this reason, I glued the scale winches adjust the tautness of the rigging shape of the jib by using the jib-sail string. | made a change where the backstay and “mainsail string” connect at the masthead. I thought that the edges of the holes in the aluminum plate would quickly wear through the string, so I used a pair of nylon clevises that I grooved with a rat-tail file. The mast can be taken down and laid horizontally on the boat without removing the sails or disconnecting any fittings (including the main and jib sheets), so the boat is easily portable. When setting the rigging for sailing, make sure that the forestay, backstay and shrouds are reasonably tight and that the mast is vertical. Adjust the tension of the lines controlling the sail, to remove the wrinkles and flatten the sails. This is always a juggling act. When you’ve finished sailing, loosen all the lines controlling the sails, or the cloth will stretch out of shape. @ Performance: On the water or off, the Fairwind is a very pretty boat, and it attracts lots of attention. It’s fun to sail and will ghost along on a “drifter” day or make knots when the wind’s up. Of course, if you forget to ballast correctly (as I did), when the wind’s up, the boat lies on its side; but as soon as the wind dies down, it rights itself. What more can one ask? Wax paper was used in making silicone seal for waterproofing. (See text.) *Here are the addresses of the companies mentioned in this article: Kyosho; distributed by Great Planes Model Distributor, 1608 Interstate Dr., P.O. Box 4021, Champaign, IL 61820. Pacer Technology, 930 W. Hyde Park Blud., Inglewood, CA 90302. Futaba Industries, 555 W. Victoria St Compton, CA 90220. Airtronics Inc., 11 Autry, nine, CA 92718. oO
GLOSSARY = PORT - left EASE.- let sails out STARBOARD- right HARDEN UP. AHEAD AN PORT | STARBOARD Basic Right of Way goes to: 1. Boat on stbd tack (sail on left) 2. Boat being overtaken 3. Boat to leeward D head boat closer into the wind (trim sails) BEAR ASTERN wi TRIM- pull sails in z BASIC SAILING OFF WIND >. – head boat away from the wind (ease sails) 2 WIND TACK-tun Wy boat into, through and SSP put the windon ~— ‘\ (leave sails alone) i the other side of sails ! JIBE – turn BA boat away yo – from the wind untilthe — £ um : sails swish \ across the boat and the wind hits them from the other side (leave sails alone) Batten WIND v WING AND WING – Leech Luff Leech sailing directly away from the wind with the mainsail on one side and the jib on the opposite side Luff Mainsai! RUNNING RIGGING movable lines that control sails, called “Sheets” – jib sheet main sheet Jib Club 4 Stern ja Topsides Rudder Bottom Wigs i STANDING RIGGING. fixed lines that support mast called “stays” or “shrouds” Waterline Keel Ballast (weight) FALL 1988 59
Reprinted courtesy of Dumas Products, Inc. WINDWARD- toward the direction from which the wind is blowing LEEWARD- away from the direction from which the wind is blowing WIND Y WIND DIRECTION Y WINDWARD BEAT a Oy LEEWARD BEAT CAN’T SAIL DRAFT- the distance from the boats waterline to the bottom of its lowest point, OR the depth of the water needed to float the boat! CLOSE REACH CLOSE REACH BROAD REACH BROAD REACH RUN BASIC = POINTS SAILING PRIMER OF SAIL 1. BEATING TO WINDWARD (ailing into the wind) WIND DIRECTION on port tack (sails on right) close hauled (sails in tight) \ \ 3. BROAD REACH sailing away from the wind) WIND DIRECTION Ny on port broad reach (sails on right) sheets eased (sails out 50%) close hauled (sails in tight) 4. RUN (sailing before the wind) WIND DIRECTION WIND DIRECTION ] (sails on left) sheets eased (sails out 50%) on starboard tack (sails on left) 2. CLOSE REACH (sailing across the wind) on starboard broad reach on starboard reach (sails on left) v on starboard run (mainsail on left) sheets out (sails out 100%) sheets eased (sails out 25%) on port reach (sails on right) sheets eased (sails out 25%) On port run (mainsail on right) sheets out (sails out 100%) 60 RADIO CONTROL BOAT MODELER
BOAT REPFORL _ SPECIFICATIONS Length: 40 inches (1,900mm) ‘Beami: 9.45 inches (240mm) Height: 54.3 inches (1,680mm) Displacement: 7 pounds, 11%, ounees (3.5kq) BY LOUIS F. ANDREKO II ODEL SAILBOATING is one of the most relaxing forms of R/C modeling, and it offers full-size | sailboat excitement. The Skandia R/C Yacht by Robbe Model Sport* has many prefabricated parts, so it’s easy to build, and the finished product has the aura of a millionaire’s full-scale plaything. THE KIT: This comes carefully packaged with all the components neatly bagged or protected with tissue paper. The aluminum-extrusion mast has a formed luff channel running along the rear side. The main boom and jib club are made of sections cut from the aluminum mast. The deck, mast and boom hardware is all made of brass. The Dacron sails are pre-sewn and are packed in a cardboard tube to prevent damage. The keel ballast (No. 1074), the Robbe sheeting arm with mount (No. 8989) and the radio gear aren’t included. CONSTRUCTION: The Skandia is designed for fairly experienced boat builders. You must have the right tools; a Dremel* Moto-Tool kit with accessories and a Dremel jigsaw are vital. The instructions could be improved, and the assembly photos aren’t detailed enough. The full-size plan sheet is much more useful—a real frustration-saver. Sort out the parts and become familiar with them. The parts list tells which parts are ready-made and which have to be cut from stock according to the plan sheet. The parts list is FALL 1988 63
numbered to show at which step in the assembly the part will be required. Trim along the lines indented in the ABS molded-plastic hull and deck, and sand the edges. The hull and keel support bulkheads have to be cut from a 3-ply birch plywood sheet and then glued together with Hot Stuff* Super-T (gap-filling CA). The ABS plastic surfaces must be scuffed with sandpaper so that the glue adheres properly. All the plywood parts should be coated with a sanding sealant to prevent water from warping them. With the bulkheads and rudder support in place, the deck can be joined to the hull. To ensure a good fit, I cut small, wooden, reinforcing strips (1×36 inch) from the scrap birch plywood. These strips are glued on the inside of the deck lip, and spaced 1% inches apart. The best way to keep the spacing to the deck edge correct is to cut a template from scrap hull ABS plastic, and then hold it between the edge of the deck and the reinforcing strip. If you do this, the joint between the deck and the hull will be tighter along the entire length of the model. Check for a proper fit, and fasten the deck to the hull with masking tape. Lay the assembled deck and hull upside-down and glue along the hull/deck seam. The Skandia ona star- board tack reaches unexpected speeds in right wind. I had a problem attaching the keel weight to the steel support-post pins that hang down from the hull. The instructions tell you to epoxy the keel weight to the pins, but what happens if the epoxy fails? Goodbye, keel weight. To solve this problem, I drilled and taped the top side edge of the keel weight to fit a 4-40 setscrew on the steel support pins. If you’re careful during assembly, you won’t need to paint the hull and deck. Also, you can assemble the entire model without the keel ballast in compartment. Note the Robbe sheeting arm mounted to the AristoCraft servo arm. place and just add it as a last step. used the Challenger 2000 two-stick R/C system by Aristo-Craft*. It has two high-torque indirect-drive servos that give 42 inch/ounces of torque. The Skandia is designed to use a Robbe sheeting arm, and this mounts onto the top of your servo. This is lighter than a heavy sail winch that can reduce the model’s performance. The servo winch arm makes it easier to set up the sheeting lines under the deck. PERFORMANCE:I tested the Skandia at a local pond on a day when the wind was just right at 8mph. I quickly rigged the model, and with all systems checked and in order, off to the water I went. With the Skandia launched, | eased out the sails and away it sailed to open water. During 30 minutes of sailing, the Skandia performed excellently. The boat was very responsive to helm and tacked straight on port and starboard tacks. The Robbe Skandia has sails designed for light to moderate winds, and it reaches speeds that are exceptional for a boat of this size. The Skandia is a quality kit that produces a great-looking R/C model yacht. *Here are the addresses of the companies mentioned in this article: Robbe Model Sport, 180 Township Line Rd., Bell Mead, NJ 08502. Dremel, 4915 21st St., Racine, WI 53406. Hot Stuff, Satellite City, P.O. Box 836, Simi, CA 93062. Aristo-Craft; distributed by Polk’s Modelcraft Hobbies, 346 Bergen Ave., Jersey City, NJ 07304. 64 RADIO CONTROL BOAT MODELER oO