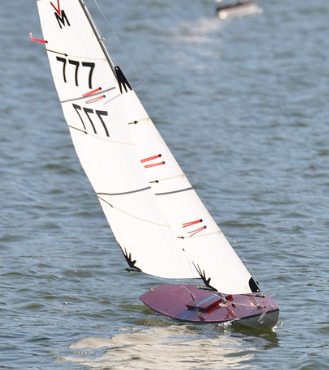
There are four items that may still need to be done. If they are not already on your sails, you should place them before you start the final assembly of the rig. It will be a lot easier. These items are the battens, class insignia, numbers, and telltales. You can see all four of these things in the photo of VM 777.
Sail Battens
A batten is a long, flexible strip of material inserted into pockets on a sail or affixed to the surface of a sail. They support the sail’s trailing edge (the leech), prevent it from fluttering, and help maintain an aerodynamic airfoil shape for better speed and performance.
In most cases, battens are controlled by the class rule. There are two things you need to know:
- The number of battens allowed.
- The maximum allowable length of each.
Generally, polystyrene strips are used. You will use larger strips for a larger boat and smaller strips for a smaller boat. They are usually placed on the trailing edge of the sail on seams between the sail panels.
Materials
- Double-face tape (1/2 in width)
- Masking tape
- Polystyrene strips
- For larger boats – Plastruct MS-625 Rectangular Strip 0.06 by 0.25 inches
- For smaller boats – Plastruct MS-419 Rectangular Strip 0.040 by 0.187 inches
Tools
- Cutting mat
- Roling pin or seam roller
- Ruler
- X-ACTO® knife
Procedure
- Determine the number and length of the battens needed for you boat.
- Mark where each batten goes on each sail.
- Cut all of the pieces needed to length.
- Place a piece of double-faced tape on a cutting mat, backing side down, and secure it to the mat with masking tape. Pull the ends taught. Note: Make it long enough to accommodate all of the battens.
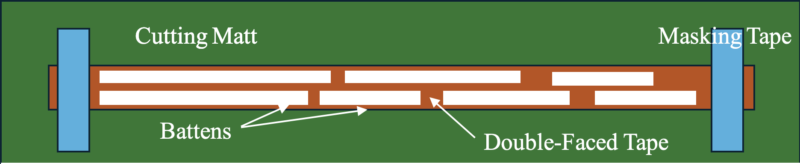
- Carefully place each batten onto the sticky face of the tape. Rub down.
- Using a sharp X-ACTO knife cut around the edge of the battens.
- Lay each one aside with the tape face up.
- Before you go to the next step know where each batten goes.
- Peal the tape backing off of a batten.
- Carefully place it on the sail starting at the trailing edge and follow the seam.
- Rub it down.
- Continue to lay all of the battens in place, rubbing them down.
- Use a roller to go over them to ensure they are down tight.
Class Insignia
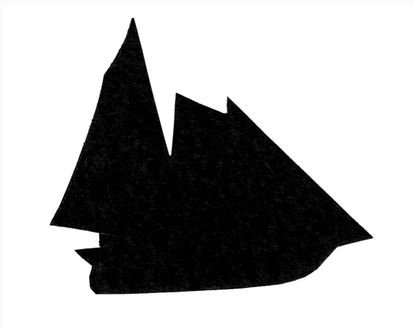
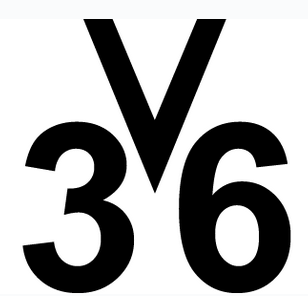
Sailboat class insignias are standardized, visual logos printed on a sail to identify the boat’s specific class or design. These are used on model yachts as well as on large sailboats.
Materials
- 60-lb card stock
- Spinnaker repair tape – available in a wide array of colors (black and red are used for US VMYG insignias)
Tools
- Class insignia templates
- Pen
- Rolling pin or seam roller
- Small scissors
- X-ACTO® knife
The sail insignias can be found in the class rules sidebar. They are prepared for download and can be printed out full size.
Procedure
- Download the class insignia template sheet PDF.
- Print these sheets on a piece of 60-lb card stock. Using card stock will make it much easier to work with the “stencil”.
- Cut out the insignia you wish to use with an X-ACTO knife or a small pair of scissors.
- You only need one insignia placed high on the starboard side of your mainsail.
- Flip your stencil over as you are working on the back side of the tape.
- Trace the insignia on the back side of a piece of black spinnaker repair tape.
- Cut the insignia out using a small pair of scissors.
- It is sometimes difficult to separate the tape from the backing. Draw the fatty part of your thumb across the edge of the tape from the front. This should release the tape from its backing. This may take a couple of swipes with your thumb.
- This tape is very sticky. Be careful not to let the tape fold back on itself.
- Apply the insignia and carefully rub it out to get it flat on the surface of the sail.
- This tape has surface holes so it should be easy to get the bubbles out.
- Use a roller to be sure they are tight to the sail.





Sail Numbers
Sail numbers are a unique identification assigned to racing sailboats. They serve as a boat’s “license plate” during regattas, helping race officials, scorekeepers, and spectators identify specific vessels on the water.
We provide downloadable files for the sail numbers. They are available in 3- and 4-in sizes. Both can be used with the 2 in wide spinnaker repair tape. We recommend using the 4-in numbers because it is easier to for race committees to identify boats from the edge of the lake.
Materials
- 60-lb card stock
- Spinnaker repair tape – available in a wide array of colors (black and red are used for US VMYG insignias)
Tools
- Class number templates
- Pen
- Small scissors
- X-ACTO® knife
Procedure
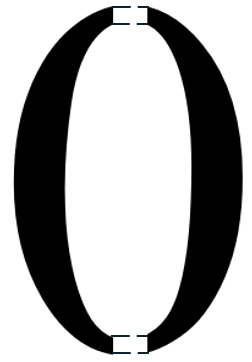
Note: If you are using any numbers with a center like a zero, make sure to layout “bridges” before you cut them out. You do not want the center piece to fall away when you cut out the template. If it does you cannot draw the zero correctly onto the tape. The bridges keep the piece in the center of the stencil. Do not cut through them when you cut out the stencil. This is just like the stencils you used as a kid. Sketch in the connectors between the sides of thenumber where the bridges are before you cut out the tape number.
- Make a template of the number positions on the sail. It is good enough to make rectangles for each number. Pay attention to the different widths of the numbers and the spacing between them.
- Trace your numbers on the back side of the tape. Be sure to flip your stencil over so you will trace the numbers backwards.
- Cut them out with a small pair of scissors.
- Tape your location template behind the sail using masking tape.
- It is sometimes difficult to separate the tape from the backing. Draw the fatty part of your thumb across the edge of the tape from the front. This should release the tape from its backing. This may take a couple of swipes with your thumb.
- This tape is very sticky. Be careful not to let the tape fold back on itself.
- Apply the starboard side numbers high aligning them with the location template.
- Apply the number and rub it out to get it flat on the surface of the sail.
- This tape has surface holes in it so it should be easy to get the bubbles out.
- Use some type of roller to assist in getting the number to adhere to the sail.
- Repeat numbers 4 through 10 above on the port side.
Telltales
Telltales are indicators on the sails that make invisible wind flow visible, acting as essential tools for sailors to trim their sails and steer the most efficient course. Telltales are made of lightweight material and are placed in pairs on each sides of the sail.
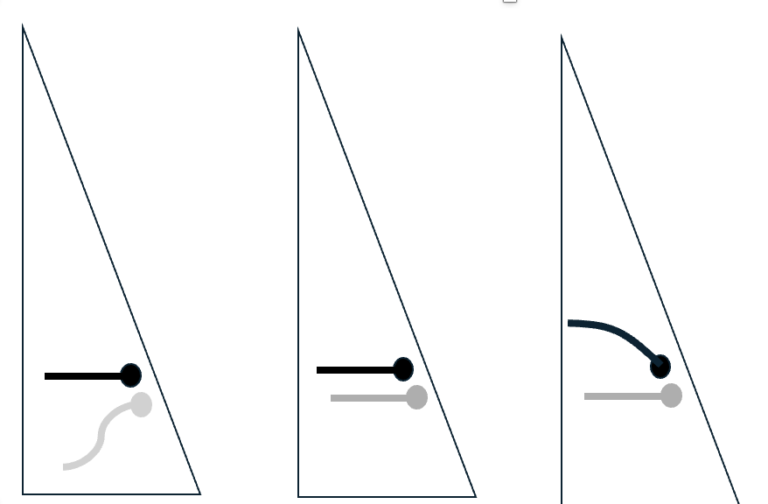
Place telltales in two primary locations on your mainsail: the luff [R34] for steering and sail trim, and the leech [R31] for detecting stalls.
On the mainsail, attach three or four pairs evenly spaced along the back edge and three or four pairs evenly spaced at the deepest point of the airfoil. This is normally considered to be 40% back from the luff of the mainsail. On the jib, place three pairs about 1 in back from the jib forestay.
Always place the starboard side telltales higher than the port side. They should be placed in a horizontal (parallel to the deck) orientation.
Materials
- Clear duct tape
- Double-face tape (1/2 in width)
- Foil ribbon (two colors: one for the starboard telltales and one for the port telltales).
Tools
- Cutting mat
- Rolling pin or seam roller
- Scissors
Procedure
- Determine how many telltales you want to install and where you want to place them on your sails.
- Cut the number of telltales you need. A length of 1 ½ to 2 inches is a good length. At each location you will place one on the starboard side slightly higher than the one you place on the port side.
- Mark the locations of all of the telltale on both sails before you go on.
- Carefully cut a piece of double-faced tape approximately ¼ in square to fit on the end of a telltale.
- Apply the tape (this stuff is sticky) to one end of a telltale and affix it to its location on the sail.
- Cut a piece of clear duct tape about 3/8 in square and place it at a 45° angle over the end of the telltale you just taped down. It will look like a diamond.
- Follow the same procedure (steps 4-6) for all of the telltales.

After years of intense research, we found the foil ribbon from cheerleader pom-poms you can get at a party store to work well. This foil is very durable. The “fringe” pieces are foil and very reflective. They are the perfect size, about ¼ inch wide.
Related Articles
- “Reading Telltales.” usvmyg.org. July 2026.