This is the point where we install the rig on the boat. You will need the boat and stand, the rig, some other stuff, and a place to hang the rig directly over the boat so the mast heel hangs just over the mast step.
Materials
- 7-in rubber band
- CA glue
- Turnbuckles [R63] (clevis assemblies)
- Sleeves [R53] (8)
- Spreader assembly [R56] (if one is being used)
- Masking tape
Tools
- Rig setting tools (square, caliper)
- Round nose pliers
- Diagonal cutting pliers
- Scissors
Procedures
Install the Turnbuckles
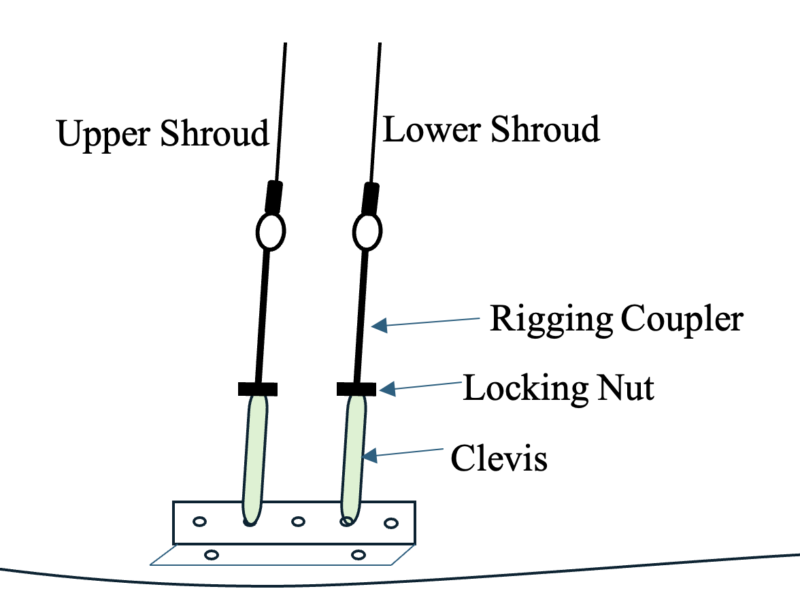
- Take the four “turnbuckles” and install them onto the shroud racks one hole from the forward and aft ends of each rack.
- Set the movement of the “turnbuckle” at about one half of the length of the thread.
- For the purpose of this discussion, clevis assemblies are being shown in the illustration. These could be turnbuckles if you have them.
Attach the Shrouds
- Cut four pieces of wire [R66], two pieces 8 in longer than the distance from the lower tang to the deck and two pieces 8 in longer than the distance from the upper tang to the deck.
- Put a sleeve on one end of a long shroud.
- Pass 2 in of the end of a long piece of wire through an upper tang.
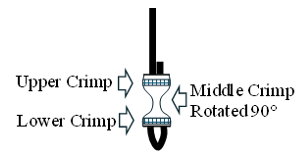
- Pass the 2-in piece of wire back through the sleeve.
- Snug the sleeve up towards the tang until it about 3/8 in away.
- Crimp the sleeve.
- Repeat with the other upper shroud.
- Do the two lower shrouds.
- Let the four ends hang loose for now.
Align the Boat and the Rig
- Place the boat on its stand under the location where you will hang the rig.
- Hang the rig over the boat by a 7-in rubber band.
- Position the boat so the mast heel is hanging directly over the mast step.
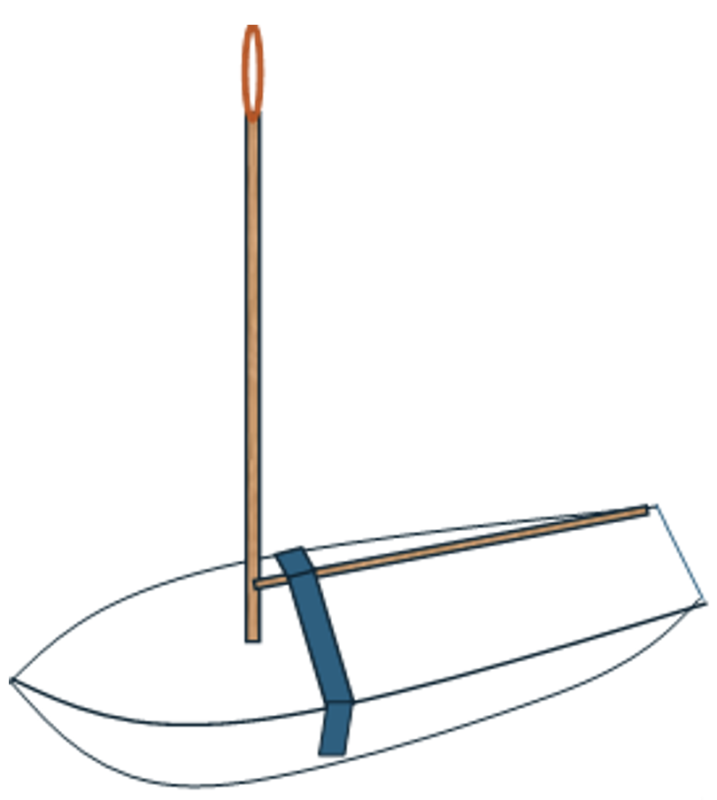
- Take a piece of masking tape long enough to extend over the boom and 3 inches down each side of the hull.
- Center the piece of tape, sticky side down, over the boom close to the mast.
- Pull down on the ends of the tape, engaging the mast heel pin in the mast step [R41] at the center hole (odd number of holes) or one hole forward (even number of holes) of the center of the mast step.
- Pull the tape down over each side of the hull with the main boom centered on the hull and secure the ends of the tape to the hull. Rub it down.
- Get the mast plumb by sliding the boat (on its stand) around until the mast is vertical. Use a small level to check. Check fore and aft and side-to-side. Close is good enough to continue.
Secure the Rig to the Boat Fore and Aft
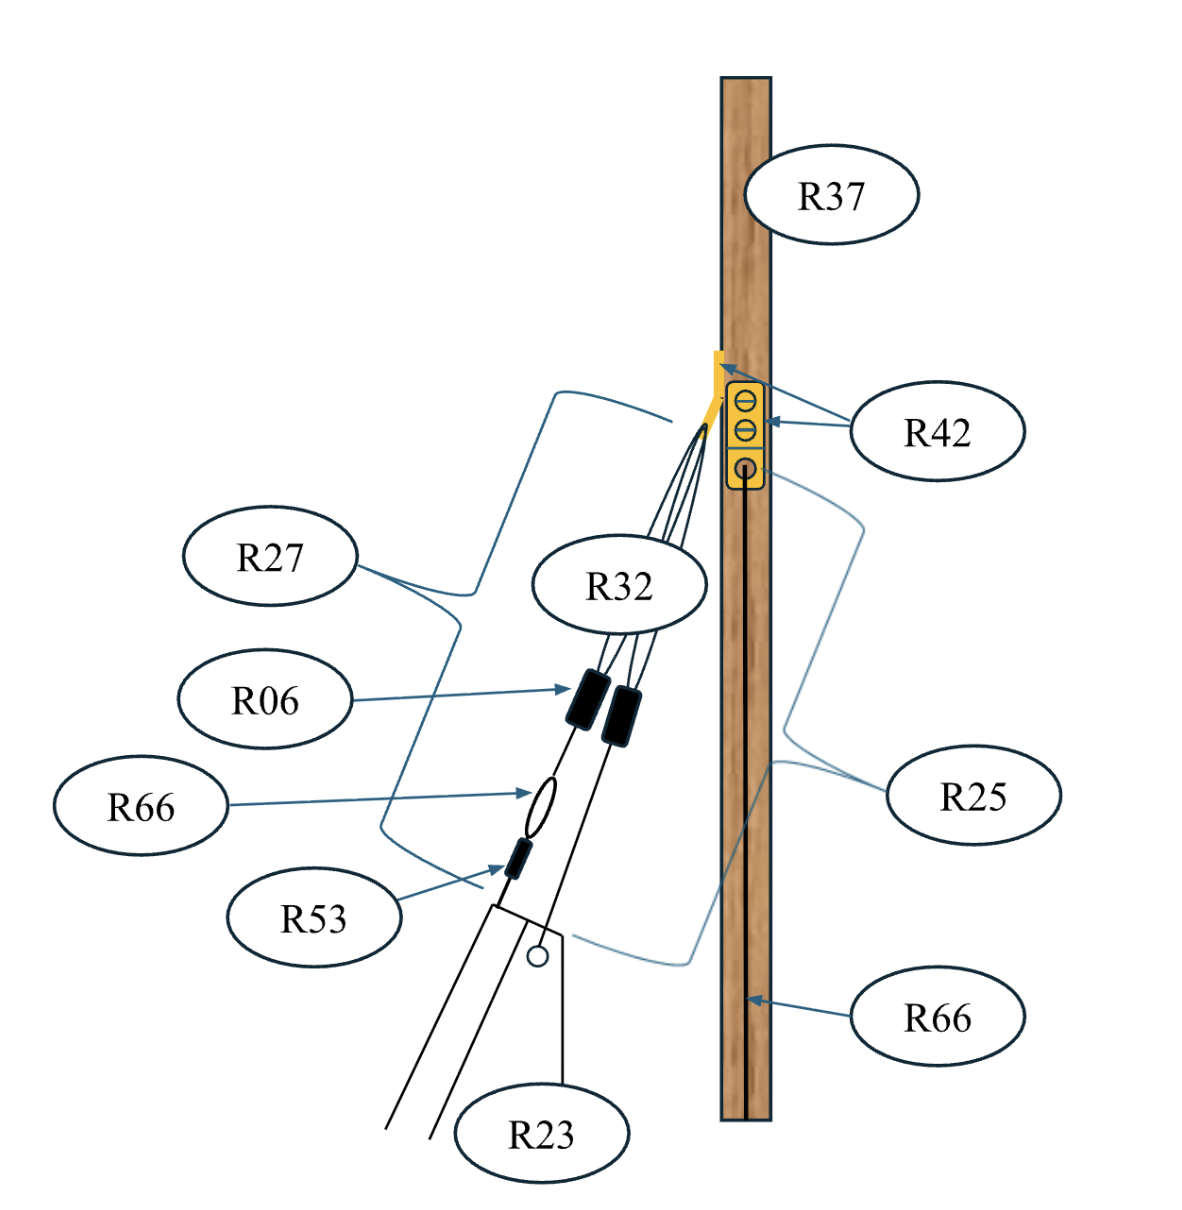
- Attach the hook on the backstay [R01] to the backstay bracket [R02]. Snug the bowsie [R06] to see how it fits. At this point you made need to adjust length of the top (wire) or the bottom (line) of the backstay to allow for a better fit. If necessary, review “Backstay.”
- Attach the jib swivel [R28] hook [R21] to the jib rack [R26]. Place it in the center hole (odd number of holes) or one hole forward (even number of holes) of the center of the jib rack.
- Take the end of the jib stay [R27] hanging loose at the top of the jib, feed it through the forward mast tang, and tie if off to the bowsie with a half knot.
- Make sure the bowsie is at a halfway point of its travel.
- Take the end of the jib halyard [R25] hanging loose at the top of the jib, feed it through the forward mast tang, and tie if off to the bowsie with a half knot.


Mast
Bowsie
Wire
Wire
Jib halyard
Mast tang
Line
Jib (sail)
Jib stay
Sleeve (ferrule)
- Make sure the bowsie is at a halfway point of its travel.
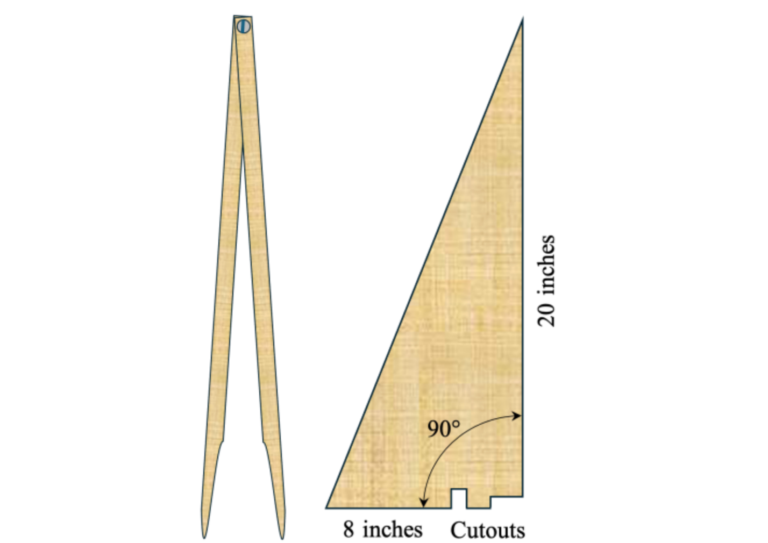
- Using your rig-setting square, check the mast fore and aft. You want the mast to be parallel with the long leg of the triangle.
- You may need to adjust the backstay, the jib stay, and jib halyard.
- Adjust the bowsies’ positions prior to completing the knots.
- When the mast is parallel with the triangle the three bowsies should be at about the mid-point of their travel.
- If you are satisfied with the position of each bowsie (there is room to adjust them in and out) complete the knots.
Secure the Rig Side-to-Side
- Take the spreader assembly [R56] and pass the piece with the shaft stiffener (stainless rod) through the lower shroud mast tang (lowest hole) from port to starboard.
- Place the other piece of the spreader onto the shaft from the starboard side.
- Take the port side upper shroud and pass it down through the hole in the end of the spreader.
- Insert a sleeve onto the lower end of the shroud wire.
- Pass the wire end through the forward clevis/assembly/turnbuckle.
- Feed the end back through the sleeve.
- Lightly pull up on the end of the wire with a pair of pliers.
- Slide the crimp down towards the clevis assembly.
- Do not crimp the sleeve.
- Repeat this with the starboard side upper shroud.
- Finish attaching the shrouds by attaching the lower shrouds the same way.
Mast tang
Mast
Spreader
Wire
Lower shroud
Upper shroud
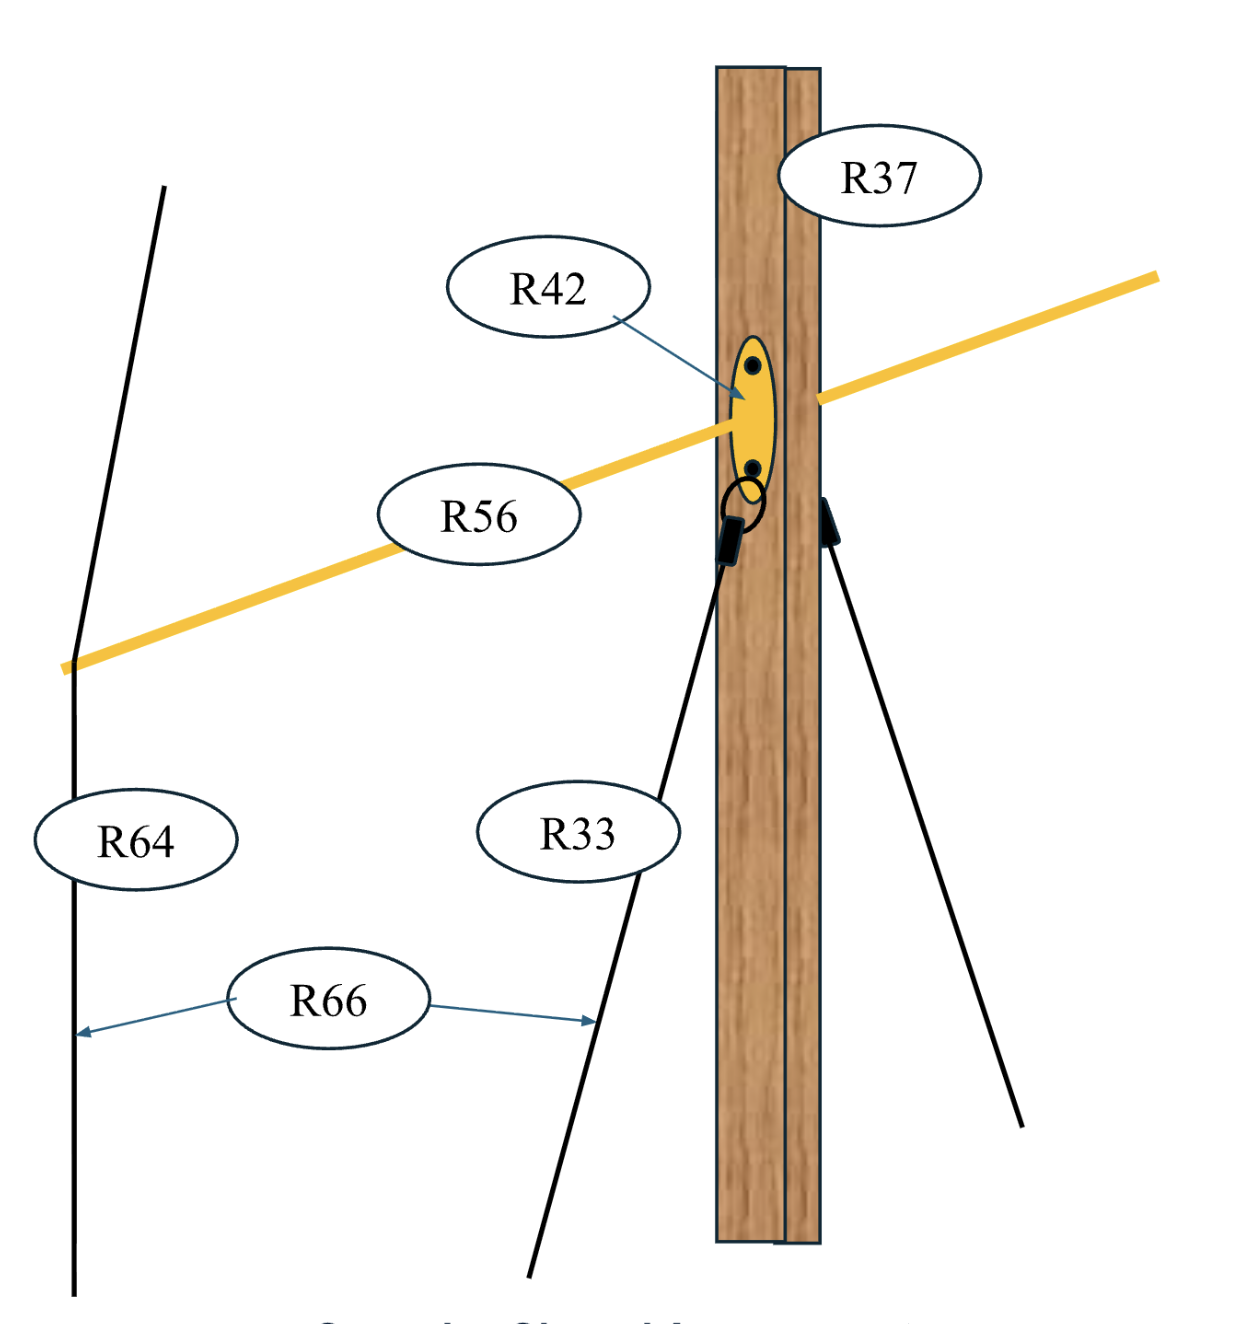
Note: The lower shrouds are always attached towards the stern end of the shroud bracket and the upper shrouds are mounted toward the foreword end of the shroud bracket. This reduces the deformation of the mainsail when the boat is running down wind.
Final Adjustment
- Check the plumb (side-to-side) of the mast using the caliper.
- If the mast and the caliper do not line up, readjust the shrouds. By releasing and tightening certain shrouds, you can move the mast from side to side. To move the mast to the port side, release the shrouds on the starboard side and tighten the shrouds on the port side. Do this in small increments. Re-check the mast for alignment after each adjustment. When you begin the process, slide the sleeves upward on each shroud. This gives you room to make the necessary adjustments. This method of adjustment will get the mast straight.
- Hold the end of a shroud with a pair of pliers and pull up to tighten the shroud.
- Slide the sleeve down to within 3/8 in of the clevis assembly/turnbuckle.
- Crimp the sleeve.
- Repeat with the mating shroud.
- Do the last two shrouds.
- Once you have the mast aligning with the caliper you will need to check the mast for straightness. Please read the article “Is Your Mast Straight.”
- At this point you may have to fine tune the mast alignment.
- Re-check the alignment with the caliper.
- If it is out of alignment, you can fine tune the alignment by disconnecting a clevis assembly and tightening or loosening the clevis or by adjusting a turnbuckle.
- Adjust all four if necessary.
- When you have the mast plumb and straight, tighten the lock nuts down on the clevis or turnbuckle.
Bench Tuning Your Boat
The last thing you must do is connect the sheets and bench tune your boat. Please refer to the article “Bench Tuning Your Boat.”