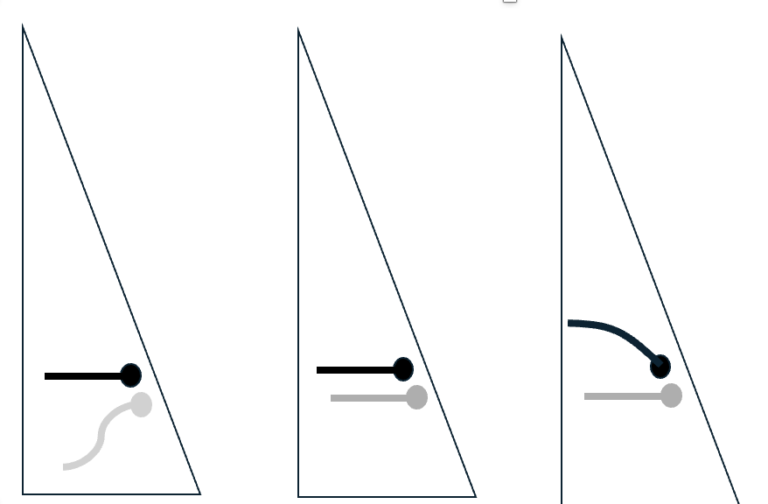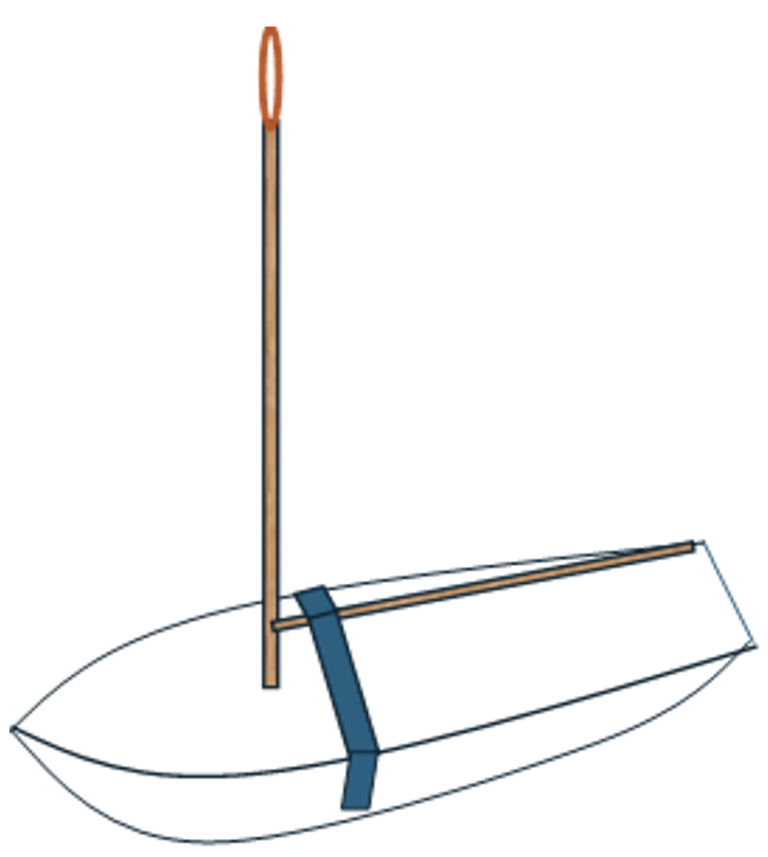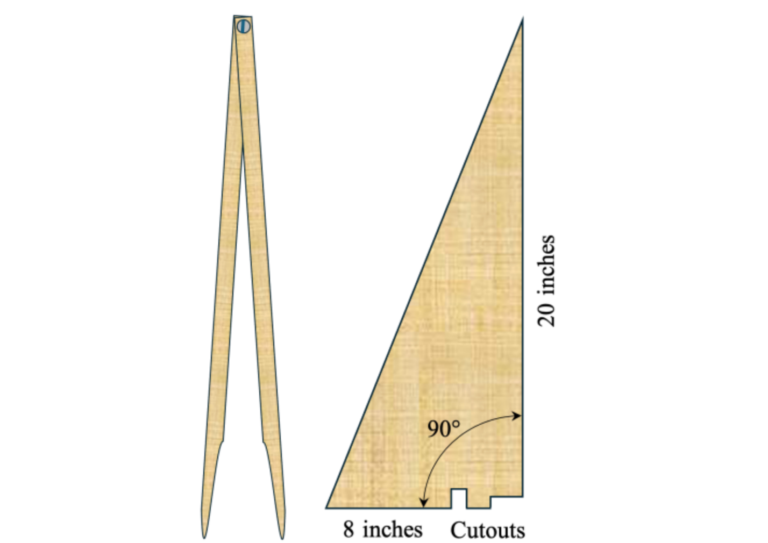
Read this and the referenced articles in their entirety before proceeding. See the “Mast Assembly Drawing” for a full view of the mast with fittings.
The mast will need to be shaped and assembled before the rig can be put together. You will need these parts for this assembly:
- assorted fasteners
- cotter pins [R11] (8–15 depending on mast height)
- gooseneck [R18] attachment bracket
- mast blank
- mast crane [R38]
- mast step [R41] pin (1/8- by 1-inch round brass or aluminum)
- mast tangs [R42] (4–6)
- screw eyes [R48] (1)
- Optional for Jenny stay strut:
- Jenny stay strut [R22]
- wire [R66] and sleeves [R53],
- two additional mast tangs [R42]
The mast length should be defined in the plan or approximately 6 inches longer than the luff [R32] of the sail. If you have a physical plan, double check the dimensions.
If you are making your mast, it should be ½ to 5/8 inch thick by ¾ to 1 inch wide. It needs to be sized to work with your specific model yacht based on your plan.
The mast will accommodate the mast crane [R38], Jenny stay strut [R22] (optional), upper shroud and lower shroud mast tangs [R42], a jib stay [R27] mast tang, the gooseneck [R18] attachment bracket, a downhaul [R13] screw eye [R48], and the mast step [R41] pivot pin. Also necessary will be the end whipping on the bottom of the mast.
Prepare the Mast
Recommendation: Drill all of the holes and cut the slot for the mast crane prior to shaping the mast. It is much easier to drill the holes and make the slot when the mast is rectangular.
- Cut the mast blank to length.
Fit the Mast Crane
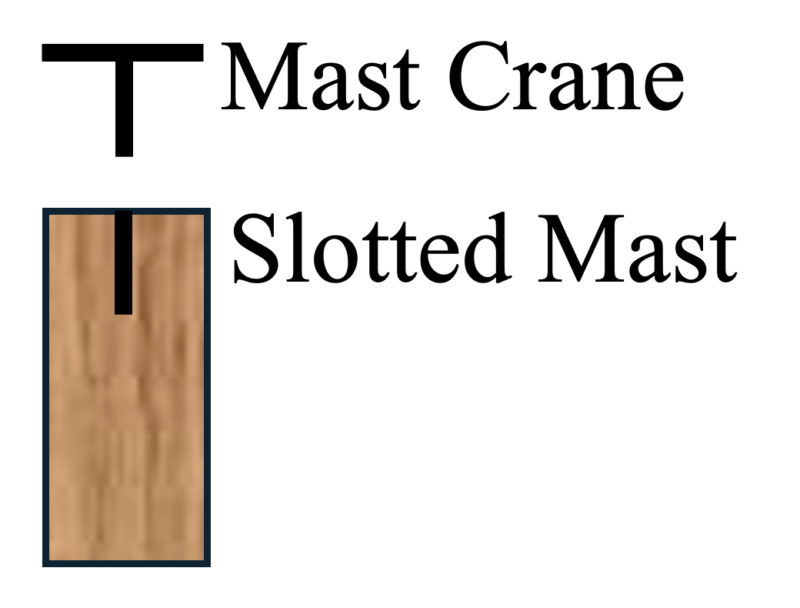
- Cut a slot in the top of the mast using a bandsaw, backsaw, or other stiff saw.
- Cut and file it deep and wide enough for the mast crane to slide in and just sit on the top of the mast.
Get Mast Final Size
- Lay the mast on a flat work surface on its starboard face.
- Place the gooseneck bracket along the trailing edge of the mast about ¾ in above the bottom of the mast.
- Lay the main boom in place, perpendicular to the mast.
- Lay the mainsail in position along the back edge of the mast.
- Place the mast crane in its slot.
- You should have about ½ in above and below the sail. If you have more than that amount of space cut the mast down accordingly.
Hardware Pilot Holes
- Once you have the mast length correct and the parts positioned as mentioned above, measure the luff (lead) edge of the mainsail.
- You are preparing to mark the mast for the cotter pin locations. These allow you to attach the mainsail to the mast using a jackwire.
- You will use between 8 and 15 cotter pins to act as attachment points for the jackwire depending on the size of your boat.
- Now for the math. You want between 3 and 5 inches of space between the cotter pin locations: a larger dimension for a large boat and a smaller dimension for a small boat.
Example (a rig for a Marblehead class boat): A good distance between the cotter pins for an M class boat is 5 inches. Divide the luff edge length of the mainsail by 5. If we have a boat with 65-in luff measurement on the mainsail: 65/5 = 13. The answer is the number of spaces. You will need one less cotter pin, or 12 cotter pins.
- Mark a pencil line on the luff (lead edge) of your sail every 5 inches (or whatever your measurement is). The top and bottom end positions of the sail will be maintained by control loops (R10) around the mast. You will not need cotter pins in those two locations.
- Adjust your sail so it is equal distance between the top of the main boom and the bottom of the mast crane.
- Transfer the marks to the trailing edge of the mast.
- Transfer the hole locations on the gooseneck bracket to the trailing edge of the mast.
- Lay the mast on its lead edge to prepare to drill these holes in the trailing edge. Use an awl or a center punch to make a “divot” at the pencil marks in the center of the trailing edge of the mast for the cotter pins holes and the holes for the gooseneck attachment bracket. An automatic center punch works very nicely for this process.
- Using a drill press (to keep everything aligned) or an electric hand drill, drill the holes for the cotter pins (these should be 1/16-in cotter pins) with a 1/16-in drill bit. DO NOT drill all the way through the mast. Set the depth gauge on your drill press or use a tape ring around the drill bit in your hand drill to control the depth. You want to have a hole that is about ½ in deep. The pilot holes in the mast for the gooseneck bracket should be drilled with a #54 drill bit.
- The three holes for the gooseneck bracket should be pilot holes and go about the same depth as the holes for the cotter pins.
Mast Step Pin
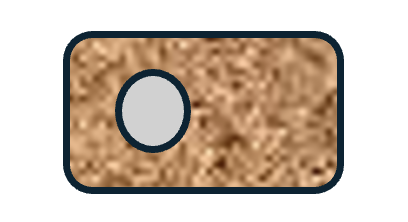
- The mast step pin is a 1/8- by 1-in piece of aluminum or brass round rod to match the simple mast step (R41) that will be used. Brass and aluminum are not compatible, so do not use both metals: use either one or the other for both the pin and the mast step.
- Drill a 1/8-in hole in the bottom of the mast, centered sideways and the same distance in from the front edge of the mast.
- Lay the mast flat on a work surface, near the edge.
- Using an electric drill , drill a 1/8-inch hole, 7/8-inch deep in the bottom of the mast, positioning it as shown.
Jib Stay Attachment
- The location of the mast tang where the jib stay attaches to the mast is controlled by the Marblehead class rules. On the example the bottom of that tang is placed at 57-inches. Mark and center punch these tang holes.
If you are going to install a Jenny stay strut skip this step. The jib stay will attach to the hole in the bottom of the strut. Go to the instructions below for installing this assembly.
Shroud Attachment Points
The Marblehead class rule states: Height of the jib head stay above the deck shall not exceed 80% of the height of the head of the mainsail above the deck.
- Locate the mast tangs for the upper and lower shrouds on the sides of the mast.
- The two upper shroud mast tangs are placed in the same area as the jib stay mast tang on the sides of the mast 1/8 inch higher. Place them higher by 1/8-inch so that the the screws for the three tangs will not interfere with each other. Mark and center punch the tang holes.
- The lower shroud mast tangs are place at a point halfway between the bottom of the mast and the upper shroud mast tangs. In the case of the example, this is 28 1/2 inches. Mark and center punch the tang holes.All of the pilot holes get drilled with a #54 drill bit for the screws that will be used. The screw is a #2 x 3/8-in round head brass or stainless-steel screw.
- The lower hole in the lower shroud mast tang gets drilled with a 3/32 drill bit to accommodate the spreader shaft.
NOTE: If you have access to a drill press you can drill the holes with a lot more accuracy and in a couple of cases, when drilling from the sides, drill directly through the mast.
Shaping the Mast
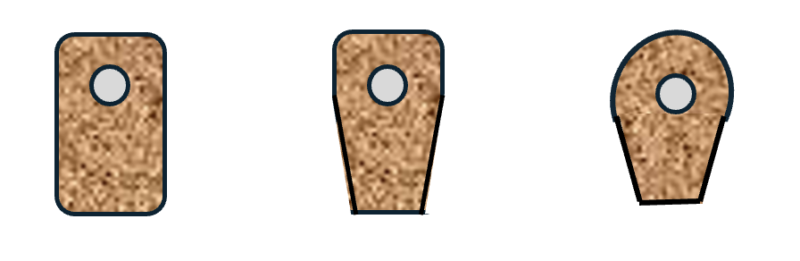
As a beginner, you may wish to keep the mast shape simple. Mast shape will makes little to no difference in the performance of your model yacht. One shape may look better than another shape to you. You can keep the cross-sectional shape simple. Or you can make the cross-sectional shape more aerodynamic.
There are number of ways you can go about shaping your mast blank for your boat. A simple cross section is a good place to start if you have minimal woodworking skills. Using a sanding block with a 100-grit sandpaper will allow you to round the long edges of the mast. Take long strokes with the sanding block along the grain (never across the grain) and work one edge until you have a nice, rounded edge. Use the same technique to round the other three edges. While you are sanding, sand each face to get out any marks (such as a saw kerf mark) that may be visible. After using the 100-grit sand paper, progress to a 180-grit and then a finer grit to get the mast ready to apply finish.
If you have woodworking skills, hand planes, and a working knowledge of their use you may wish to make a more complex cross-sectional shape.
Apply Finish to the Spars
Now is a good time to apply finish to the mast and booms. Wait until the spars have finish on it before you install the fittings.
Assembling the Parts
Make sure you check the orientation of the mast before you begin to install the parts. See the “Mast Assembly Drawing” for a full view of the mast with fittings.
Mast crane
The mast crane sticks out the back of the mast. The final fit should be snug.
- Scratch up the areas on the mast crane that will be in the slot and touching the top of the mast. This will give the epoxy a rough surface on which to bond.
- Apply epoxy to the top of the mast and inside the slot and the mating areas of the mast crane.
- Wipe off the access epoxy. Set aside until the epoxy cures.
- When the epoxy has cured, drill a #50 hole through the mast and mast crane, centering the hole in both directions.
- Tap this hole through the assembly with a 2-56 tap. Insert a 1-inch, 2-56 stainless-steel machine screw through the hole.
- Place a drop of thin cyanoacrylate (CA) on the threads near the mast on each side of the mast to secure the machine screw.
- Allow a few seconds for the CA to wick into the internal threads.
- Cut off the bolt and carefully file/sand the ends flush with the sides of the mast.
Jenny Stay Strut
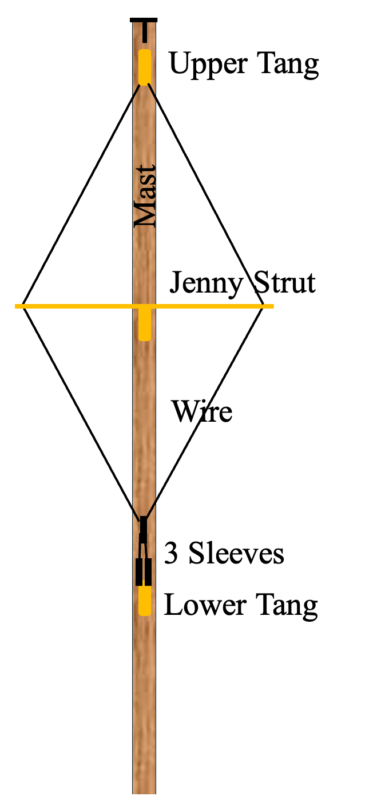
If you intend to install a Jenny stay strut do not install the jib stay mast tang. Install the strut instead in the same location.
- You will need to have a mast crane that extends through the front side of the mast with a hole in it for the strut wire or you may install a mast tang just below the mast crane, so the single hole points down.
- Install another mast tang below the strut the same distance that the strut is down from the mast crane with the single hole pointing up.
- Take the wire and insert a sleeve on one end of the wire, pass the wire through the lower tang, and back through the sleeve.
- Crimp the sleeve. Clip off the excess wire.
- Cut the wire off about 4 ft long.
- Insert another sleeve on the wire and slide it down to the sleeve that was just crimped. Leave it there temporarily.
- Pass the loose end of the wire through the right-hand hole in the Jenny strut, through the top mast tang, and down through the left-hand hole on the Jenny strut.
- Pass the end of the wire through the free-floating sleeve.
- Place another sleeve on the wire and pass the free end of the wire through the lower tang.
- Slide the free-floating sleeve up the wire a couple of inches. This sleeve will serve as a tensioning (adjuster) device to reshape the curve of top of the mast.
- Take the end of the wire and pass it through the last sleeve you placed on the wire, pull up slightly on the wire to take up the slack, and crimp the last sleeve.
Related Articles
- “Make a Jenny Stay Strut.” usvmyg.org. April 2026.
- Materials, tools, and procedures for making the strut that is used to adjust the shape of the top of the mast. A pattern for the strut is provided.
Mast Tangs
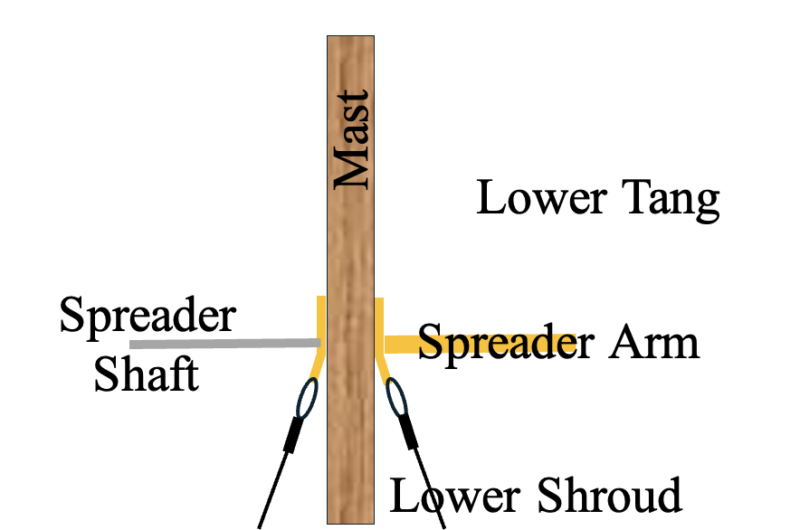
There are five mast tangs for a rig without a Jenny stay strut
- The jib forestay mast tang is installed to the front of the mast in the two holes near the front of the mast with two #2 by 3/8-in round head brass or stainless wood screws
- The two upper shroud mast tangs are installed using four #2 by 3/8-in round head brass or stainless wood screws.
- The lower shroud mast tangs are installed using two #2 by 3/8-in round head brass or stainless wood screws in the upper holes.
- The lower holes are there to receive the spreader shaft when the rig is installed on the mast.
- Make sure that the lower holes in these two tangs have been drilled out to 3/32 in to accept the spreader shaft.
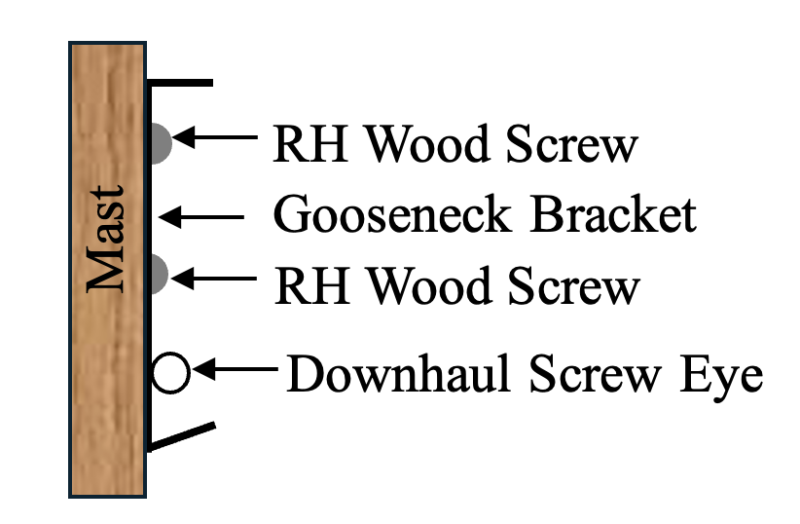
Gooseneck Attachment Bracket
Install the gooseneck attachment bracket with the 90° bend at the top and the 30° at the bottom. Use two #2 by 3/8 in round head brass or stainless-steel wood screw in the top hole and one screw eye in the bottom hole.
Mast Step Pin
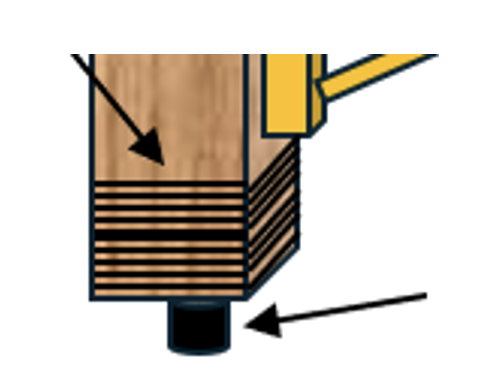
- Insert the pin into the hole to check alignment.
- If it looks fine, epoxy it into place. Do not forget to scratch up the surface of the pin in the hole. Wipe off the excess epoxy.
- It will stick out about 1/8-inch below the bottom of the mast.
- You will need to reinforce the bottom end of the mast.
- This is accomplished by doing an end whipping of about ten to twelve wraps of line. See “How to Do End Whipping.”
- This line is very strong and provides increased strength to the bottom end of the mast to prevent it from splitting.
Cotter Pins
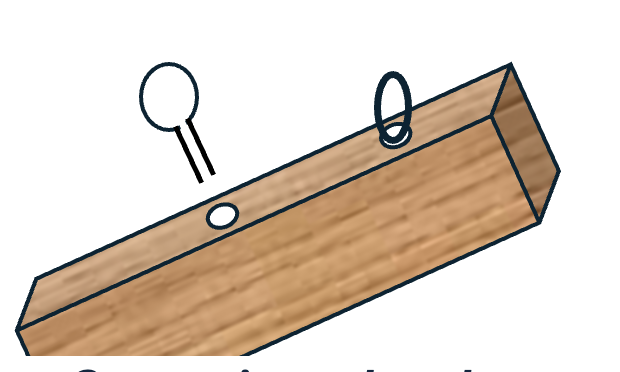
- Cut each cotter pin to about ½ inch in length.
- Using a pair of tweezers, hold the cotter pin over one of the holes and carefully tap it into the hole with a small hammer until the loop on the end of the cotter pin just touches the wood.
- Using a pair of pliers turn the cotter pin so it is perpendicular to the long edge of the mast.
- Apply a drop of CA to the “Y” in the cotter pin and allow the CA to wick into the slot.
- After a few seconds dab off the excess CA with a paper towel.
- Repeat this process until all of the cotter pins are in place.
See the “Mast Assembly Drawing” for a full view of the mast with fittings.
Your mast assembly is complete. Prepare for the final assembly of the rig.