You must first make up a couple of pieces of the tee-shaped brass as described in Tee-shaped Brass for Various Fittings. This article was published in The Model Yacht, Vol 24 No 4, Summer 2023. See number 2 below to determine the length of Tee stock you need for the parts you want to make.
You can use these tee-shaped pieces to make various fittings including a backstay bracket (R02), jib rack (R26), mast crane (R38), and shroud rack (R52).
Materials
- Enough tee-shaped brass to make the parts you need
Tools
- 1/16-, 3/32-, and ¼-inch drill bits
- Assorted files
- Assorted abrasives
- Automatic center punch
- Aviation shears
- Cordless drill or drill press
- Metal scribe
- Ruler that measures in sixteenths of an inch
- Thin blade metal saw
| PART DETAILS | ||
| Part | Number of Holes | Length |
| Backstay Bracket | 1 | ½-inch |
| Jib Rack | 3 – 5 | 1 ½ -inch to 2 ½-inch |
| Shroud Rack | 5 – 7 | 2 ½-inch to 3 ½-inch |
Procedures
- Determine which parts you want to make.
- Calculate the total length of tee-shaped material you need. (see table)
- Make sure you have enough. Make more if needed.
- Use the patterns provided to lay out each piece.
- You may have to add a line or two to either pattern to get the size you want.
- Cut out the pattern.
- Tape the pattern to the tee brass.
- Use an automatic center punch to center punch all of the hole centers.
- Scribe the perimeter of the mast crane shape or end points in the case of the racks.
- Drill all holes in the mast crane using a 1/16-in diameter drill bit and in the racks using a 3/32-in drill bit. You will need to place the part to be drilled on a piece of wood to keep it in the correct position to drill it accurately.
- Debur all of the holes using a larger drill bit (3/16-inch). Spin the bit between your thumb and index finger or use a pin vise to do this.
- Round all corners to a 1/4-inch radius using an appropriate file.
- Clean up the edges and faces of the parts using an abrasive sponge.
The full sized patterns shown below are available on a downloadable PDF file for easy printing.
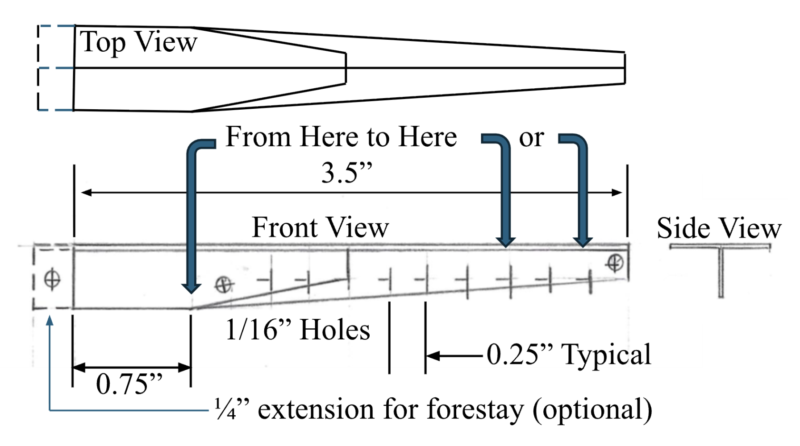
Mast Crane Pattern
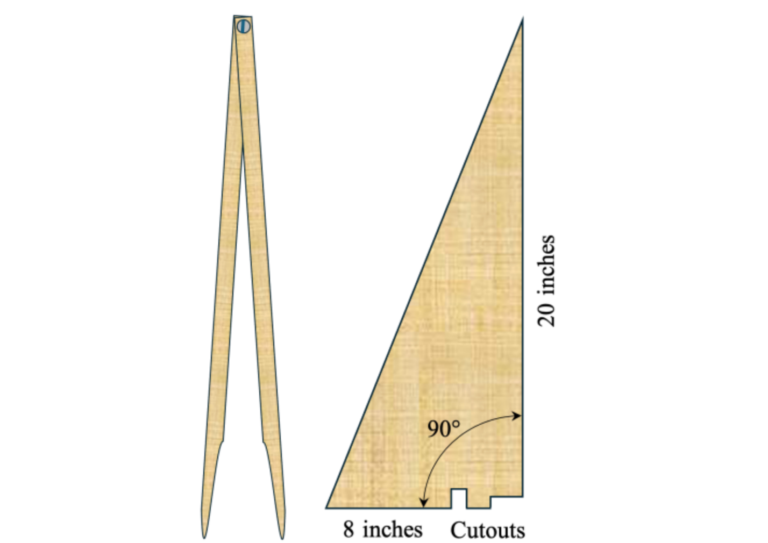
This is a full-size pattern. This pattern will accommodate a mast crane as short as 1¼ in and as long as 3½ inches in ¼-inch increments. You simply connect a line on the front view from the corner at the right-hand end of the 0.75-in dimension line to the correct mark along the series of marks. You add three lines to the top view, one short horizontal and two diagonal lines. These are at 1/4-inch intervals. You make whatever length you need.
Rack Pattern
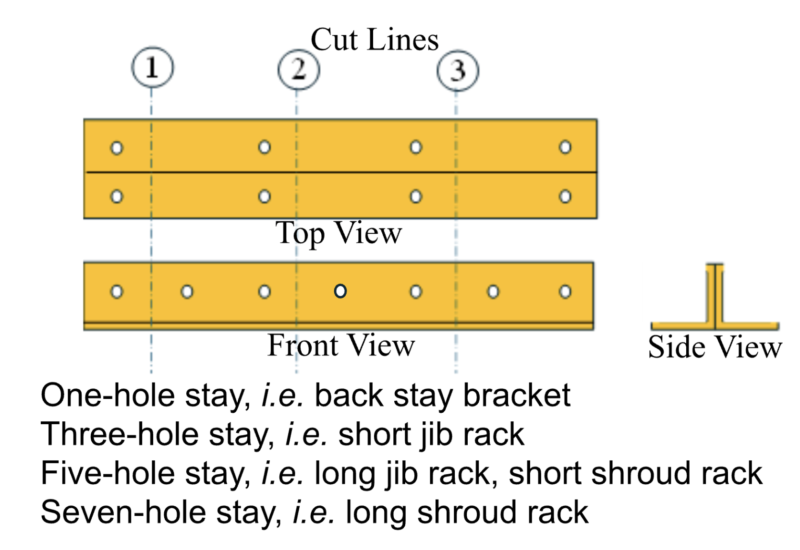
This is a full-size pattern. You determine what size you need for a particular part and cut the piece based on the yellow diagram at the end of the article. The rack pattern will accommodate a backstay bracket as well as jib and shroud racks from one to seven holes in odd number increments.
The shortest will work for a backstay bracket (one hole) and longest a shroud rack (seven hole). Tape the pattern in place on the material and center punch the hole locations using an automatic center punch.
The top view shows the hole locations for the mounting screws. The front view shows the hole locations for the turnbuckle/clevis attachment locations.
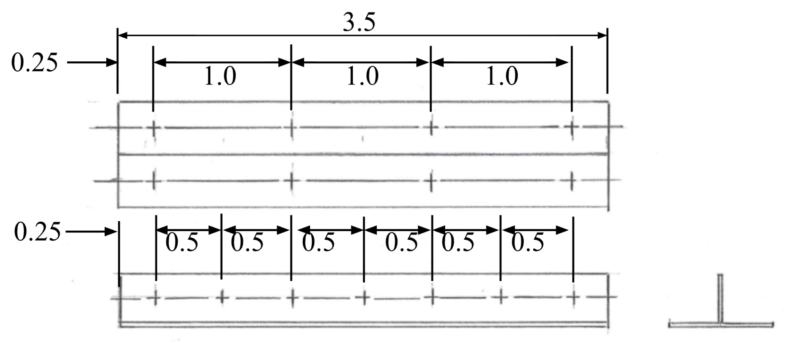
You simply draw a line at the point where you want to cut the blank piece of tee and cut that piece off. Follow the cut line diagram below.