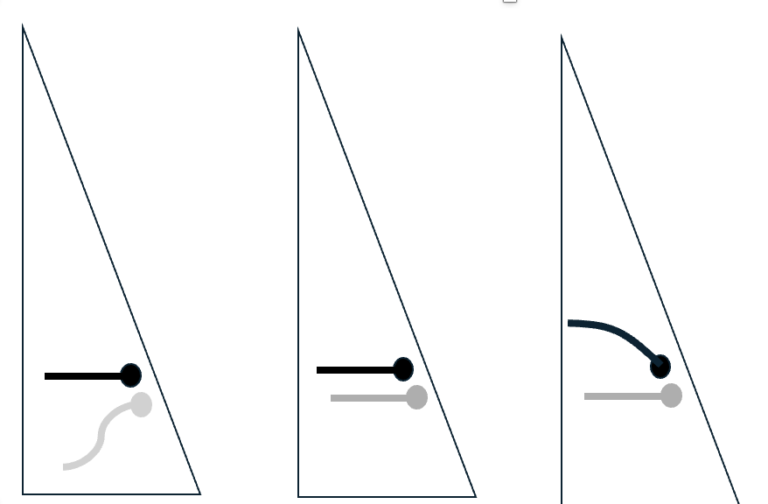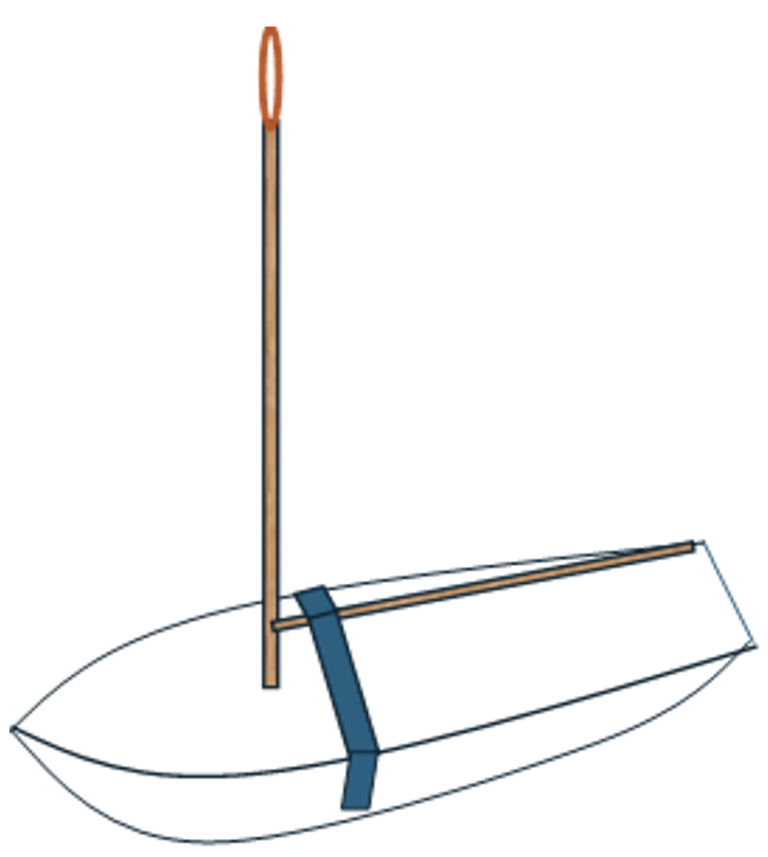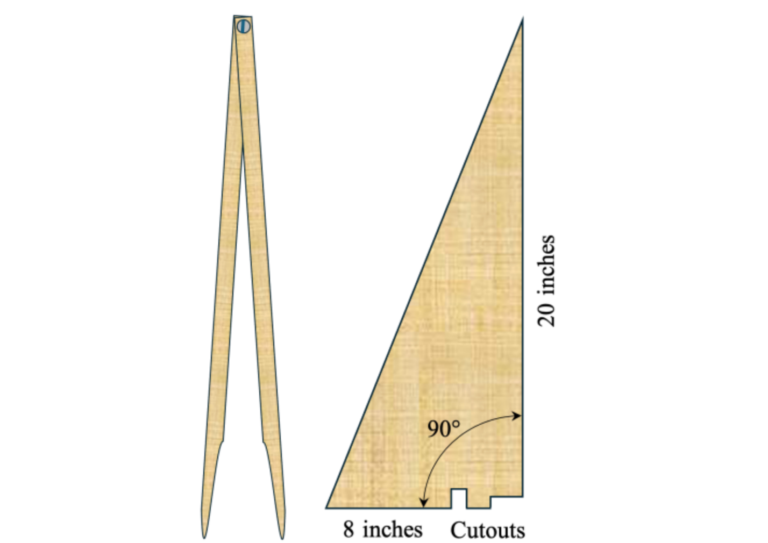
Read this and the referenced articles in their entirety before proceeding.
The first thing you must do is to make sure that you have all of all the parts and supplies needed to assemble your rig. Use the list below as a guide and check off the items that you a have gathered and are ready to use.
This article describes the final rig assembly. You should have your booms and mast assembled following the procedures in these articles:
- “Assembling a Jib and Main Boom.” usvmyg.org. June 2026.
- The step-by-step process for shaping and installing fittings on your main and jib booms to prepare for final assembly of the rig.
- “Assembling the Mast.” usvmyg.org. June 2026.
- The step-by-step process for sizing and shaping your mast and installing the mast fittings including the optional Jenny stay strut.
You have finally arrived at the place where you can begin to assemble the rig.
You will need to make sure you have the parts and supplies ready for the assembly.
You will need:
- assembled jib and main booms
- assorted fasteners
- bolt wire [R03] (single strand stainless)
- boom vang [R05]
- bowsies [R06] (2)
- hook [R21] (1)
- jib swivel [R28](assembled)
- line [R32]
- “O” rings [R43] (2)
- sails (made to be attached with a bolt wire)
- screw eye [R48] (1)
- sleeves [R53] (15)
- snap clips [R54] (2)
- turnbuckles [R63] (4)
- wire [R66](multi-strand coated)
Tools
- line cutter
- Cyanoacrylate adhesive (use the thin CA)
- floss threader
- round nose pliers
- small diagonal cutting pliers
- needle nose pliers
Procedure
If the battens, class symbol, numbers, or telltales are not installed on your sails, now is the time to install them. It is much easier to do this when the sails are lying flat. See “Finishing Touches” for more information.
You will also the need the hull ready to receive the rig. All deck fittings must be installed and the electronics should be in the boat and working. The very last part of the assembly is “Setting Up the Rig” on the boat.
Assemble the areas in the order defined by the labels on the illustrated rig diagram.
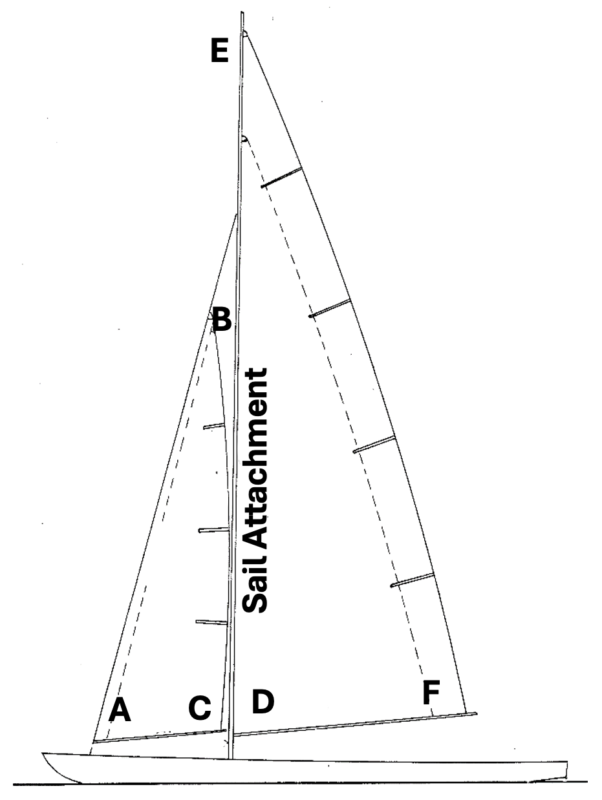
Sail Attachment (Installing the Mainsail on the Mast with a Bolt Wire)
A — Jib Tack Assembly Details


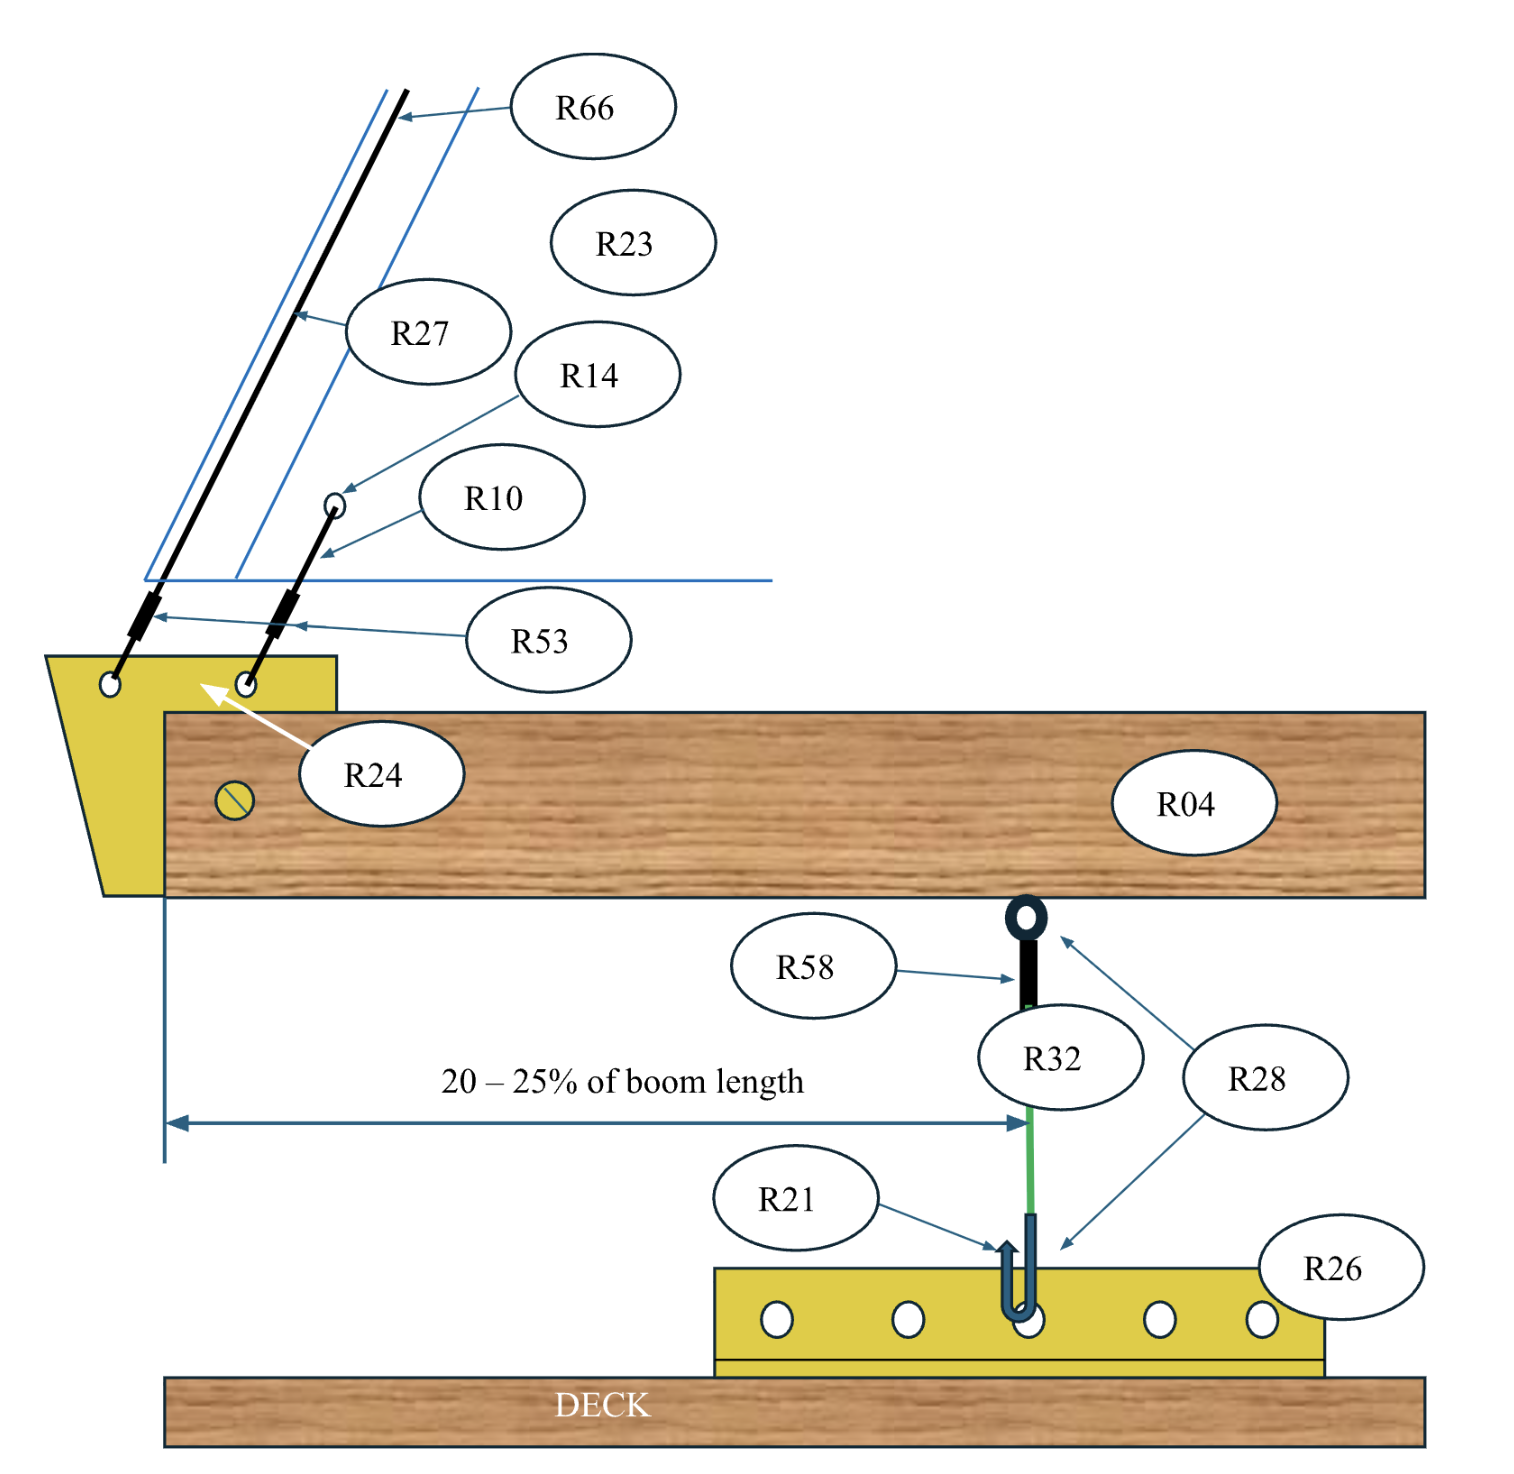
- Jib Stay [R27]
- Take the jib stay wire coming out of the bottom of the luff edge of the jib sail and feed a sleeve [R53] onto the end.
- Feed about 2 inches of wire through the front hole of the jib club fitting [R24].
- Slide the same end back through the sleeve.
- Pull up on the short end of the wire until the loop closes to about 1/4 inch from the jib boom.
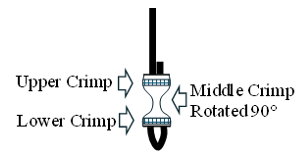
- Crimp the sleeve multiple times. With a round nose pliers crimp the sleeve once on each end and then in the middle at 90°.
- Pull up from the head of the jib sail on the jib stay wire while pulling down on the jib sail until the foot of the sail is about 3/8 inch above the jib boom. It is likely that the sleeve will slide into the jib stay hem on the lead edge of the jib sail. That is okay!
- Jib Tack [R59] Control Loop [R10]
- Lay the jib sail and boom on your work surface with the foot parallel to the top of the boom.
- Measure the distance from the rear hole in the jib club to the hole (eyelet) in the tack of the jib sail.
- Take a 4-inch piece of wire [R66] and bend the wire with two 90° bends in the center that distance apart.
- Slide each end through the two holes so they stick out towards you.
- Feed a sleeve [R53] on one end and feed the other end of the wire through the sleeve so they face in opposite directions.
- Pull them snug with pliers.Crimp the sleeve as shown in the illustration above, with a round nose pliers.
- Clip off the ends of the wire.
- Jib Swivel [R24]
- Carefully open up the jib swivel screw eye with a pair of needle nose pliers.
- Slide the top hole of the swivel [R58] over the screw eye.
- Pinch the screw eye closed with the needle nose pliers.
B — Jib Head Assembly Details
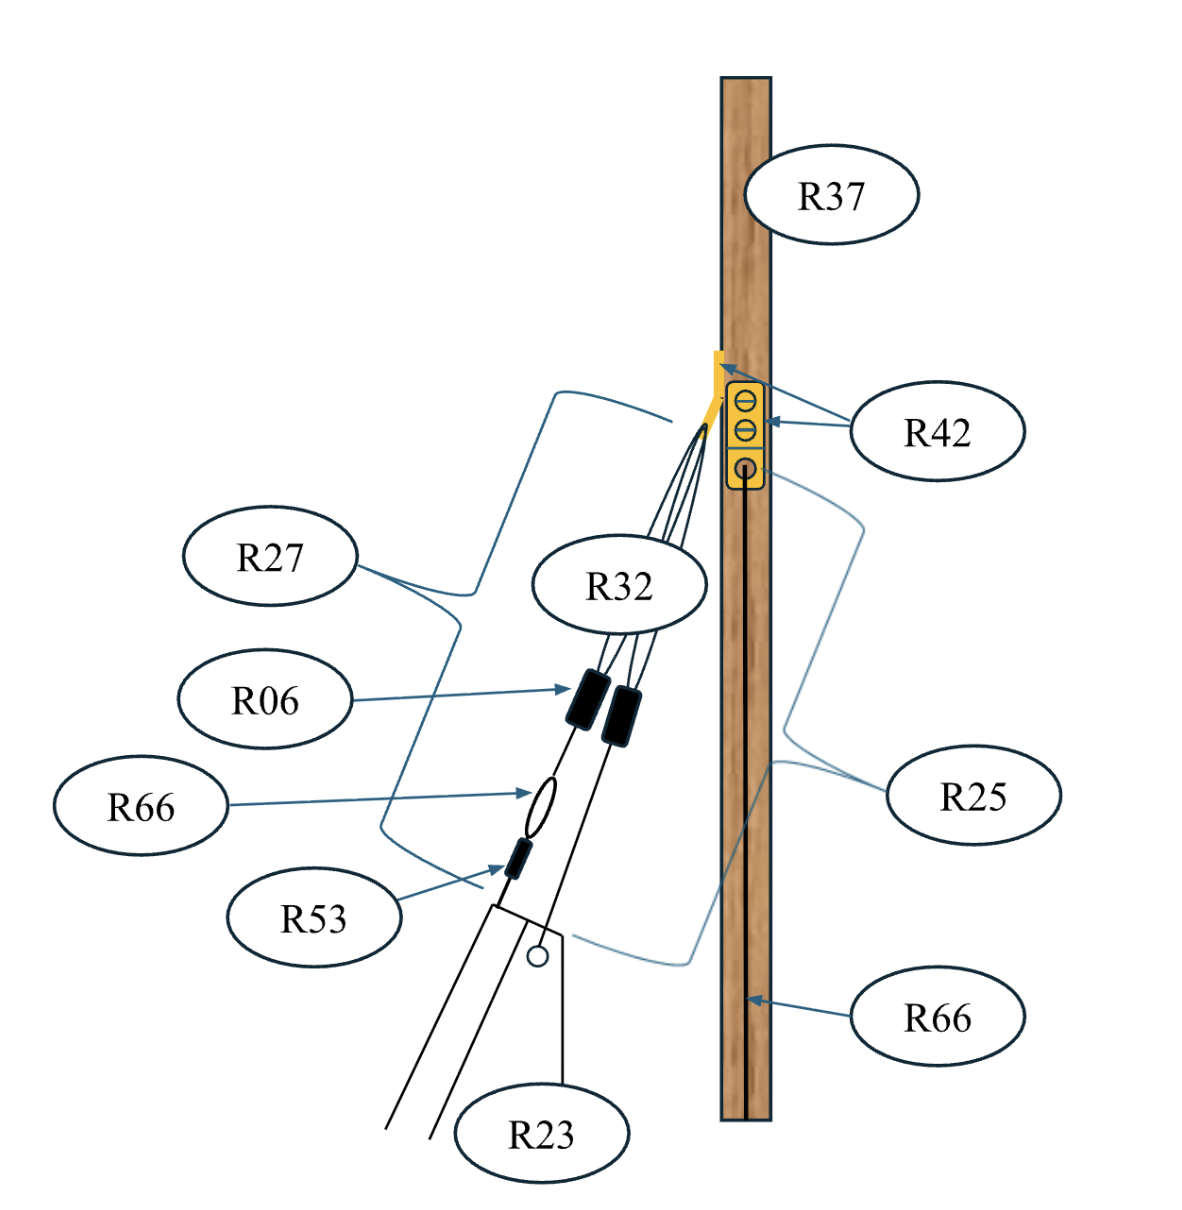
- Jib Stay [R27]
- Slide a sleeve [R53] over the upper end of the jib stay.
- Slide the sleeve down until it is about ¾ inch from the head of the jib sail.
- Feed the end of the wire back through the sleeve and pull it tight until it has about a ¼-in loop.
- Crimp the sleeve with a round nose pliers.
- Clip off the short end of the wire.
- Tie a piece of line 20 inches long to the wire loop with a bowline knot.
- Secure the knot with CA.
- Pass the line through a bowsie [R06] as shown in the diagram.
- Allow this to hang freely for the time being.
- Jib Halyard [R25]
- Feed a piece of line 20 inches long through the eyelet [R14] in the head [R20] of the jib sail.
- Tie it off with a bowline knot.
- Secure the knot with CA.
- Pass the line through a bowsie as shown in the diagram.
- Allow this to hang freely for the time being.
C — Jib Clew Assembly Details
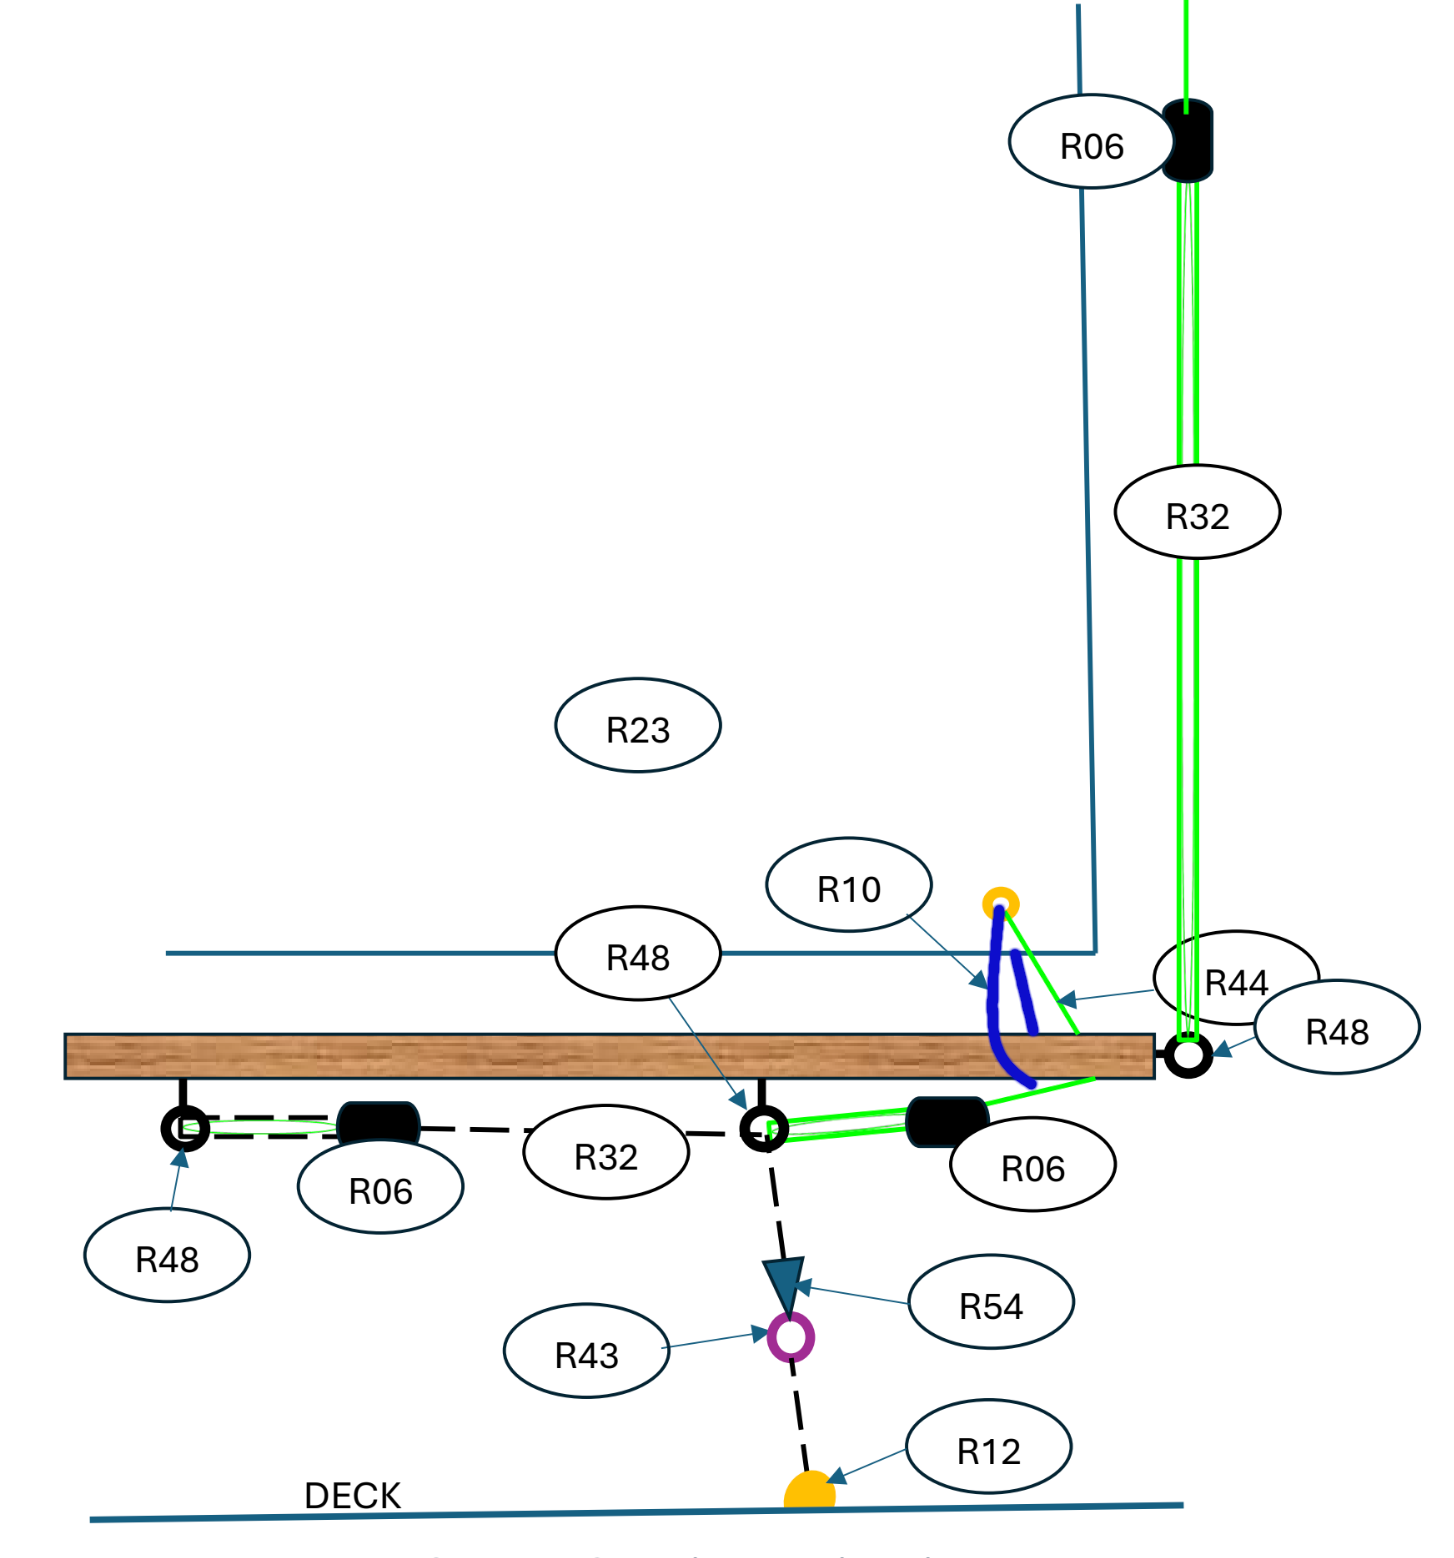
- Jib Outhaul [R44]
- Take a 15-inch piece of line [R32] and feed one end through the eyelet [R14] in the jib clew [R08].
- Secure it by tying a bowline knot.
- The end of the line will pass down through the jib outhaul fairlead [R45] at back end of the jib boom.
- Thread the line through a bowsie [R06] as shown in the diagram.
- Thread the line through the jib sheet fairlead (screw eye).
- With a slight belly (camber) in the sail adjust the bowsie to the mid-point of its travel.
- Tie the end of the line off to the bowsie using a bowline knot.
- Secure the knots with CA
- Jib Control Loop [R10]
- Take a 10-inch piece of line through the eyelet [R14] in the clew of the jib sail and loop it around the jib boom.
- Adjust the jib sail so it is 3/8 inch away from the with jib boom (roughly parallel fore and aft).
- Snug up on the line, being careful not to move the boom.
- Tie a square knot in the line.
- Secure the knot with CA.
- Topping Lift [R62]
- Cut a 5-foot piece of line.
- Tie one end of the line to a bowsie using a bowline knot.
- Secure the knot with CA.
- Pass the other end through the topping lift screw eye on the back of jib boom.
- Feed the line through the bowsie as shown.
- Allow this to hang freely for the time being.
- Jib Sheet
- Cut a 30-inch piece of line.
- Tie one end of the line to a bowsie using a bowline knot.
- Secure the knot with CA.
- Feed the line through the jib sheet terminus (forward screw eye) and through the bowsie as shown.
- Feed the end through the jib sheet fairlead (screw eye).
- Allow this to hang freely for the time being.
Installing the Mainsail on the Mast with a Bolt Wire Assembly Details
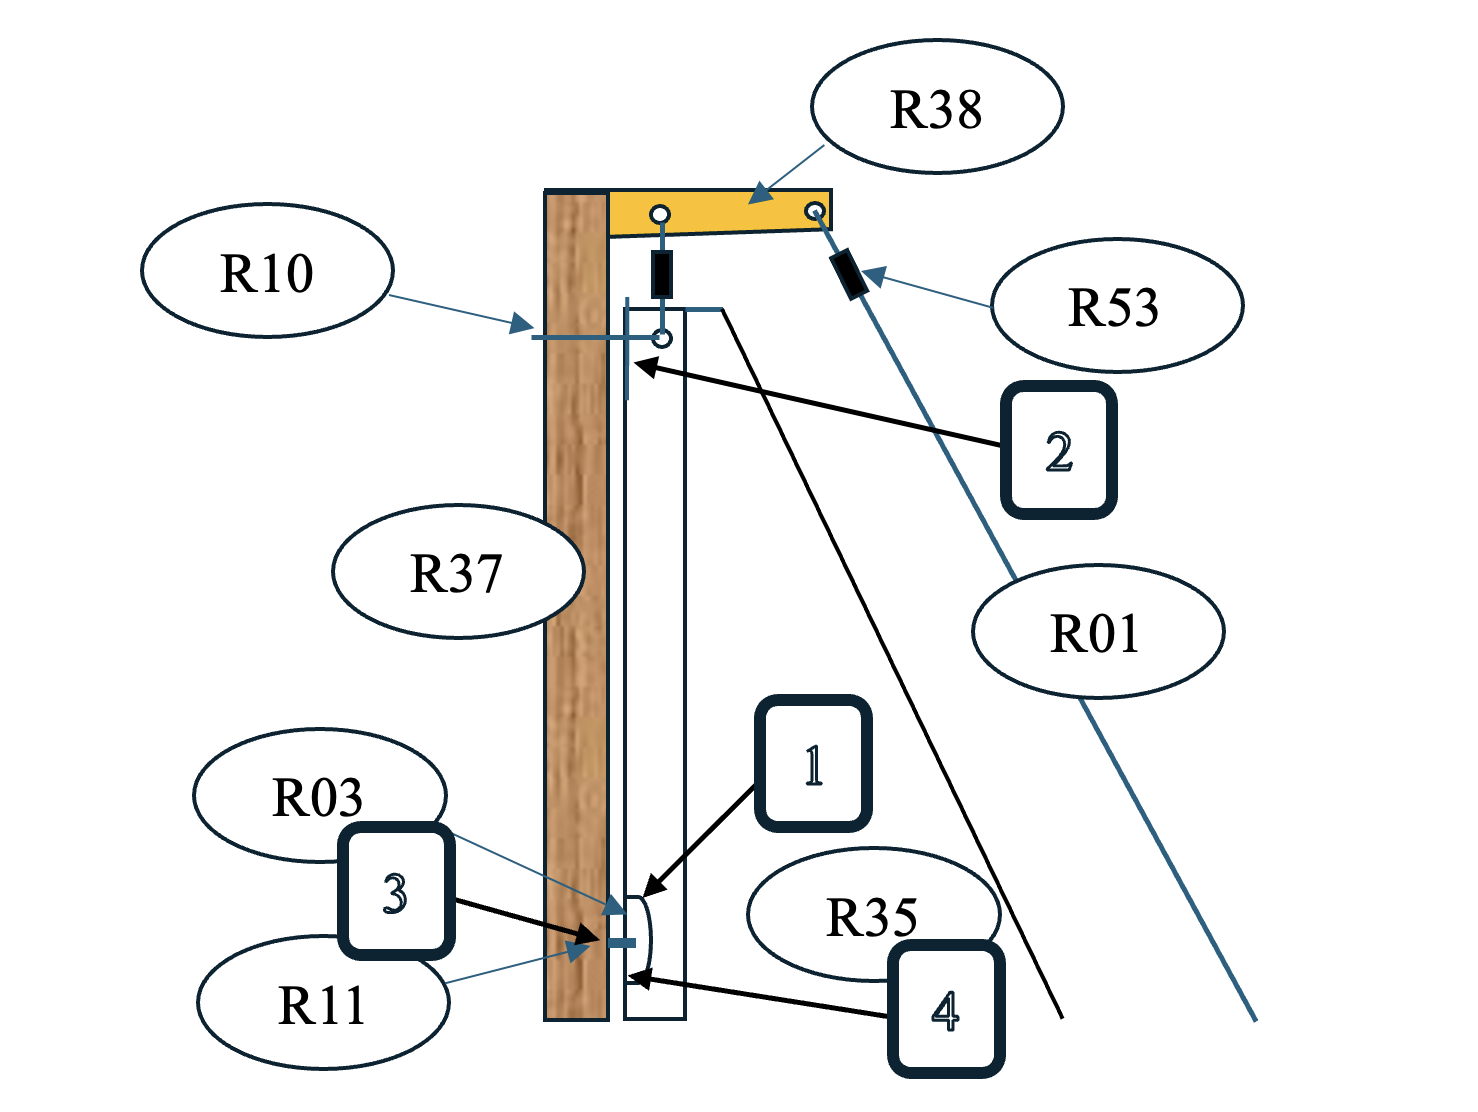
Note: If you need to add battens, class insignia, sail numbers, and/or telltales to your sail, it is easier to do that before the sails are bent onto the mast. See “Finishing Touches” for the details.

- Make 3/8-in crescent-shaped cutouts, centered at each pencil mark on the mainsail (see #1 in the figure above). A very small pair of scissors (cuticle scissors) works well.
- Cut a piece of bolt wire [R03] 1 inch longer than the length of the luff [R34] of the mainsail.
- Bend one end of the bolt wire back on itself ¾ in (see #2 in the figure above).
- Take the other end and feed it into the top of the hem at the luff of the sail.
- As it comes out of the first cutout, feed it through the first cotter pin (see #3 in the figure above) and then back into the hem (see #4 in the figure above). Note: You will need tweezers and patience to do this.
- Repeat this process until you have captured all of the cotter pins with the bolt wire.
- Feed the bolt wire out through the bottom of the sail and cut off the excess wire.
D — Mast Tack Assembly Details
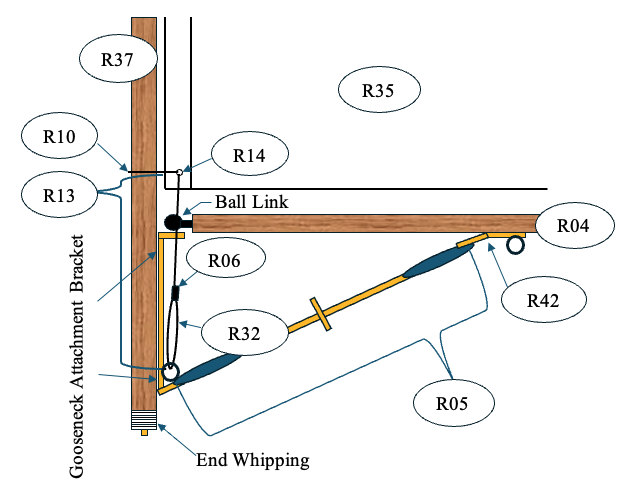
- Ball Swivel Joint
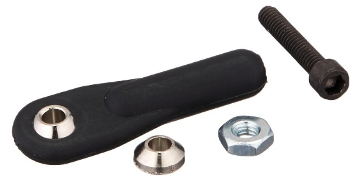
- Note: The large black piece (swivel ball link [R67]) in the photo is already epoxied and pinned to the forward end of the main boom.
- Take the main boom and hold it in the correct orientation.
- Place the machine screw vertically, down through the hole in the pivot arm.
- Slide the bevel washer up onto the machine screw with the bevel up. The orientation is correct in the photo.
- Place the machine screw down through the upper hole of the gooseneck attachment bracket, which is already attached to the mast.
- Thread the nut onto the machine screw and tighten it.
- Add a second nut and “jam” the two nuts together using small open-end wrenches.
- Boom Vang [R05]
- Clip one end of the boom vang over the bottom end (the other hole) of the gooseneck attachment bracket at the mast.
- Adjust the boom vang clevises so they are at the middle of the threaded travel on each end.
- Check the alignment between the upper clevis and the tang attached to the boom that is going to have the upper end of the boom vang attached to it. Do this with the main boom at 90° to the mast.
- If alignment is close go ahead and attach the upper clevis to the tang on the boom.
- If alignment is off significantly, move the tang to obtain alignment. Fill the old holes with five-minute epoxy.
- Mainsail downhaul [R13] (aka Cunningham)
- Take a 10-in piece of line and tie it to the tack of the mainsail using a bowline knot.
- Feed the line through the bowsie [R06] as shown in the diagram.
- Pass the end of the line through the screw eye at the bottom of the gooseneck attachment bracket.
- Tie the end off to the bowsie so the line is snug and approximately in the middle of its travel.
- Mainsail lower control loop [R10]
- Take a 10-in piece of line through the eyelet [R14] in the clew [R08] of the jib sail and loop it around the mast.
- Adjust the mainsail so it just clears the back edge of the mast.
- Snug up on the line being careful not to move the boom.
- Tie a square knot in the line.
- Secure the knot with CA.
E — Mast Head Assembly Details
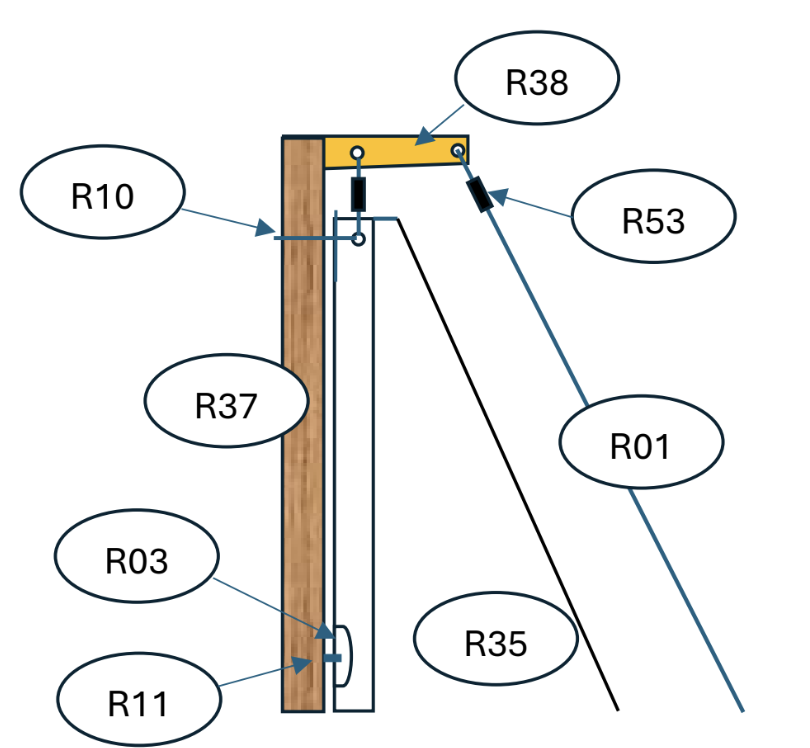
- Mainsail Upper Mast Control Loop [R10] (between the mast and the sail)
- Take a 10-in piece of line through the eyelet [R14] in the head of the mainsail and loop it around the mast.
- Adjust the main sail so it just clears the back edge of the mast.
- Take the line around the mast.
- Snug up on the line being careful not to move the mast. Make sure there is a small amount of space between the sail and the mast to allow for free movement of the sail.
- Tie a square knot in the line.
- Secure the knot with CA.
- Mainsail Head Control Loop [R10] (between the head of the sail and the mast crane)
- Lay the mainsail and the mast on a flat surface with the sail parallel with the mast and 3/8 inch from the mast crane.
- Measure the distance from the eyelet [R14] in the head of the mainsail and the hole at the mast in the mast crane.
- Take a 4-in piece of wire [R66] and bend it with two 90° bends in the center that distance apart.
- Slide each end through the two holes so they stick out towards you.
- Feed a sleeve [R53] on one end and feed the other end of the wire through the sleeve so they face in opposite directions.
- Pull them snug.
- Crimp the sleeve as shown above, with a round nose pliers.
- Clip off the ends of the wire.
- Backstay [R01]
- Cut a 36-in piece of wire.
- Place a sleeve [R53] on the end.
- Loop the wire through the rear hole in the mast crane.
- Pull it through about 2 inches and slide the end back through the sleeve until it is 3/8 inch from the crane.
- Crimp the sleeve as described above.
- Slide a sleeve on the other end.
- Loop the end of the wire back into the sleeve.
- Pull the loop to a 3/8-in loop and crimp.
- Tie a 36-in piece of line to the lower loop with a bowline knot.
- Feed the line through the bowsie [R06] as shown in the diagram.
- Place a hook on the line and tie off the line to the bowsie so it will be the correct length to reach from the mast crane to the backstay bracket [R02]. This step can wait until you rig the boat.
F — Main Clew Assembly Details
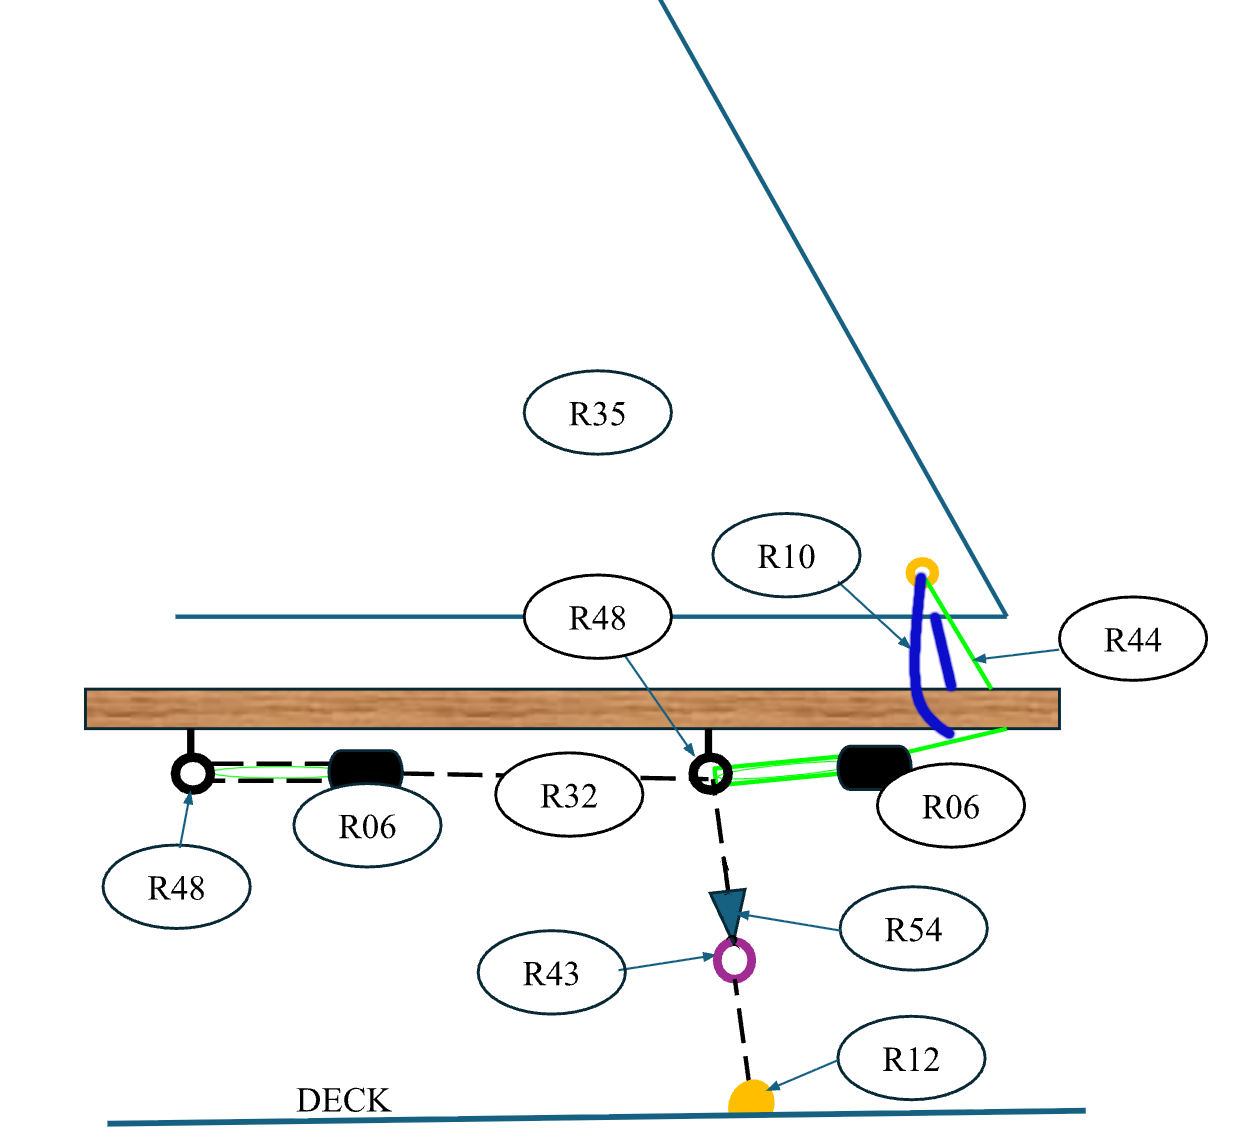
- Control Loop [R10]
- Take a 10-inch piece of line through the eyelet [R14] in the clew [R08]. of the mainsail and loop it around the main boom.
- Adjust the main sail so it is roughly 3/8 inch away from the main boom (roughly parallel fore and aft).
- Snug up on the line being careful not to move the boom.
- Tie a square knotin the line.
- Secure the knot with CA.
- Mainsail Outhaul [R44]
- Take a 15-inch piece of line and feed one end through the eyelet [R14] in the main clew [R08].
- Secure it by tying a bowline knot.
- Secure the knot with CA.
- Pass the end of the line through the main sheet outhaul fairlead [R45] at the after end of the main boom.
- Thread the line through a bowsie [R06] as shown in the diagram.
- Thread the line through the main sheet fairlead (screw eye).
- With a slight belly (camber) in the sail adjust the bowsie to the mid-point of its travel.
- Tie the end of the line off to the bowsie using a bowline knot.
- Secure the knot with CA.
- Main Sheet
- Cut a 30-in piece of line [R32].
- Tie one end of the line to a bowsie [R06] using a bowline knot.
- Secure the knot with CA.
- Feed the line through the main sheet terminus and through the bowsie [R06] as shown in the diagram.
- Feed the end through the main sheet fairlead (screw eye).
- Allow this to hang freely for the time being.