Read this and the referenced articles in their entirety before proceeding.
The jib and main booms (R04) will need to be shaped and assembled before the rig can be put together. You will need these parts for this assembly:
- assorted fasteners
- boom vang bracket – a mast tang [R42]
- jib and main boom blanks
- jib club fitting [R24]
- jib swivel [R28] assembly
- screw eyes [R38] (5; brass or stainless)
- swivel ball link [R67] (a part of the gooseneck [R18] assembly)
The booms should be shaped to accommodate the various parts and tasks they must perform. Each boom should be approximately 1 in longer than the foot of the sail. If you have a physical plan, double-check the dimensions on the plan.
If you are making your booms, they should be ⅜ in thick by ¾ to 1in high. They should be sized to work with your specific model yacht based on your plan.
Jib Boom
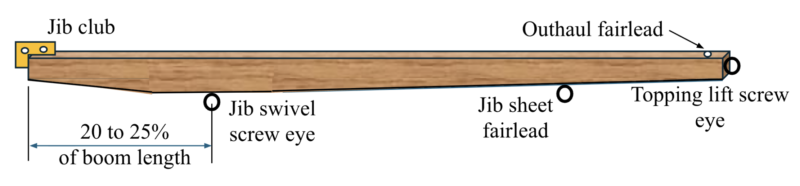
The jib boom will accommodate the jib club fitting [R24], the outhaul fairlead [R45], a screw eye [R38]for the jib swivel [R28] (also used for the sheet terminus), a screw eye for the jib sheet fairlead [R15], and if needed a screw eye for the topping lift [R62].

Shape the jib boom as follows:
- Cut the boom to length.
- Lay the boom flat with the “top” up. If the boom is 3/8 in thick, mark down from the top of each end 3/8 in.
- Measure in 15% and 30% from the front end of the boom and make pencil marks.
- Measure down from the top 5/8 in for a V36 and ¾ in for a Marblehead and draw a line parallel with the top edge.
- Connect the intersection of these lines with the marks at the ends of the boom.
- Cut the boom out and sand it smooth and slightly round all the edges.
Now is a good time to apply finish. Wait until both booms have finish applied to them before you install the fittings.
Continuing with the installation of the parts on the jib boom:
- Install the jib club following the directions in “Make a Jib Club Fitting.”
- Install the outhaul fairlead following the directions in “Make an Outhaul Fairlead.” If you want to install a topping lift, move the outhaul fairlead forward ¼ in from the trailing edge of the boom. This will provide enough clearance for the topping lift screw eye.
Note: Make sure you drill pilot holes for the screw eyes.
- Install the jib swivel screw eye on the bottom of the jib boom. This should be placed between 20 and 25% of the length of the boom, measured from the front of the boom. This screw eye also serves as the jib sheet terminus.
- Install the jib sheet fairlead screw eye at a point corresponding to the position of the jib sheet deck fairlead (where the jib sheet comes up through the deck).
- Install the screw eye for the topping lift.
Main Boom
The main boom will accommodate the gooseneck (R18) swivel ball link, an outhaul fairlead, a bracket (a mast tang (R42)) for the boom end of the boom vang (R05), a screw eye for the jib sheet terminus, and a screw eye for the sheet fairlead.

Shape the boom as follows:
- Cut the boom to length.
- Lay the boom flat with the “top” up. If the boom is 3/8 in thick, mark down from the top of the front of the boom 5/8 in and down 3/8 in from the trailing edge of the boom.
- Measure down from the top of the boom ¾ in and draw a line parallel with the top edge of the boom.
- Measure in from the lead edge of the boom to locate the boom vang attachment point. Mark that location with a pencil. From that location mark a point ¾-inch in front of and ¾-inch behind that mark, along the line drawn in step 3 above.
- Connect the intersection of these lines with diagonals with the marks at the end of the boom as noted in step 2 above.
- Cut the boom out and sand it smooth and slightly round all the edges.
Now is a good time to apply finish. Wait until both booms have finish applied to them before you install the fittings.
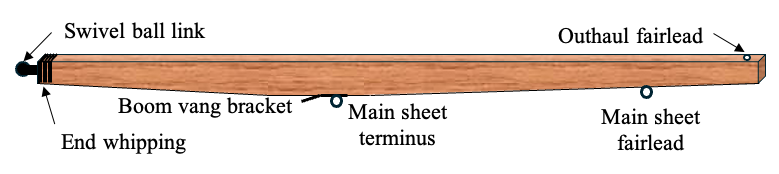
Continuing with the installation of the parts on the main boom
- Install the outhaul fairlead following the directions in “Make an Outhaul Fairlead.”

- Install the swivel ball link in the forward end of the main boom.
- Measure the diameter of the tubular end of the swivel ball link.
- Drill a 1 inch deep hole that diameter in the forward end of the main boom, deep enough to accept the tubular end of the swivel ball link. The hole should be equal distance from the top, the port, and starboard edges of the boom (see illustration).
- Epoxy the swivel ball link into the hole you drilled and turn it to position it correctly (ball end flat is horizontal). Carefully wipe off any access epoxy.
- When the epoxy has set, drill through the boom and the round end of the swivel ball link with a number 50 drill bit (dashed line on illustration).
- Tap that hole with a 2-56 tap.
- Insert a ¾-in 2-56 stainless steel machine screw.
- Cut and file the ends flush.
- Make an end whipping around the forward end of the main boom to provide additional strength to the area where the swivel ball link is installed.
Note: Make sure you drill pilot holes for the screw eyes.
- Install the boom vang bracket (mast tang) on the bottom of the jib boom. This should be placed according to the length of the boom vang. The length of the boom vang is hypotenuse of the triangle between the mast (short leg) and the main boom (long leg). Use one round head brass (or stainless) wood screw (forward hole) and the main sheet terminus screw eye (rear hole) to fasten the bracket (mast tang) to the main boom.
- Install the main sheet fairlead screw eye at a point corresponding to the position of the main sheet deck fairlead (where the main sheet comes up through the deck).
Set your booms aside to await the final assembly of the rig.
Related Articles
- “How to Do End Whipping.” usvmyg.org. May 2026.
- Whipping is a common way to stabilize the end of a piece of rope, but it can work in other applications. There are a few circumstances when building a rig for a model yacht where you may want to end-whip the end of a mast or boom.
- “Make a Jib Club Fitting.” usvmyg.org. May 2026.
- Materials, tools, and procedures for making this important attachment point for the jibstay and jib control loop.
- “Make a Mast Tang.” usvmyg.org. April 2026.
- Materials, tools, and procedures for making this simple but hard-to-source rigging item.
- TMY Editorial Staff. “Gooseneck Attachment Bracket.” The Model Yacht. 24:2. Summer 2023.
- This gooseneck attachment bracket accommodates a ball link and a Walton Boom Vang.
- TMY Editorial Staff. “Make a Jib Swivel.” usvmyg.org. May 2026.
- Materials, tools, and procedures for making this connector that must handle the highest loads on a model yacht.